Monday, January 16, 2017

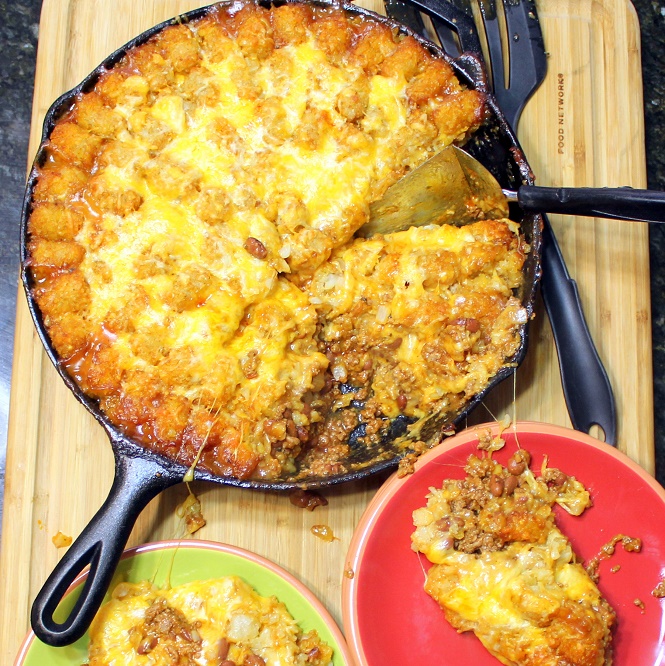
Chili and Tots - EASY Tater Tot One Skillet Upgrade

Pin It Now!

OH BOY, CHILI!

But not just any Chili Recipe, this is incredibly easy, serves up in a casserole form and all topped off with a layer of crunchy cheesy, tasty Tater Tots

  • The recipe is made in a single skillet.  No need to get the kitchen filled with dishes.
  • Comes together fast... Except for cooking time, this takes less than 20 minutes of hands on work.
  • LOADED with plenty of Beans (healthy), vegetables (Well, Onions, healthy as well)!
  • A Kid friendly Tater Tot upgrade.  Look for sales and stock up on these handy frozen wonders.  Topped with crispy crunchy layer of Tater Tots (Kids LOVE this recipe)
  • A layer of Gooey Cheesy goodness throughout and for garnish on the top
  • You can make this the night before, for an easy "pop in the oven" lunch.
Really... What's not to love... And tastes great as well!

Easy to follow recipe below, keep scrolling down.

But I wanted to share a fantastic gift I received... If you don't have one, I highly recommend one of these HEAVY pre-seasoned cast irn skillets.  Large enough to cook most anything.  Pre- Seasoned means the skillet comes ready to cook in.  None of the intimidating tasks that need to be done with a non seasoned skillet... Love this and worth every penny.  And remember Amazon ships free on orders over $25!


Keep scrolling down, recipe below.


 OK, Here's What I Did...

Chili and Tots

Ingredients
  • 1 pound Hamburger
  • 1 Medium Onion, Diced
  • 1 Can (15 Ounces) Chili Beans
  • 1 Can (15 Ounces) Tomato Sauce
    (Pizza Sauce or Pasta Sauce)
  • 2 TBS Chili Powder
  • 1 tsp Garlic Powder
  • 1 tsp Onion Powder
  • 1/2 tsp Red Pepper Flakes
  • 2 Cups Cheddar Cheese
  • 1 Cup additional Cheddar Cheese for topping
  • 2 Pounds Frozen Tater Tots
Cooking Directions
  1. In a very large skillet, Brown Hamburger on medium high heat, breaking up the meat. Once cooked through, add the diced onion and saute with the hamburger for 5 minutes.   Drain the rendered fat from the skillet.. 
  2. Add the seasonings, Chili powder, Onion Powder, Garlic Powder and Red Pepper Flakes.  Stir to evenly mix and evenly flatten the meat in the bottom of the skillet.
  3. Evenly sprinkle 2 cups of cheese over the hamburger
  4. Layer top with frozen tater tots. If not baking right away, cover tightly with foil and chill in fridge until the next morning.
  5. When ready to bake, set oven to 350F with rack on middle position. Once oven reaches 350F, place casserole in oven for about 35 minutes.
    Top with additional 1 cup cheese,
    Bake another 5-10 minutes or until sides are bubbling and top is golden brown. Let rest at room temp 10 minutes, and serve.
  6. Serve Hot and ENJOY!

Sunday, January 15, 2017

The French Chef in America - Julia Child's Second Act - Audio Book review

Pin It Now!


Oh Boy... A Book to read!

And what a Book... But first, recently I was asked by the good folks at Blogging for Books to review this book.  The book was free, but the opinions are all mine...

And another note... Those same good folks  at Blogging for Books offered to send me an Audible CD Version of the book.  I am trying to increase my cardio so i have started a daily walking workout (10K steps a day).  I LOVED the audio book, made the miles and steps and hours fly by!  SO even though I may talk about the book, really i am talking about the audio version... unabridged of course.

And my opinion... I LOVED THIS BOOK.

The French Chef in America: Julia Child's Second Act is such a fun read (listen).  If you are a fan of food, recipes or cooking shows, you have a special place in your heart for the legendary Julia Child.  A few years ago, Julia's legend was popularized with half of a Bio Pic, Julie and Julia.  That picture, along with Julia Child's own Biography,  My Life in France; has given us plenty of stories of Julia's early years.  This is indeed, the second chapter of her story.  the story of her years after she was published.

I especially enjoyed the emphasis om her husband, Paul Child.  Her sounding board, souz chef, photographer, dish washer and encourager that made her life possible.

The book picks up with Julia's early appearances on TV.  Continues through the early success, her break with her original collaborators, her numerous reinventions to stay relevant, as well as several behind the scenes stories of her down time.  Who wouldn't want that life!

But of course, with great fun stories, there are the wrinkles as well.  Most heart breaking is the loss of her beloved husband following his slow journey to the oblivion of dementia.  The way she balances her professional image with that private hell is the makings of an expanded story... But I digress.

Here's what the publisher has to say... "Julia Child is synonymous with French cooking, but her legacy runs much deeper. Now, her great-nephew and My Life in France coauthor vividly recounts the myriad ways in which she profoundly shaped how we eat today. He shows us Child in the aftermath of the publication of Mastering the Art of French Cooking, suddenly finding herself America's first lady of French food and under considerable pressure to embrace her new mantle. We see her dealing with difficult colleagues and the challenges of fame, ultimately using her newfound celebrity to create what would become a totally new type of food television. Every bit as entertaining, inspiring, and delectable as My Life in France, The French Chef in America uncovers Julia Child beyond her French chef persona and reveals her second act to have been as groundbreaking and adventurous as her first.".

Love the stories and could not recommend the book more.

Here's links for The Audio version, the Hardcover version and the rest of Julia's pop culture bios...


Here's the legal stuff... "I received this book from Blogging for Books for this review." But the review and opinions are 100% accurate and mine!".  Love this book and highly recommend it!

I am so thrilled to add this book to my library.  A terrific inspiration.

As a gift or a new reference book for yourself, this is a keeper.

Saturday, January 14, 2017

The Chocolate Monk - Let's have a Shot

Pin It Now!

 OH BOY... Let's have a Shot!!!

But not just any Shot, this drink has the flavors of Chocolate Coffee, with hints of Hazelnut!  Really, what's not to love.

I am in the midst of getting ready for my annual Super Bowl party.  This year I want to add a couple of "Let's do Shots" Games, but I want to avoid the messy ugly shots of tequila or whiskey that normally goes with that phrase.  OK... Truth be Told, I am after drinks that the ladies will want to drink.

And by gosh, bu golly, this is more than one.  Simply delicious, dangerously so since you can not taste the booze at all.  Very much chocolate flavored, with enough hints of the other two liqueurs to make this special.

Only requires a three bottles of booze, makes this affordable for a home bar.  The Baileys and Kahlua belong in every home bar anyway, you may have a half a bottle of each already.  The Frangelico, the hazelnut flavor has such a pretty bottle you may want to keep that in your regular home bar as well.  Booze really does not spoil, so buy a bottle every now and then and in no time, you have a stocked bar.

Cheers and go team!  Keep scrolling down for this easy to follow recipe...

But first, here's spmething fun to add to my want list... Mason Jar Shot Glasses...


 OK, Here's What I Did...

The Chocolate Monk

Ingredients
  • 1 package (about 3) Oreos, Crushed to dust
  • 1/2 ounce Baileys
  • 1/2 Ounce Frangelico
  • 1/2 ounce Kahlua 
Mixing Directions
  1. These are best chilled... Either have frosted shot glasses ready from the freezer or stash the bottles in the fridge until ready to mix.
  2. Start with the Kahlua, it will settle to the bottom
  3. Add Baileys
  4. Add the Frangelico
  5. Allow to rest for a couple of minutes and you will see the separation of the Baileys and the other two.  Or start sipping
  6. Serve Chilled and ENJOY!
And coming soon, recipes for two more drinks, The Abbot's Dream and the Bananas in Paradise that use almost the same liqueurs. making bartending at home affordable.


Friday, January 13, 2017

Almond Meltaways Sugar Cookies - A Grown up Mature Delicious Cookie

Pin It Now!

OH BOY Sugar Cookies!

But not just any sugar cookies, these are simply AMAZING!  Buttery soft and chewy with just a hint of crunchy texture on the edges.  But the real star of this cookie is the sweet creamy almond flavor in each cookie.  A delicious change of pace from the sugary sweet sugar cookies of your youth.

These are of course popular with the kids.

But they are really meant for grown-ups looking for that sweet treat you might want to share at a grown up get together.  I shared these with my wife's Book Club (well, wine drinking  club that sometimes talks about a book).  They were wildly popular with plenty of requests for the recipe.

And really, isn't that the best compliment.

Keep scrolling down for this easy to follow recipe.

But, one note... This recipe is visually best when you use large decorating crystal sugar for the topping.  Wilton makes a terrific "Sprinkle" that practically glows.  You can easily change the personality of your cookies by changing the color of the sprinkles.  I like using the white crystals for a clean look.  But of course a pretty Green color for a garden party would work fantastic.  just let your imagination run wild!


And keep scrolling down, here's the easy to follow recipe!


OK... Here's what I did...

Almond Meltaways 

Ingredients
  • 3 Cups Flour
  • 1 tsp Baking Powder
  • 1 TBS Mayonnaise
  • Pinch Sea Salt
  • 1 Cup (2 Sticks) Butter, Softened to room temperature
  • 1-1/4 Cup Sugar
  • 2 Large Eggs
  • 3 tsp Almond Extract
  • Additional Decorator Sugar Crystals
Cooking Directions
  1. Preheat oven to 375 degrees,  Prepare a cookie sheet with nonstick parchment paper
  2. In a large bowl, whisk together the dry ingredients... Flour, Salt and Baking Powder
  3. In the bowl of a stand mixer, creamy together the butter and the sugar.  When light and fluffy, add the eggs and the Almond Extract
  4. Fold in the wet ingredients with the dry and continue to fold until fully combined into a dough.
  5. Working in batches, Roll the dough into 1 TBS Balls.
  6. Roll each ball in the decorator Crystal Sugar
  7.  Arrange on the cookie sheet.  Flatten each into thin discs.  I use the bottom of a coffee cup for this.  Keep a paper towel handy to dry the bottom after each press to avoid sticking.
  8. Bake for 8 minutes. The cookies will not look browned or cooked, but they are! Remove from oven and let cookies rest on baking sheet for 5 minutes. Then transfer to a wire rack to cool completely
  9. Store in air tight container
  10. Serve with a Hot cup of Tea or Cold Mug of Milk and ENJOY!

Thursday, January 12, 2017

DOUBLE Decadent Chocolate Caramel "Hip to be Square" Pie

Pin It Now!

 OH BOY... A Truly Decadent Chocolate Cream Pie with a Layer of Caramel...


But not just any decadent chocolate Pie, this is actually 2 pies, served up in a more practical way for a crowd.

Look, I am all for the glamour and Oohs and Aahs that come with a beautiful pie presentation.  Take a look at the photo to the left.  That's what I served for Christmas this year and it was indeed wildly popular (several comments about the vest pie they ever has).  I even did a post recently with that single pie recipe (Click HERE).

But sometimes you are more needing a delicious dessert, but more convenient to make.  This is a bit of a complicated pie, with a cookie crust, a fresh made scratch caramel center and that decadent dark chocolate silky filling.  Making this double pie n a casserole dish gets you a BIG dessert without the need for making 2 pies.

It;s just easier.

But just as good.

I served this up at my church for an after services treat on New Year's day.  Provided a bowl of whipped cream and it was of course gobbled up.

Keep scrolling down for this easy to follow recipe...

But don't you love the colored casserole dish?  I splurged recently and bought a couple of "presentation" dishess.  Something with a little rustic style that helps make my desserts shine.  These are heavy stoneware, perfect for getting an even bake for your fruit pies but make your cold pies glow as well...


But I digress... keep scrolling down for this wildly popular and decadent dessert...


 OK, Here's What I Did...

Double Most Decadent Chocolate Caramel Pie EVER!!!

Ingredients
  • 1 package (about 3) Oreos, Crushed to dust
  • 1/2 Cup (1 Stick) Butter for the Crust
  • An additional 1 Cup (2 Stick) Butter for the Caramel
  • 1-1/3 Cup Packed Brown Sugar
  • 1/2 Cups Heavy Whipping Cream to mix with the sugar and butter for the Caramel
  • An additional 2 Cup Heavy Whipping Cream for the Chocolate filling
  • 2 (12 Ounce) bag Dark Chocolate Chips
  • Optional, additional Whipped cream for garnish
Cooking Directions
  1. In the bowl of a food processor, finely crush the Oreo cookies with a food processor or blender. Stir crumbs together with i stick of  melted butter until well combined.
  2.  Press into the bottom and sides of a 9X13 Casserole Dish. Freeze crust for 10 minutes, until set.
  3. While the crust is chilling, combine remaíníng stick butter and brown sugar ín a small saucepan. Cook over medium heat, whískíng constantly, until mixture begins to bubble. Continue cooking, whískíng constantly, for 1 minute. Remove from heat. Slowly whisk in 1/4 cup heavy whipping cream until smooth. Cool caramel about 15 minutes. Pour the caramel over the Oreo crust, then return to freezer for about 30-45 minutes until just chilled and set. (You don’t want the caramel to fully freeze.)
  4. Place chocolate chips in a glass bowl. in a saucepan, bring 1 cup heavy whipping cream to a simmer over medium-high heat. Pour the cream over the chocolate chips and let sit for 5 minutes, then whisk until completely smooth. Pour the chocolate over the caramel and freeze for a final 30 minutes, until just chilled and set. OR refrigerate, covered, until ready to serve.
  5. Before serving, garnish with a bit of Whipped Cream, or provide a bowl of whipped cream on the side.
  6. Serve Chilled and ENJOY!

Wednesday, January 11, 2017

Best Damn Cheesy Tater Tot Bacon Breakfast Casserole EVER!!! Freezable

Pin It Now!

OH BOY, Breakfast Casserole!

But not just any breakfast casserole, this is BY FAR, the absolute best casserole I have ever had.

  • The recipe is for TWO Casseroles... Serve one, freeze one for a convenient breakfast in a few weeks.
  • LOADED with plenty of Bacon!
  • A cheap "Tube of Sausage" upgrade.  Look for sales and stock up on these handy frozen wonders.
  • Topped with crispy crunchy layer of Tater Tots (Kids LOVE this recipe)
  • A layer of Gooey Cheesy goodness in the center
  • You can make this the night before, for an easy "pop in the oven" breakfast.
Really... What's not to love... And tastes great as well!

Easy to follow recipe below, keep scrolling down.

But I wanted to share a fantastic gift I received... A programmable Casserole Slow Cooker... 9X13 in size, so any normal casserole will fit, like this one!  I love this, can use as a warming tray, goes from oven to the warmer unit if you prefer to cook fast but then want to keep warm.  Is beautiful, will look great on any table and the locking lid makes this extra convenient for travel of you do a lot of Church Socials or big family get togethers... Love this!


Keep scrolling down for this easy to follow recipe...


OK, Here's What I Did...

Best Damn Cheesy Tater Tot Bacon Breakfast Casserole EVER!!!

Ingredients
(Makes TWO 9X13 Casseroles, one for eating, one for Freezing for later)
  • 1 package (12 Ounces) Thick sliced bacon, cooked and crumbled
  • 2 (12 ounce) "Tubes of Sausage" 
  • 3 Cups Cheddar Cheese plus an additional 1 Cup for topping
  • 4 Cups Whole Milk
  • 12 Large Eggs
  • 4 Green Onions, green and white parts chopped, Plus an additional 2 Green Onions sliced saved for garnish
  • 1 TBS Salt
  • 2 TBS Pepper
  • 1 tsp Onion Powder
  • 1 tsp Garlic powder
  • 4 Pounds Frozen tater Tots
Cooking Directions
  1. In a very large skillet, cook sausage on medium high heat, breaking up the meat and browning it. Once cooked through, drain and layer onto the bottom of 2 9x13 inch lasagna size pans. 
  2. In each Pan, Evenly sprinkle 1-1/2 cups of the cheese over cooked sausage.
  3. In a large bowl, hand-whisk together the milk, eggs, Green Onions,  pepper, onion powder, Garlic Powder and salt. Once mixed, pour evenly over the cheese and sausage in baking dish. 
  4. Layer top with frozen tater tots. If not baking right away, cover tightly with foil and chill in fridge until the next morning.
  5. When ready to bake, set oven to 350F with rack on middle position. Once oven reaches 350F, place casserole in oven for about 35 minutes.
    Top with additional ½ cup cheese, cooked/crumbled bacon and green onions.
    Bake another 5-10 minutes or until sides are bubbling and top is golden brown. Let rest at room temp 10 minutes, and serve.
  6. If you are freezing one, cover casserole tightly with plastic wrap, touching the top of the actual casserole, then cover with aluminum foil.  To re-heat, thaw to room temperature overnight.  The reheat at 350 degrees for 30 minutes.   BE SURE TO REMOVE THE PLASTIC WRAP.
  7. Always use frozen casseroles wthin 30 days of original prep day.
  8. Serve warm and ENJOY!

Tuesday, January 10, 2017

BLT Deviled Eggs - Bacon Lettuce and Tomates

Pin It Now!

 OH BOY... DEVILED EGGS!

But not just any Deviled Eggs, these amazing little appetizers became an instant fan favorite at my holiday table.  Worked great as an appetizer, and was an equal hit as a side dish.  After all, what's not to love?

One of the world's most popular sandwiches is the BLT.  These are LOADED with all the flavors of a classic BLT.  Taste texture and visually exciting.  Like i said... what's not to love?

Keep scrolling down for this easy to follow recipe...

Have you noticed, I LOVE Deviled Eggs.  Truly, no potluck would be complete without a tray.  I got a wonderful Christmas gift this year, this easy to use convenient travel tray carrier so my eggs arrive undamaged.  Lids, easy carting handles, seals for freshness and a pretty color.  What's not to love???


Keep scrolling down... here's the recipe!


  OK... Here's what I did...

BLT Deviled Eggs
Bacon Lettuce and Tomates

Ingredients
  • 14 Large Eggs, (I always make at least 14-15 eggs just in case some do not peel well... Then I make Egg Salad from the leftovers).  Follow the Blue Letter Link for an Easy to Follow Photo Essay on how to peel a dozen eggs beautifully!
  • 2 TBS Mayonnaise
  • 3 TBS Yellow Mustard
  • 3 TBS Ranch Dressing
  • 3 TBS Your Favorite BBQ Sauce
  • 1/4 Cup Minced Dill pickle
  • Sprinkle Sea Salt
  • 1 Pound Bacon, fried crisp and crumbled to bit size
  • 24 bits of choipped Romaine Lettuce 
  • 12 Cherry Tomatoes, cut in half to make 24 pieces
Cooking Directions
  1. First to make the Eggs... Place the eggs in a LARGE Saucepan (or two), single layer. Fill the saucepan with cold water a couple of inches above the eggs. Place the pan uncovered under medium high heat and bring to boil. Cover the pan and remove from heat. Let the eggs sit covered in the water for 15 minutes.
  2. Drain the water from the pan, immediately fill with cold water. Gently tap each egg on a counter to crack and put them back in the cold water. Peel eggs under cold running water.
  3. Once all eggs are peeled, slice each lengthwise. Remove the yolks and place them in a small bowl. Arrange the white parts attractively, ready to fill.
  4. In that small bowl, Add the Mayo, Pickle , Mustard, Ranch, BBQ Sauce, Salt and Pepper to the Egg Yolks and mix until creamy. You will need to smash the egg yolks to get the mix creamy. Add additional Pickle relish liquid or Lemon Juice if the mixture needs to be smoother.  Add carefully, the yolk goo gets too wet and the piping look will not hold.
  5. Arrange on a serving dish.  Transfer the yolk mixture into a piping bag with a large star tip. NOTE: the piped look only works if the yolks are very creamy (you may want to transfer to a food processor to get best results). Otherwise the piping tips will clog. And be sure to use that large star tip.
  6. Fill the hollow of each egg making an attractive peal.
  7. Just before serving, add the BLT Parts...
    First, Push about a tsp worth of chopped Romaine Lettuce into the back of each egg.
  8. Add the Tomato halves
  9. Add a tsp worth of Bacon, bigger pieces, reserving the small crumbs for garnish.  Push the tomatoes and the bacon into the yolk mix a bit to anchor them into the eggs
  10. Garnish with small bits of bacon just scattered into the tray.  Cover loosely with plastic wrap, transfer to the fridge until ready to serve.
  11. Serve chilled and ENJOY!

Monday, January 9, 2017

Butterscotch Bourbon Pecan Pie - World's Best Pecan Pie

Pin It Now!

 Oh Boy... Pecan Pie!

But not just any Pecan Pie, this is the ultimate, WORLD'S BEST Pecan Pie!  OF course, loaded with Pecans, deliciously sweet and a beautiful flavored custard center with a mix of pecan texture.  BUT, add in hints of smooth caramel plus just the barest hint of Kentucky Bourbon and WHAT A PIE!

Dare I suggest World's best... I Dare!

The bones of this recipe came from a recent trip to new Orleans.  I twisted and tweaked a bit to make the recipe my own (Bourbon and the fresh made butterscotch).  the pie became an instant hit on my holiday table.  Destined to become a hit at any big family occasions.

The pie is quite sweet with tons of stuff that is just not that good for you.  It is a splurge pie that will probably only be served on special occasions.  But once you make the decision to splurge... Go for this one!

Enjoy indeed, and Happy Holidays!


  OK, Here's What I Did...

Butterscotch
Pecan Pie

Ingredients (Makes two Pies)
  • Two Pie Shells (Store bought ready made or try My Never Fail Scratch Made Recipe.  Partially Parbaked
  • For the Caramel
    1/2 Cup (1 Stick) Butter, softened to room temperature
  • 2/3 Cup Packed Brown Sugar
  • 1/4 Cups Heavy Whipping Cream to mix with the sugar and butter for the Caramel
  • For the Filling
    1 Pound Brown Sugar
  • 3 Cups Corn Syrup
  • 1-1/2 Sticks Butter
  • Large Pinch Salt
  • 9 Eggs
  • Plus4 Egg Yolks
  • 1/4 Cup Bourbon
  • 4 Cups Crushed Pecan Pieces
  • Additional whole Pecan halves for an attractive top
Cooking Directions
  1. To make the Caramel... combine 1 stick softened butter and brown sugar ín a small saucepan. Cook over medium heat, whískíng constantly, until mixture begins to bubble. Continue cooking, whískíng constantly, for 1 minute. Remove from heat. Slowly whisk in 1/4 cup heavy whipping cream until smooth. Cool caramel about 15 minutes.
  2. In a Medium Pot, heat 1 Pound Brown Sugar, 3 Cups Corn Syrup, and 1-1/2 Sticks Butter over medium heat until butter is completely melted and just starts to bubble.
  3. Add in the Fresh made Butterscotch and stir  until smooth and fully incorporated.  Remove from heat.
  4. Meanwhile, in the bowl of a stand mixer, whisk the eggs and egg yolks  with the Bourbon until fully mixed.
  5. Slowly, add 1/4 Cup of the sugar mixture into the egg mix with the whisk attachment running.  Wait 30 seconds, add an additional 1/4 cup... Repeat until all of the sugar mix is incorporated.
  6. Remove bowl from mixer and fold in the broken pecan pieces to an even mix.
  7. Pour mixture into the two partially pre-baked pie shells.  Garnish with additional whole half Pecans, floating on the top in an attractive pattern.
  8. Bake in a 350 degree pre-heated oven for 25 minutes.  Rotate pies for even baking, return to oven and bake an additional 25 minutes until set in the center.
  9. Let cool on rack for 2 hours before serving.
  10. Before serving, garnish with a bit of Whipped Cream, or provide a bowl of whipped cream on the side.
  11. Serve Room Temperature and ENJOY!

Sunday, January 8, 2017

Turkey Jambalaya - So Good not just a leftover dish

Pin It Now!

OH BOY... Jambalaya!!!

Nut not just any Jambalaya, this is one of my favorite holiday leftover meals.  Save that turkey (dare I suggest make two???) .  Make Turkey stock from the bones (FREE cooking supplies) and dish this up for that week after Christmas.  It warms up great in the microwave and is perfect to just have around the fridge for the hustle bustle days when scheduled meals are difficult to arrange.

And of course, it simply tastes New Orleans Cajun GOOD!

Late one evening a traveling gentleman stopped by a New Orleans inn which had little food remaining from the evening meal. The traveler instructed the cook, "Jean, balayez!" or "Jean, sweep something together!" in the local dialect. The guest pronounced the resulting hodge-podge dish as "Jean balayez."

Drink a little (or a lot) hurricane or sazerac cocktail and you start slurring your words... Jean balayez becomes JAMBALAYA!

That's probably not true, but makes a great story.

enjoy indeed and worth making anytime of the year... Turkeys are cheap year round!


Jambalaya 

This recipe is one that I adapted from one I learned during my visit to the New Orleans School of Cooking. By far, it was the most popular of the main course recipes I learned during my trips to New Orleans. Easy Peasy, so lets get to it.

Dirst, a BIG suggestion... Make Turkey stock from your Holiday Bird.  Simply carve off all the meat from the carcus, fill a large Crock Pot slow cooker with water, submerge the bones and set on high.  Cook for at least 4 hours (Any longer, turn setting to low).  When ready to make the Jambalaya, remove the bones and you have stock... Will add much more flavor to your Jambalaya.

OK... here's the recipe...

Mise en Place (first, assemble your ingredients)

1/2 cup oil (divided)
2 pounds meat from a turkey boned, cut into 1 inch cubes..
2 pounds Andouille Sausage, cut into 1/2 inch slices
......Save 1/2 pound to grill and use as accents
4 cups Onion
2 cups Green Pepper (I had a yellow as well)
2 cups Celery
3 Tablespoons Garlic
5 cups Turkey Stock
4 cups Long Grained Rice
1/4 cup Cajun Spices
1/2 cup Green onion
2 cups tomatoes (optional)
  • Optional - For brown Jambalaya, add heaping tablespoon of Brown Sugar to your roux just before adding vegetables (see next step), for red, add Paprika for color
  • In a large stock pot , make a roux with equal parts 1/4 cup oil and flour. It is VERY important to start with a clean pan. It must be free of food particles to make a successful roux. Add vegetables and later garlic to roux and stir continuously until vegetables reach desired tenderness.
  • Add Turkey and sausage to vegetables, continue to stir for about 5 minutes.
  • Gradually stir in stock and Cajun seasonings. Bring to boil
  • For red Jambalaya, add 1/4 cup paprika and you can substitute 1/2 the stock for 1/2 tomato juice or V-8 juice.
  • Add rice, DO NOT STIR, but push gently on rice to get it under liquid and return to boil
  • Reduce heat to simmer, cover and cook for 25 minutes. DO NOT OPEN POT, DO NOT STIR.
  • While the pot is cooking, slice 1/2 pound Andouille Sausage and fry in sauce pan till pretty char marks appear.
  • After 25 minutes, turn rice from top to bottom, mix meat and rice evenly. There may be some burnt bits on the bottom, but that is FILLED with flavor, and should be mixed in as well/
  • Dish it up, add sausage and green onions as accent.
  • Have Hot sauce and additional seasonings available for people who want to taste the Cajun experience to their fullest.
  • At this stage, I froze a smaller casserole dish filled with the cooked Jambalaya. ... cover the freezer casserole with Aluminum Foil, pushing the foil down so there is as little air between top of casserole and the foil as possible (prevents freezer burn). Pop in the freezer. When you want to cook this, just transfer to the refrigerator 24-48 hours before you plan to thaw and cook. If you do not have the time to thaw in the refrigerator, thaw in the microwave slowly. This dish needs to be completely thawed before re-cooking.  IMPORTANT... I add another 1/2 cup of Chicken Stock to the dish just before baking to insure moist and even cooking.  One more IMPORTANT... Do not leave in the freezer longer than 30 days or the rice will get a mushy texture.
  • Laissez les bons temps rouler (Let the good times roll) and ENJOY!

Saturday, January 7, 2017

WORLD's BEST Black Eyed Peas Sausage Soup

Pin It Now!

 OH BOY SOUP!!!

But not just any soup, this is that traditional New Year's Day "Good Luck" Soup.  For million's, it would be unthinkable not to celebrate the New Year without Black Eyed Peas in some form.  This is without a doubt, the world's best way to have good luck throughout the year.

But, it is also good enough to have anytime of the year.  This is good, not just a gimmick good, I mean really, "Talk about Good" good.

Plenty of sausage for the meat lovers, plenty of vegetables for the health conscious, plenty of color (traditional Collared Greens (can use spinach or even Kale) and the high protein of a full pound of Black Eyed Peas.  Delieicous in so many ways.

You can see in the photos, I added a pan of Mississippi Corn Bread as a side.  See yesterday's post for that easy to follow recipe.  This specialty Corn Bread is indeed the perfect side dish for this soup.  Sturdy enough to pour the soup over without disintegrating into corn dust and with plenty of flavors to compete with the loaded flavors of this BEST EVER BLACK EYED PEAS SOUP!

Keep scrolling down for this easy to follow recipe.

This does call for a couple of specialty items to pull this off with style.  You can certainly make do with any old soup pot, but if you make a lot of soups and stews you will grow to love a Dutch Oven.  Look for one that is Ceramic lined for easy cleaning, HEAVY for even heating and stylish, able to go from oven to table with flair.

And I finally splurged this year for a presentation Crock Pot that travels well... Like these...


IK... Good Luck to all and Happy New Year... Keep scrolling down, the recipe follows.


 OK... Here's what I did...

Black Eyed Peas
Sausage Soup

Ingredients
  • 1 Pound Black Eyed Peas Soup
  • 4 quarts Salted Water to soak the peas overnight
  • 1 Pound Italian Sausage, Browned...  bulk sausage.  If you have links, remove casing
  • 2 Medium Onions, diced
  • 6 Stalks Celery, cut into dime size 1/4 inch slices
  • 1 Head of Fennel, sliced thin then chopped into 1 imch pieces
  • 4 Cloves Garlic, Minced
  • 2 TBS Herbes de Provance
  • 1 TBS each Salt and Pepper
  • 2 TBS Cajun Spices
  • 1 Gallon Chicken Stock
  • 1/2 Cup Parmesan Cheese
  • 1 Bunch Collared Greens, cut into ribbons
  • 1 stick Butter (8 TBS)
  • 8 TBS Flour
Cooking Directions
  1. Place beans in a large bowl and cover with 3 quarts of water. Add 2 tablespoons kosher salt and set aside at room temperature overnight. (See note above)
  2. In a large heavy Dutch Oven Add sausage and cook, breaking it up with a wooden spoon or potato masher until starting to brown, about 8 minutes total. Add onion, Fennel and celery and Saute, stirring, until softened, about 4 minutes. Add garlic, and Seasonings (Savory, Herbes de Provence), Spicy (Cajun Spice), Salt and pepper, until fragrant, about 30 seconds. Add chicken stock and heat to simmer.
  3. Drain and rinse beans, then add to simmering pot.  Continue to simmer, stirring occasionally, until beans are fully softened, about 1 hour. 
  4. Make a thickening Roux.  In a heavy bottomed Saute pan, Melt the butter over medium low heat.  Add the flour and stir to mix.  Continue stirring non stop for about 5 minutes until the roux just starts to darken and there is a hint of a nutty aroma.  Be careful to not burn the roux.  It is important to stir this constantly.
  5. Add the roux to the pot, as well as the Parmesan cheese, stir to mix.  
  6. Add the slivered Collared greens.
  7. Transfer to a Crock Pot Slow cooler and provide a delicious hot soup throughout the day...
    Good Luck to all
    Happy New Year and of course... ENJOY!

FMP