Thursday, August 18, 2016

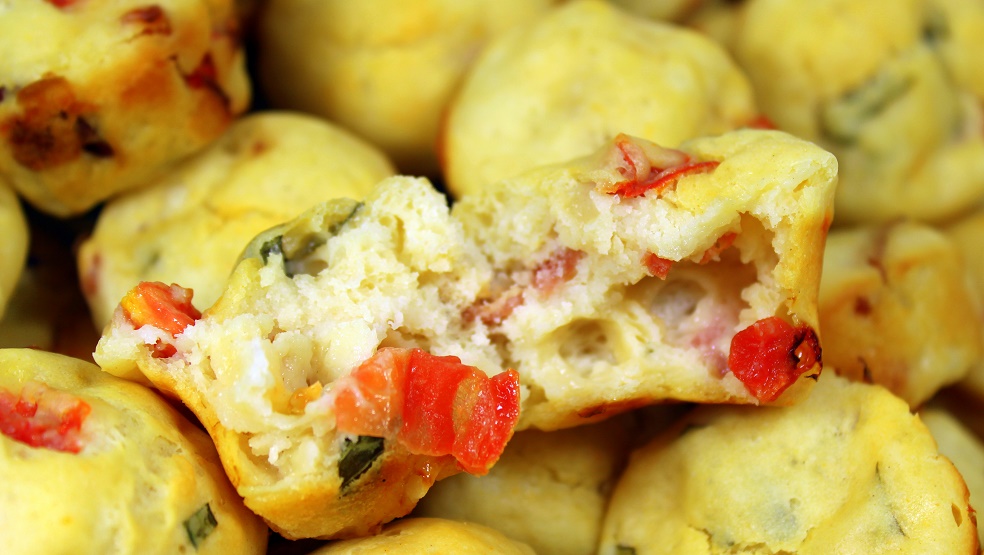
Mini BLT Muffins Bacon Lettuce (Basil) and Tomatoes

Pin It Now!

 OH BOY MUFFINS!  And just the right size... Min Muffins, just a bite or two!

But not just any muffins.  For these I went totally savory with all the flavors of a Classic BLT (Bacon lettuce and tomato Sandwich)!

Rich, moist (two secrets to insure extra moistness, sour cream and Mayonnaise) and simply exploding with flavors.

I made these for a Sunday morning Church social hour and they were a huge hit.  Of course anything with bacon is always a hit but the flavor combination set these apart!

The recipe will make 48 mini muffins, make larger muffins (be sure to cut the baking time by about 1/3rd) and the recipe will make about a dozen.

Unique flavors for a muffin (Classic flavors for a sandwich), super moist and a delicious combination makes these such a winner...

Enjoy indeed!

Keep scrolling down for this easy to follow recipe.


 OK... Here's what I did...

Mini BLT Muffins
Bacon Lettuce (Basil) and Tomatoes

Ingredients
  • 3 Cups Flour
  • 2 TBS Baking Powder
  • 2 TBS Sugar
  • 1 Cup Half and Half
  • 1/2 Cup Sour Cream
  • 1/2 Cup mayonnaise
  • 1/2 Pound Crumbled cooked crispy Bacon
  • 1 Cup Chopped Tomatoes, drained and seeds removed
  • 1/4 Cup Fresh chopped Basil
Cooking Directions
  1. Prepare a mini-muffin pan with non stick spray.  Pre heat the oven to 350 degrees
  2. In the bowl of a stand mixer, cream the Half and Half, Mayonnaise and Sour Cream.
  3. In a separate bowl, whisk together the dry ingredients, Flour, Baking Powder and Sugar.
  4. Add the wet ingredients to the dry and fold to mix.
  5. Add the BLT (Bacon basil and Tomatoes) and stir to evenly mix.  Fold gently to mix, do not over mix,
  6. In a prepared mini muffin baking sheet (non-stick spray is a must, the extras will caramelize and stick), Spoon the batter into the pan, filling each cup to the level of the rims.
  7. Bake for 25-30 minutes until the tops just start to turn golden brown and delicious.
  8. Allow to rest for 5 minutes in the pan then transfer to a cooling rack.
  9. Serve warm with a COLD Glass of milk or room temperature with a HOT cup of coffee and ENJOY!

Wednesday, August 17, 2016

Spaghetti Squash Mushroom Egg Casserole

Pin It Now!

Keep scrolling sown for this easy to follow recipe...  But first...

 I LOVED this dish!  Anything that starts with spaghetti squash is going to be fun and with the addition of garlic, salt, pepper and mushrooms, a simple egg dish becomes a tasty addition to a morning potluck...

And that's where this recipe comes from.

Recently I was asked to look over the new cookbook, Modern Potluck: Beautiful Food to Share!  The book is a beauty that really delivers on the title.  Stunning beautiful inspiring photos are included with almost every recipe.  The book covers not just a casserole dish (the main stay of any potluck), but also Appetizers, Drinks, Salads, Room temperature Main Dishes, Slow Cooker Recipes, Sides, Baked Goods and of course Sweets.

I particularly enjoyed the extra closing chapter on Condiments and other things in Jars (Hostess gift anyone?).

The book delivers on inspiration and moderately easy to follow recipes that will set your contributions apart.  I will be revisiting this nook often... Look out for my next Church PotLuck!

As to the recipe I chose to help me review the book... I chose a meatless Monday (served on Saturday night) dish.  Anything eggs works for breakfast, but this made for a wonderful vegetarian dish.  Can easily be served as a side dish or with all the protein rich eggs, certainly works as a vegetarian main dish.

The dish is a slightly goosed up version of a quiche.  Instead of a pastry crust, a bed of Spaghetti Squash becomes the tangled webbing to absorb the eggs and create this mix.  The eggs are flavored with lots of Garlic!!!, Goat cheese!!!, dill (Love eggs and dill)!!! and some fresh seasonal Mushroom!!!

Add everything together and you indeed have a modern twist on a classic quiche... All dressed up to impress and it does!

Here's the legal stuff... "I received this book from Blogging for Books for this review." But the review and opinions are 100% accurate and mine!".  I did indeed cook the recipe as printed and it worked on every level I could ask.  Wonderful Look, appealing texture and delicious taste.  I look forward to making many more of the beautiful dishes offered!  Love this book and highly recommend it!

I am so thrilled to add this book to my library.  A terrific inspiration.

As a gift or a new reference book for yourself, this is a keeper.


 OK... Here's what I did...

Spaghetti Squash Mushroom Egg Casserole

Ingredients
  • Unsalted Butter for the pan
  • 1 Medium Spaghetti Squash (2 to 3 Pounds) Halved and Seeded
  • 1/4 Cup Extra Virgin Olive Oil
  • Kosher Salt and Ground Black pepper
  • 6 Garlic Cloves, Unpeeled
  • 1 Pound White Button mushrooms or a mix of wild mushrooms sliced 1/4 inch thick
  • 12 large eggs, Lightly Beaten
  • 1/2 Cup Creme Fraiche (Can use Sour Cream if you can not find the creme)
  • 1/2 Cup Fresh Dill, Finely Chopped
  • 1 (4 Ounce) Package fresh crumbled Goat Cheese
Cooking Directions
  1. FOR THE SPAGHETTI SQUASH AND GARLIC...
    Pre-Heat the oven to 400 degrees.  Line a rimmed baking sheet with parchment paper.
  2. Drizzle the cut side of each half of the spaghetti squash with olive oil.  Generously salt and pepper.  Group the garlic cloves together, drizzle with olive oil and Salt.
  3. Place the squash,  cut side down on the parchment lined baking sheet, covering the garlic in the cavity of the squash.
  4. Roast for 40 minutes until the squash is tender when pierced with a fork.  Let cool slightly and then use a fork to rake the squash into threads.
  5. Reduce oven temperature to 325 degrees/  Prepare a 9X13 Casserole dish with non-stick spray.
  6. Arrange the eggs on a serving dish.  Cover lightly with cling wrap and chill in the fridge for a couple of hours. Just before serving, prepare your blackened shrimp.
  7. FOR THE CASSEROLE...
    While the Squash is cooking, heat 1/4 cup butter in a heavy bottomed saute pan over medium high heat.  slice the mushrooms and add the the melted HOT Butter.  Cook until the mushrooms are browned, about 5 minutes.
  8. Add the spaghetti squash to the pan and cook until the squash begins to brown, about another 5 minutes, stirring to mix occasionally.
  9. Meanwhile. peal the garlic and smash to a paste.  Once the squash begins to brown, add the garlic and stir to mix.
  10. Also meanwhile, in a large bowl , whisk the eggs with the Creme Fraiche and salt until smooth.
  11. Take the squash and mushrooms and form an even base in the bottom of the casserole dish.  Pour the egg mix evenly over the squash mix.  Add the Crumbled goat cheese and dill
  12. Bake for 40 minutes until the center is set.  Let cool for 10 minutes before cutting.  Cut into squares
  13. Serve warm or at room temperature and ENJOY!

Monday, August 15, 2016

Cajun Blackened Shrimp Deviled Eggs

Pin It Now!

 Here's another one of my "Dressed to Impress" recipes.  A fantastic colorful presentation featuring Cajun Spiced Blackened Shrimp resting in the colorful bed of normal mustard based deviled egg stuffing.

I did add some sweet cream cheese to the stuffing to balance the flavors of the Cajun shrimp.  A little sweet and creamy flavor texture combines with the punch of Cajun.

And just to add a little more zing to the presentation (and flavor), I added a lemon basil leaf to the mix.

Wonderfully filled with flavor, certainly a "dressed to Impress" presentation and a glorious near one perfect Cajun bite!


Keep scrolling down for this easy to follow recipe...

 OK... Here's what I did...


BACON BBQ Ranch
Deviled Eggs


Ingredients
  • 12 Large Eggs, Hard-Boiled and Peeled
  • 1/4 Cup Mayonnaise
  • 1/4 Cup Cream Cheese (Softened to room temperature)
  • 1 TBS Your Favorite Cajun Spice Mix
  • FOR THE BLACKENED CAJUN SHRIMP -
    24 Small to medium sized shrimp, peeled and deveined.  You can use the precooked version.
  • 3 TBS (half a stick) Butter
  • 2 heaping TBS Cajun Blackened Spice Mix
  • 24 sweet basil leaves (Lemon basil if you can find it)
  • Additional sprinkle of Cajun Spices for garnish
Cooking Directions
  1. Slice the eggs in half lengthwise, putting the yolks in a medium bowl and the whites on a platter.
  2. Use a fork to mash the yolks and mix in the mayonnaise, cream cheese and Cajun Spices.  Mix until completely smooth (I prefer to use a food processor).
  3. Place the yolk mixture into a piping bag with a large opening star tip OR into a sturdy resealable plastic bag, push into one corner, and cut off the tip to make a pastry bag. Pipe the yolk mixture into the whites.
  4. Arrange the eggs on a serving dish.  Cover lightly with cling wrap and chill in the fridge for a couple of hours. Just before serving, prepare your blackened shrimp.
  5. FOR THE BLACKENED SHRIMP...
    In a heavy bottomed large saute pan, melt the butter and add the Blackening spices.  Heat until the butter starts to pop.  Add the shrimp and saute for 3 minutes.  Stir and saute constantly during this time.  Be sure the shrimp are evenly coated.
  6. Remove from heat and drain excess moisture.
  7. Add one shrimp and one Basil leaf to the top of each Deviled Egg.
  8. Best to serve while the shrimp are still warm but taste just fine when cooled to room temperature. ..and of course, ENJOY!
******************************************************

This recipe has been added to my growing list of "52 Church PotLuck Dishes"!

A list of something NEW worthy of being shown off at a neighborhood BYODish (Bring Your Own Dish) Party, a Family special occasion dinner, Any Big Holiday Gathering or of course that glorious day when you bring a dish to share with your Church family...

Ages ago, literally almost a half century ago I was listening to our pastor talking about a PotLuck Dinner. It happened to be scheduled around a church work day when we were expected to weed, polish and do general cleaning and maintenance around the church (you know, back in the day when there were no no-wax floors and church pews smelled of Old English furniture polish). I am of course paraphrasing, but as I recall the pastor said,

"A potluck, like a church requires work. At a potluck everyone is expected to contribute.. At a church no one should come empty handed and no one should leave unfed".
I will confess that in my youth I brought more store bought plastic spoons and forks than I ever brought covered dishes and crock pots of fresh made love and caring delights. But now that I have become a hobbyist cook, I occasionally am reminded of those days and people from my youth. I reminded and I do wish that I could drop a dish of some new creation on those old tables at my fondly remembered Liberty Baptist Church.  Tables covered with newspapers and loaded with God's bounty prepared with love and caring... Enjoy

***********************PINTEREST*********************

Come and find me on Pinterest... Any of my "52 Ways to cook" Boards are worth following.  If you like this post, please take a second and "Pin" this to your own boards... Better yet, if you are part of a foodie group board please take a second and add this post to your group pins... best way to show your Love!

And BTW, if you are not yet part of a group board, drop me an email at Contact@eRecipeCards.com and request to be added to my group board... FAVORITE FOOD BLOGGERS! (be sure to include your pinterest ID when you write)  Once you are added, any pins you add will be seen by 10s of THOUSANDS of followers of the board (and growing daily).

Rules, only 2... 
  1. In order to join you need to start following the group board as well as at least one of my boards.
  2. And you must ONLY pin original sources, posts from food related bloggers only.  If you are a blogger, this is a great way to have thousands of potential readers see your work,  If you are a fan of bloggers, a great way to share your favorites...
    Come and be a part of ... FAVORITE FOOD BLOGGERS! on Pinterest

Friday, August 12, 2016

Deviled Egg Potato Salad - 52 Church PotLuck Side Dishes

Pin It Now!

 OH BOY POTATO SALAD!

But not just any... This has the flavor (and ingredients) of your favorite "Mom's Old School" Deviled Eggs...

Yellow Mustard... Pickle Relish... Mayonnaise base (but also  more up to date Sour Cream and Greek Yogurt additions)!  Even Plenty of hard boiled eggs in the mix.

You can even dress it up with actual Deviled Eggs as garnish.   Simple classic eggs all the way up to fancy ones like in my photos... Blackened Cajun Shrimp Deviled Eggs (come back tomorrow for that recipe).

Takes a simple potato salad and moves it up to something special your guests will remember.


Keep scrolling down for this easy to follow recipe...


 OK... Here's what I did...


Deviled Egg Potato Salad


Ingredients
  • 2 Pounds Red Potatoes, Large Dice, Boiled until cooked through, about 10 minutes
  • 6 Eggs, divided for additional Deviled Eggs to Garnish
  • 3 TBS Reduced Fat Sour Cream
  • 2 TBS Greek Yogurt
  • 2 TBS Yellow Mustard
  • 1/4 Cup Pickle Relish
  • Several Turns of a Pepper Grinder (About 2 TBS for me, to taste)
  • 1 tsp Sea Salt
  • 5 Green Onions, sliced... Reserve 2 TBS For garnish.
Cooking Directions
  1. First, hard boil the eggs.  In a pot of cold water, add the eggs.  If needed, add additional water to cover eggs by at least 1 inch.  Over medium high heat cook the eggs until the water reaches a rapid boil.  Remove from heat and cover.  let set for 17 minutes.  One at a time, working quickly, dump an egg in ice water to cool and peal.  Use 3 to make your favorite deviled egg recipe to use as garnish.  Dice the remaining three eggs to add to the potato salad.
  2. In a pot of boiling water add the already diced potatoes and Cook until cooked through... About 10 minutes.  Be careful to not over boil, Red Potatoes turn mushy if over cooked.. Drain and return potatoes to pot.
  3. In a small bowl, combine the yogurt, sour cream, mustard, pickle relish, salt and pepper and half of the green onion slices.   Whisk to blend.
  4. Mix diced eggs with the potatoes and fold in the dressing until coated.          
  5. Transfer to serving dish, serve warm or transfer to the refrigerator and chill to serve cold.
  6. Garnish with additional Green onions and Deviled Eggs
    ... and ENJOY!

*************************************************************************

Double Click the photo above for a
link to my growing list of
52 Side Dishes
So,  I am pleased to list this as one of my Growing list of  "52 Ways to Cook Side Dish Recipes"!!!

Sure the meat gets all the glory but real cooks know it's the spread... the specialty Side Dishes that makes a meal rise or fall. Here's a few of my favorite recipes that will help to create that illusive COMPLETE MENU!

LOTS of Potato Sides, Vegetable Sides, Specialty Salads, Bread and MORE!

******************************************************

Double click the photo above for a
link to my growing list of HUNDREDS
of recipes suitable for any big
PotLuck meal
This recipe has been added to my growing list of "52 Church PotLuck Dishes"!

A list of something NEW worthy of being shown off at a neighborhood BYODish (Bring Your Own Dish) Party, a Family special occasion dinner, Any Big Holiday Gathering or of course that glorious day when you bring a dish to share with your Church family...

Ages ago, literally almost a half century ago I was listening to our pastor talking about a PotLuck Dinner. It happened to be scheduled around a church work day when we were expected to weed, polish and do general cleaning and maintenance around the church (you know, back in the day when there were no no-wax floors and church pews smelled of Old English furniture polish). I am of course paraphrasing, but as I recall the pastor said,

"A potluck, like a church requires work. At a potluck everyone is expected to contribute.. At a church no one should come empty handed and no one should leave unfed".
I will confess that in my youth I brought more store bought plastic spoons and forks than I ever brought covered dishes and crock pots of fresh made love and caring delights. But now that I have become a hobbyist cook, I occasionally am reminded of those days and people from my youth. I reminded and I do wish that I could drop a dish of some new creation on those old tables at my fondly remembered Liberty Baptist Church.  Tables covered with newspapers and loaded with God's bounty prepared with love and caring... Enjoy

***********************PINTEREST*********************

Come and find me on Pinterest... Any of my "52 Ways to cook" Boards are worth following.  If you like this post, please take a second and "Pin" this to your own boards... Better yet, if you are part of a foodie group board please take a second and add this post to your group pins... best way to show your Love!

And BTW, if you are not yet part of a group board, drop me an email at Contact@eRecipeCards.com and request to be added to my group board... FAVORITE FOOD BLOGGERS! (be sure to include your pinterest ID when you write)  Once you are added, any pins you add will be seen by 10s of THOUSANDS of followers of the board (and growing daily).

Rules, only 2... 
  1. In order to join you need to start following the group board as well as at least one of my boards.
  2. And you must ONLY pin original sources, posts from food related bloggers only.  If you are a blogger, this is a great way to have thousands of potential readers see your work,  If you are a fan of bloggers, a great way to share your favorites...
    Come and be a part of ... FAVORITE FOOD BLOGGERS! on Pinterest

Wednesday, August 3, 2016

Fresh Corn Relish Salsa - Alabama White

Pin It Now!

Did you happen to catch yesterday's post of an Alabama White Sauce (Mayo based BBQ sauce that works wonders on Chicken)?

If so, did you notice the bed of corn relish underneath the chicken quarter...

Well, the secret is indeed in the sauce.  Many corn relishes will have a base of Mayo included.  I used the very same chicken BBQ dipping sauce as the base for this side dish.

And why Not?

The sauce has a spicy Cajun flavor, a creamy smooth texture and a a surprising little tang from the vinegar which is a part of the sauce.

The recipe I make for the sauce will make almost three cups.  I use about a cup for the chicken, so I always have some left over (Makes the BEST Chicken Wings).  Since it is mayo based, you can not really can this for long term storage.  So in about 2 weeks you end up tossing a little out.  This recipe is a perfect way to use some up.

Beautiful side dish with all of the colors... Tasty with plenty of little surprise undertones... And a perfect side dish that is actually best when you make ahead and let sit in the fridge for a few hours for the flavors to mix and mingle, freeing you up to cook the dishes that need to be hot.

So, keep scrolling doen for this easy to follow recipe and as always... ENJOY!


 OK... Here's what I did...

Fresh Corn Relish Salsa
Alabama White

Ingredients
  • For the Alabama White Sauce (note: Recipe makes 3 cups, this salsa only requires 1/2 Cup) -
    2 Cups Mayonaiise
  • 1 Cup Apple Cider Vinegar
  • 2 TBS Lemon Juice
  • Several Turns of a Pepper Grinder
  • 1 tsp Salt
  • 2 TBS (to taste) Cajun Spice Mix
  • For the Corn Relish Salsa -
    3 Ears Fresh Corn, cooked, kernals cut from ear... Can sustitute 2 Cans Sweet Corn, Drsined or 3 Cups Frozen Corn, thawed and heated under running hot water
  • 2 Red Bell peppers, Minced same size as the corn kernals
  • 1 large Vadalia Sweet Onion, Minced same saize as the corn kernals
  • 2 TBS Freshly grated Parmesan Cheese
  • 2 TBS Sugar
  • 1/2 Cup Alabama White Sauce (See recipe above)
  • Ribbons of fresh Basil for garnish.
Cooking Directions
  1. For the Alabama White Sauce... 
    Mix all listed ingredients together.  This is a Jam Jar recipe... Mix ingredients into a large Mason jar, seal and shake for a full 2 minutes until thoroughly blended.  Taste... Add additional seasoning as needed
  2. Refrigerate for at least 8 hours for the flavors to mix and lock in together.
  3. For the Fresh Corn Relish Salsa...
     Boil your fresh ears of corn for about 6 minutes until cooked through but still crunchy.  Alternatively, open and drain the canned corn or measure and thaw the frozen corn.
  4. Gently Fold the corn with the minced pepper, onion, Parmesan cheese, sugar and about half of the Alabama White Sauce until well mixed.
  5. Taste.  Add additional white sauce as needed for desired texture and taste.  You may wish to add additional seasonings to taste.
  6. Cover and chill in the refrigerator for a couple of hours (up to overnight).  Drain excess liquid if needed.
  7. Serve chilled and ENJOY!

*************************************************************************

Double Click the Photo above for
my GROWING list of HUNDREDS
of BBQ Recipes
So,  I am pleased to list this as one of my Growing list of  "52 Grilling Time Secret Extras" or "52 Ways to Cook BBQ and Grilling Recipes"!!!

Well over 52 recipes actually as I just can't stop... Over 100 in one grilling season (I love to grill!). But not just leat... Drinks, Condiments (LOTS of different BBQ sauces), Drinks, Desserts... even specialty items like GRILLED Pizza, and fun shaped Watermelons.  Easy and these ideas will make you the MASTER of your Backyard Domain!

*************************************************************************

Double Click the photo above for my
GROWING list of Hundreds of
Side Dishes
So,  I am also pleased to list this as one of my Growing list of  "52 Ways to Cook Side Dish Recipes"!!!

Sure the meat gets all the glory but real cooks know it's the spread... the specialty Side Dishes that makes a meal rise or fall. Here's a few of my favorite recipes that will help to create that illusive COMPLETE MENU!

LOTS of Potato Sides, Vegetable Sides, Specialty Salads, Bread and MORE!

****************************PINTEREST**************************

Come and find me on Pinterest... Any of my "52 Ways to cook" Boards are worth following.  If you like this post, please take a second and "Pin" this to your own boards... Better yet, if you are part of a foodie group board please take a second and add this post to your group pins... best way to show your Love!

And BTW, if you are not yet part of a group board, drop me an email at Contact@eRecipeCards.com and request to be added to my group board... FAVORITE FOOD BLOGGERS! (be sure to include your pinterest ID when you write)  Once you are added, any pins you add will be seen by 10s of THOUSANDS of followers of the board (and growing daily).

Rules, only 2... 
  1. In order to join you need to start following the group board as well as at least one of my boards.
  2. And you must ONLY pin original sources, posts from food related bloggers only.  If you are a blogger, this is a great way to have thousands of potential readers see your work,  If you are a fan of bloggers, a great way to share your favorites...
    Come and be a part of ... FAVORITE FOOD BLOGGERS! on Pinterest

Tuesday, August 2, 2016

Baptized Chicken - Alabama White BBQ Sauce

Pin It Now!

 The secret's in the sauce...

The sauce is Mayonnaise based.  Think of an Aioli and you will be close.  It has been made famous by Chris Lilly owner and celebrity cook of Big Bob Gibson BBQ joint in Alabama.  I did a little research and found several versions of this recipe, actually more than one version credited to Chris himself.  So I took a little of this recipe and a little of that one and came up with a version I liked best.  My main contribution of the legend is the extra Cajun Spices.  Mayo on turkey is just fine for a sandwich.  As a serving sauce, I like the extra kick.

The name, Baptized Chicken, I borrowed from my blogging buddy (Cookbook author, competitive smoker, grill master and all around nice guy), Chris Grove of the Nibble me This Grilling and Smoking specialty blog.  As the name implies, the chicken is dunked into the sauce.  You can go the total immersion route (I use this sauce for chicken wings sometimes; a great total immersion opportunity).

The chicken quarters shown are more sprinkled (liberally).  Pour a little on,. brush around and you have the look and proper amount of spice!  You can certainly make chicken yourself (broil, fry, bake).  Me, I used the leg quarters from a store bought pre-cooked, pre-seasoned Rotisserie Chicken.  Used the breast meat for some chicken salad and served these up for an evening meal.

Unlike most DIY BBQ sauces, this is a make fresh, store in fridge and use up in a week sauce.  SO, once I make a jar, I usually have a serving of wings a few days latter.  I also used some for the corn salsa shown above.  Adds a a nice little zing!  Come back tomorrow for that easy to follow recipe!

But at least on this day, As for me and my house we will serve... Baptized Chicken!


 OK... Here's what I did...


Baptized Chicken 
Alabama White Sauce


Ingredients
  • 2 Cups Mayonnaise
  • 1 Cup Apple Cider Vinegar
  • 2 TBS Lemon Juice
  • Several turns of a Pepper Grinder
  • 1 tsp Sea Salt
  • 2 TBS (more or less - To Taste)Cajun SPice Mix
Cooking Directions
  1. Mix all ingredients together.
  2. It is important to taste as you add the Cajun Spice Mix. Add "to taste"
  3. Refrigerate for at least 8 hours before using. Brush lightly over chicken, turkey or pork during the last few minutes of grilling.
  4. Or drizzle over cooked Chicken Parts on a serving platter (Baptized)
  5. OR... This sauce is also great as a dipping sauce so set some aside for a veggie tray.
  6. Serve chilled and ENJOY!!!
And check back tomorrow for the recipe for this wonderful Corn Salsa made with this self same Alabama White!

*************************************************************************

So,  I am pleased to list this as one of my Growing list of  "52 Grilling Time Secret Extras" or "52 Ways to Cook BBQ and Grilling Recipes"!!!

Well over 52 recipes actually as I just can't stop... Over 100 in one grilling season (I love to grill!). But not just leat... Drinks, Condiments (LOTS of different BBQ sauces), Drinks, Desserts... even specialty items like GRILLED Pizza, and fun shaped Watermelons.  Easy and these ideas will make you the MASTER of your Backyard Domain!

****************************PINTEREST**************************

Come and find me on Pinterest... Any of my "52 Ways to cook" Boards are worth following.  If you like this post, please take a second and "Pin" this to your own boards... Better yet, if you are part of a foodie group board please take a second and add this post to your group pins... best way to show your Love!

And BTW, if you are not yet part of a group board, drop me an email at Contact@eRecipeCards.com and request to be added to my group board... FAVORITE FOOD BLOGGERS! (be sure to include your pinterest ID when you write)  Once you are added, any pins you add will be seen by 10s of THOUSANDS of followers of the board (and growing daily).

Rules, only 2... 
  1. In order to join you need to start following the group board as well as at least one of my boards.
  2. And you must ONLY pin original sources, posts from food related bloggers only.  If you are a blogger, this is a great way to have thousands of potential readers see your work,  If you are a fan of bloggers, a great way to share your favorites...
    Come and be a part of ... FAVORITE FOOD BLOGGERS! on Pinterest

Monday, August 1, 2016

Creamy Lemon Ice Box Pie

Pin It Now!

 It's HOT.  Not just a little, but that oppressive heat and humidity that comes around only a couple of times a year.

Time for an ice box pie!

And yes, there is a little bit of oven top cooking, but you do that hours before in the cool quiet of the morning.

And BTW, this pie comes away with a bit of an urban legend.  In the 50's, a waitress at a small town diner saw a notice that a Condensed Sweetened milk company was giving away a FREE Fur coat to the first cook that was able to collect 500 labels of their product.

The waitress added whipped cream as a topping to the normal lemon pie, added noticeably extra topping for whomever ordered the pie and in a couple weeks she was seen around town sporting a new addition to her wardrobe,

And the moral, most urban legends come with morals, is to give that little unexpected extra to your efforts and you will be rewarded in kind.

This pie has a couple of extras that reward.  The real lemon flavor comes not only from lemon juice, but the lemon zest is the true zing to the flavor.  Just a little hint, but lemon zest added to almost anything is a good thing!

The other secret extra is the addition to whipped cream to the filling.  Many ice box pies have almost a gelatin consistency.  This has more of a creamy cheesecake filling that I Like so much better.

The recipe seems just a bit complicated, but really it is not.  Work in stages, low and slowly building heat, don't leave the stovetop, stir and slowly simmer throughout.

You can do this... and you will wear the mantle of that fur coat of appreciation for your adoring fans!!!

Enjoy indeed!


 OK... Here's what I did...

Creamy
Lemon Ice Box Pie

Ingredients (Makes 2 Pies, cut in half for only 1 pie)
  • FOR THE LEMON CRUMB CRUST -1 large package Lemon Cream Sandwich Cookies (inexpensive Oreo knockoff looking)
  • 1 Cup (2 Sticks) Room temperature softened Butter
  • FOR THE CREAMY LEMON FILLING - 3 (14 Oz) Cans Sweetened Condensed Milk
  • 12 Egg Yolks
  • Zest of 2 Lemons 
  • 1 Cup Fresh Squeezed Lemon Juice (About 4 Lemons), strain the seeds
  • 2 Cups Whipping Cream
  • FOR THE WHIPPED TOPPING -
    2 Cups Whipping Cream
  • 1 Cup Powdered Sugar
  • 1 TBS drizzed white corn syrup
Cooking Directions
  1. First, make the pie crusts...
    Work in two batches for the pie crust... Add half the package of lemon cookies to the bowl of a food processor and pulse until the consistency of wet sand.  Add 1/2 the softened butter and process for one minute.
  2. Dump this into the bottom of a pie pan.  I do spray mine with a vegetable oil non stick spray for guaranteed easy removal when time to serve.  Starting in the center and press the crumbs info an even flat layer.  As you work around the bottom the crumbs will begin to climb the sides.  Continue toe press the bottom until the crumb topping comes to the top of the pie shell.  Resist the urge to press that top layer of crumbs.  you want that loose sand look for the edge.  Repeat first two steps with second shell.
  3. For The Pie Filling...
    In a large non-stick sauce pan over medium heat, whisk together the 3 cans of sweetened condensed milk, the egg yolks, lemon zest and juice.  raise temperature to a slow simmer.  Add the Whipping cream and continue to whisk for about 10 minutes.  The custard begins to thicken.  Do not allow to boil, gently stir throughout.  Once the custar thickens, pour evenly into the two pie shells.  
  4. Cover each pie with a sheet of plastic cling wrap, gently pressing to make contact with the top of the custard to prevent as much air as possible from reaching the pie.
  5. Chill in the ice box for at least 3 hours.
  6. For the Whipped Topping...
    In the bowl of a stand mixer, with the whisk attachment, begin whisking the cream.  after 1 minute, add the powdered sugar and continue to whisk at a higher speed for 5 minutes.  Check the topping to see if you can reach stiff peaks.  If not, continue to whisk, checking every minute or so.
  7. Once the stiff peak stage has been reached, with the whisk whirring, slowly drizzle in the corn syrup to help keep the topping stiff for presentation.
  8. Decorate the pies with the whipped topping.  A piping bag with star tip works wonderful, or simply drop dollops onto the top and smooth.
  9. Return to the ice box until ready to serve.
  10.  Serve chilled ...
    And of course... Enjoy!!!

******************************************************

This simple recipe has been added to my growing list of "52 Cakes and Pies at Home"!

These are the desserts you make for your family.  No fancy amazing wedding cakes, just the rustic beauty of the classics.  From pumpkin pie to cheesecakes to layer cakes, these are what your family craves for dessert.  You may even see a few unusual crusts and frosting ideas to try.

You get the idea. These recipes are simple, delicious and will have your family wanting dessert first...

***********************PINTEREST*********************

Come and find me on Pinterest... Any of my "52 Ways to cook" Boards are worth following.  If you like this post, please take a second and "Pin" this to your own boards... Better yet, if you are part of a foodie group board please take a second and add this post to your group pins... best way to show your Love!

And BTW, if you are not yet part of a group board, drop me an email at Contact@eRecipeCards.com and request to be added to my group board... FAVORITE FOOD BLOGGERS! (be sure to include your pinterest ID when you write)  Once you are added, any pins you add will be seen by 10s of THOUSANDS of followers of the board (and growing daily).

Rules, only 2... 
  1. In order to join you need to start following the group board as well as at least one of my boards.
  2. And you must ONLY pin original sources, posts from food related bloggers only.  If you are a blogger, this is a great way to have thousands of potential readers see your work,  If you are a fan of bloggers, a great way to share your favorites...
    Come and be a part of ... FAVORITE FOOD BLOGGERS! on Pinterest

FMP