Saturday, September 6, 2014

Corn on the Cob with Garlic Lime Pepper Butter - 52 Grilling Time Secret Extras

Pin It Now!

If you've been following along for the last few days you may have noticed a theme.  I've been posting the dishes from one of my very favorite BBQ sessions of the year.  Something simple, a friend we hadn't seen for months over for dinner.  A half hour of prep time, 20 minutes on the grill and we enjoyed a couple of inch thick Sirloin Steaks with a Garlic Peppercorn Rub and my very favorite grilled side dish of Cheesy Sour Cream and Chives Twice Baked Potato Skins!

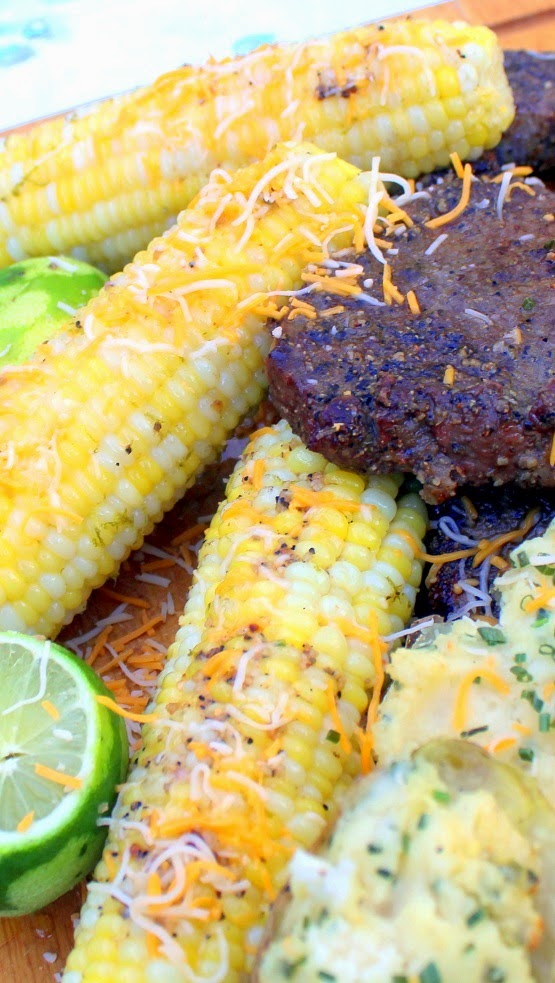
Today's post is the final menu item for the meal.  Fresh corn is in season and this is my favorite way to serve.  Pre-cooked on the stove top, then Cooked through on a grill with seasoned butter.  Then finally garnished with a final brish of seasoned butter, lime juice and some cheese.

Made for a hell of a presentation board when I mixed the steaks, potatoes and corn.

LOVE this meal!


OK... Here's what I did...


Corn on the Cob with Garlic Lime Pepper Butter


Ingredients
  • FOR THE LIME PEPPER BUTTER 2 Sticks Unsalted Butter, Softened to Room Temperature
  • Several Turns (Enough to make 1/4 Cup) Fresh ground Peppercorns
  • Zest From 2 Limes
  • Juice From 1 Lime
  • 1 Clove Garlic, Minced fine
  • FOR THE CORN 4-8 Ears of Corn, husks removed
  • 1/2 cup Mexican Mix pre-packaged grated Cheese, For Garnish
  • Juice from 2 Limes For Garnish
Cooking Directions
  1. Par Boil the corn for 10 minutes in already boiling salted water.
  2. While the corn is boiling, prepare the Peppered Lime Butter... Mix the Butter, Pepper, Zest and Garlic together until well blended.
  3. Melt the seasoned butter in a heat proof bowl.
  4. When the corn is done, either move to the grill or arrange on a baking sheet.in a preheated 350 degree oven.
  5. On the grill, cook these at the last 10 minutes before serving (the corn is mostly already cooked, you are just warming up). Over the hot spot on the grill, arrange ears.
  6. Brush with the flavored butter (same if the corn is in the oven. After a couple of minutes, turn ears a quarter turn and repeat brushing.
  7. Repeat until all four sides of the ears are cooked. Brush with remaining butter and arrange on a serving plate
  8. Sprinkle the cheese and squeeze the limes juice over the corn
  9. Serve HOT and ENJOY!

*************************************************************************

So,  I am pleased to list this as one of my Growing list of  "52 Grilling Time Secret Extras" or "52 Ways to Cook BBQ and Grilling Recipes"!!!

Well over 52 recipes actually as I just can't stop... Over 100 in one grilling season (I love to grill!). But not just leat... Drinks, Condiments (LOTS of different BBQ sauces), Drinks, Desserts... even specialty items like GRILLED Pizza, and fun shaped Watermelons.  Easy and these ideas will make you the MASTER of your Backyard Domain!

*************************************************************************

So,  I am pleased to list this as one of my Growing list of  "52 Ways to Cook Side Dish Recipes"!!!

Sure the meat gets all the glory but real cooks know it's the spread... the specialty Side Dishes that makes a meal rise or fall. Here's a few of my favorite recipes that will help to create that illusive COMPLETE MENU!

LOTS of Potato Sides, Vegetable Sides, Specialty Salads, Bread and MORE!

****************************PINTEREST**************************

Come and find me on Pinterest... Any of my "52 Ways to cook" Boards are worth following.  If you like this post, please take a second and "Pin" this to your own boards... Better yet, if you are part of a foodie group board please take a second and add this post to your group pins... best way to show your Love!

And BTW, if you are not yet part of a group board, drop me an email at Contact@eRecipeCards.com and request to be added to my group board... FAVORITE FOOD BLOGGERS! (be sure to include your pinterest ID when you write)  Once you are added, any pins you add will be seen by 10s of THOUSANDS of followers of the board (and growing daily).

Rules, only 2... 
  1. In order to join you need to start following the group board as well as at least one of my boards.
  2. And you must ONLY pin original sources, posts from food related bloggers only.  If you are a blogger, this is a great way to have thousands of potential readers see your work,  If you are a fan of bloggers, a great way to share your favorites...
    Come and be a part of ... FAVORITE FOOD BLOGGERS! on Pinterest

Friday, September 5, 2014

Cheesy Sour Cream and Chives Twice Baked Potato Skins - 52 Grilling Time Secret Extras

Pin It Now!

This is hands down my very favorite side dish for a night on the grill.

All of the work is done in advance.  The 'taters are cooked and mashed hours ahead of time.  While of course you can do this in an oven, broiler setting; pulling these off a grill (along with a steak and corn on the cob becomes something magical!

Bar Snacks at Home!!!  I LOVE EM!


Keep scrolling down for this easy to follow recipe...


OK... Here's what I did...


Cheesy
Sour Cream and Chives
Twice Baked 
Potatoes


Ingredients
  • 4 Medium Russet Baking Potatoes
  • 1/4 Cup Butter
  • 1/4 Cup Sour Cream
  • Half and Half as needed to thin the potatoes
  • Pinch of Salt and Pepper to Taste
  • 1/4 Cups fresh herbs (I used Chives), divided, save some for garnish on top
  • 3/4 Cup Extra Sharp Cheddar Cheese, freshly shredded, save some for garnish n the top
Cooking Instructions
  1. Prepare baked potatoes as you like (Microwave, oven baked, even slow cooker roasted)...
  2. Or...Turn your grill into an oven, Wrap olive oil rubbed potatoes in Aluminum Foil.Bake potatoes in a 425° (medium heat) grill (lid closed) for 45-55 minutes or until tender. 
  3. When cool enough to handle, Cut the potatoes in half.  Carefully scoop out pulp into a bowl, leaving a thin shell. Set shells aside. 
  4. Beat or mash potato pulp with butter, Sour Cream, salt and pepper and most of the herbs until smooth. Using a fork, stir in onions. and cheese. 
  5. Add additional 1/2 and 1/2 (or milk) as needed for creamy smooth potatoes.
  6. Return to the oven/grill for 15 minutes or until heated through
  7. When potatoes are done, top with the remaining Chives and cheese.
  8. Serve hot... AND ENJOY!

Thursday, September 4, 2014

Garlic Peppercorn Steak Rub DIY Spice Mix - 52 Grilling Time Secret Extras

Pin It Now!

If you get up very early in the morning, you can feel it... Early September but still... Fall is in the air.

While grilling can be and for some of us already is a year round activity, Fall is my very favorite time to grill.  The weather is crisp, the air smells fresh and of course the extra laser light show (leaves changing color) that nature provides.

And of course the possibility of the last grill of the season,

Steaks are expensive (and seemingly getting more expensive every trip to the store).  This mix of fresh garlic, lots of fresh ground peppercorns and the all important secret ingredient (a little Mustard Powder) is worthy of that expense.

Easy to DIY RUB, just a few tips to make your back yard grilling session (or cook under your broiler if you want to cook inside).  Dramatic flavor PUNCH for your steak!


OK... Here's what I did...


Garlic Peppercorn Steak Rub
DIY Spice Mix -
52 Grilling Time Secret Extras


Ingredients
  • 4 Cloves (4 TBS) Garlic, Fine Mince
  • 2 tsp Ground Mustard
  • 1 tsp Chili Powder
  • 4 TBS Freshly Ground Black Pepper
  • 1 TBS Sea Salt
  • 1/2 tsp Cayenne Pepper
  • 4 (6 to 8 Ounce) Beef Sirloin Steaks (any cut of beef or even Hamburgers
  • Drizzle of Olive Oil
Cooking Directions
  1. In a small bowl, combine all of the spice ingredients. Mix well, break up any clumps with your fingers to insure even distribution.
  2. Drizzle Olive Oil on the steaks and spread evenly.
  3. RUB (It's not called a sprinkle) the spice mix on the steaks. Once they have an even coat, wrap in cling wrap and allow to sit room temperature for 30 minutes for the spices to meld into the meat.
  4. During that 30 minutes, prepare your grill. Make a HOT spot, with the coals under half of the grate.
  5. With the coals HOT, unwrap the steaks and grill about 2 minutes per side. Take the internal temperature of the beef. Continue cooking 2 minutes per side, checking internal temp with each flip. Transfer meat from the HOT side to the cooler side with no coals under the steak when internal temp reaches 140 degrees. Cooking time over the hot coals will vary depending on how hot the fire is, how thick the steak is and the fat content of the steak. Always check done-ness with an instant read meat thermometer. Continue to monitor the internal temp and pull the meat from the grill when internal temp evens out to 145 degrees (medium rare).
  6. VERY IMPORTANT... Always rest your grilled meat for 10 minutes room away from the grill before slicing/serving, allowing the juices to reabsorb into the meat.
  7. Serve warm and ENJOY!

*************************************************************************

So,  I am pleased to list this as one of my Growing list of  "52 Grilling Time Secret Extras" or "52 Ways to Cook BBQ and Grilling Recipes"!!!

Well over 52 recipes actually as I just can't stop... Over 100 in one grilling season (I love to grill!). But not just leat... Drinks, Condiments (LOTS of different BBQ sauces), Drinks, Desserts... even specialty items like GRILLED Pizza, and fun shaped Watermelons.  Easy and these ideas will make you the MASTER of your Backyard Domain!

****************************PINTEREST**************************

Come and find me on Pinterest... Any of my "52 Ways to cook" Boards are worth following.  If you like this post, please take a second and "Pin" this to your own boards... Better yet, if you are part of a foodie group board please take a second and add this post to your group pins... best way to show your Love!

And BTW, if you are not yet part of a group board, drop me an email at Contact@eRecipeCards.com and request to be added to my group board... FAVORITE FOOD BLOGGERS! (be sure to include your pinterest ID when you write)  Once you are added, any pins you add will be seen by 10s of THOUSANDS of followers of the board (and growing daily).

Rules, only 2... 
  1. In order to join you need to start following the group board as well as at least one of my boards.
  2. And you must ONLY pin original sources, posts from food related bloggers only.  If you are a blogger, this is a great way to have thousands of potential readers see your work,  If you are a fan of bloggers, a great way to share your favorites...
    Come and be a part of ... FAVORITE FOOD BLOGGERS! on Pinterest

Wednesday, September 3, 2014

Mini Fruit on a stick Skewers Appetizers - 52 Catering Recipes

Pin It Now!

Great for a BBQ (Easy and can be done in advance)... These little fruit appetizers are always popular.

Serve standing up in a glass of White Wine as a garnish to make it special (Extra tip... Freeze em before putting in the glass)

And SIMPLE.


Keep scrolling down for this easy to follow recipe...


OK... Here's what I did...


Mini Fruit on a stick Skewers Appetizers


Ingredients
  • 1 Fresh Pineapple, sliced and cored; cut into 36 fifty cent piece size pieces
  • 1 Fresh Watermelon, Sliced thin and cut into 36 quarter size pieces
  • 1 package (at least 36) Fresh Raspberries
  • 1 Package (at least 36) Fresh Grapes
  • 1 Package (at least 36) Fresh Blueberries
  • 36 Long Skewers
Cooking Directions
  1. Slice the Watermelon first. Cut thin slices and use a decorative cookie cutter (I used a small biscuit cutter) to make the right size pieces (You can eyeball small squares if you do not have the right size cookie cutter).
  2. Put the pieces in a strainer and allow to drain for 1 hour. This keeps the watermelon from leaking water into the tray.
  3. Slice and cut the pineapple into pieces. The edges closest to the removed rind are firmer and hold the skewer best.
  4. Prepare an assembly station with the individual fruit arranged in order, smallest to largest.
  5. And skewer each piece of fruit.
  6. Chill in the refrigerator until ready to serve and ENJOY!

******************************************************

This simple recipe has been added to my growing list of "52 Simple but Next Level Dishes"!

Kind of an odd title for these posts. But the longer sentence is... Simple recipes that are easy and inexpensive that will take your cooking to the next level... Things like easy pickled items (I always have a jar of Pickled Red Onions for sandwiches in my fridge). Or how about the easiest bread to make in the world... Beer Bread that is tasty on it's own but also makes a wonderful open face pizza style sandwich... With easy to make Tomato Sauce. Or how about Roasting Garlic for a spread on toast points for a unique appetizer. Infusing Oil with Herbs or spices or spicy peppers. Or how about making your own BBQ sauce. Nothing sets you apart as a grill master like setting out a jar of your own specialty BBQ Sauce.

You get the idea. These recipes are very simple, take very little time but will set you apart as a better cook...

*************************************************************************

So,  I am pleased to list this as one of my Growing list of  "52 Grilling Time Secret Extras" or "52 Ways to Cook BBQ and Grilling Recipes"!!!

Well over 52 recipes actually as I just can't stop... Over 100 in one grilling season (I love to grill!). But not just leat... Drinks, Condiments (LOTS of different BBQ sauces), Drinks, Desserts... even specialty items like GRILLED Pizza, and fun shaped Watermelons.  Easy and these ideas will make you the MASTER of your Backyard Domain!

****************************PINTEREST**************************

Come and find me on Pinterest... Any of my "52 Ways to cook" Boards are worth following.  If you like this post, please take a second and "Pin" this to your own boards... Better yet, if you are part of a foodie group board please take a second and add this post to your group pins... best way to show your Love!

And BTW, if you are not yet part of a group board, drop me an email at Contact@eRecipeCards.com and request to be added to my group board... FAVORITE FOOD BLOGGERS! (be sure to include your pinterest ID when you write)  Once you are added, any pins you add will be seen by 10s of THOUSANDS of followers of the board (and growing daily).

Rules, only 2... 
  1. In order to join you need to start following the group board as well as at least one of my boards.
  2. And you must ONLY pin original sources, posts from food related bloggers only.  If you are a blogger, this is a great way to have thousands of potential readers see your work,  If you are a fan of bloggers, a great way to share your favorites...
    Come and be a part of ... FAVORITE FOOD BLOGGERS! on Pinterest

Tuesday, September 2, 2014

Cucumber Tea Sandwich with Sun Dried Tomato Pesto - 52 Catering Dishes

Pin It Now!

The illusive hunt...

In my journey towards becoming a caterer, I am challenged by needing to provide dishes that I simply have never thought of before.  One of my regular clients always asks for something for vegetarians that pop in at her lunches.  the other day she asked for a vegetarian tea sandwich.

This is what I came up with.

The Sun Dried Tomato Pesto is FANTASTIC!  The tomatoes are slow roasted to a sweetness that blends with the nutty, salty and herbal ingredients to become a real treat.

There is also a layer of Cream Cheese Spread that has a hint of Ranch Dressing (yep, straight from a bottle of Hidden Valley).

The Cucumbers add a crunch and the Sandwich more than met the request!

So, file this away.  Someday you too may get a request for something Vegetarian to bring to a pass the plate event.

Enjoy


OK... Here's what I did...


Cucumber
Tea Sandwich with
Sun Dried Tomato Pesto


Ingredients
  • For the Sun Dried Tomato Pest
  • 6 Ounces Sun Dried Tomatoes packed in Olive Oil
  • 1 Cup Freshly grated Parmesan Cheese
  • 6 Ounces Walnuts
  • 1 Cup Spinach
  • For the Cream Cheese Spread
  • 1 Brick (4 Ounces) Cream Cheese (softened to room temperature)
  • 1/4 Cup Ranch Dressing
  • For the Sandwich
  • 2 Large Cucumbers, peeled, scored (for scalloped edges), sliced thin
  • Mini Cocktail Rye Bread slices (Can do this open faced or even as a topping for a whole wheat cracker)
Cooking Directions
  1. First make up the pesto... In a food processor, add the Sun Dried Tomatoes, Parmesan Cheese, Walnuts and Spinach. Process until mixed and pulverized. Add additional Oil if needed to reach spreading consistency.
  2. Next, make up the Cream Cheese Spread... in a stand mixer bowl, add the softened cream cheese and Ranch dressing and mix until smooth.
  3. Assemble the sandwiches, one side with the pesto spread, the other with the cream cheese. Cucumber between... And ENJOY!

******************************************************

This recipe has been added to my growing list of "52 Church PotLuck Dishes"!

A list of something NEW worthy of being shown off at a neighborhood BYODish (Bring Your Own Dish) Party, a Family special occasion dinner, Any Big Holiday Gathering or of course that glorious day when you bring a dish to share with your Church family...

Ages ago, literally almost a half century ago I was listening to our pastor talking about a PotLuck Dinner. It happened to be scheduled around a church work day when we were expected to weed, polish and do general cleaning and maintenance around the church (you know, back in the day when there were no no-wax floors and church pews smelled of Old English furniture polish). I am of course paraphrasing, but as I recall the pastor said,

"A potluck, like a church requires work. At a potluck everyone is expected to contribute.. At a church no one should come empty handed and no one should leave unfed".
I will confess that in my youth I brought more store bought plastic spoons and forks than I ever brought covered dishes and crock pots of fresh made love and caring delights. But now that I have become a hobbyist cook, I occasionally am reminded of those days and people from my youth. I reminded and I do wish that I could drop a dish of some new creation on those old tables at my fondly remembered Liberty Baptist Church.  Tables covered with newspapers and loaded with God's bounty prepared with love and caring... Enjoy

***********************PINTEREST*********************

Come and find me on Pinterest... Any of my "52 Ways to cook" Boards are worth following.  If you like this post, please take a second and "Pin" this to your own boards... Better yet, if you are part of a foodie group board please take a second and add this post to your group pins... best way to show your Love!

And BTW, if you are not yet part of a group board, drop me an email at Contact@eRecipeCards.com and request to be added to my group board... FAVORITE FOOD BLOGGERS! (be sure to include your pinterest ID when you write)  Once you are added, any pins you add will be seen by 10s of THOUSANDS of followers of the board (and growing daily).

Rules, only 2... 
  1. In order to join you need to start following the group board as well as at least one of my boards.
  2. And you must ONLY pin original sources, posts from food related bloggers only.  If you are a blogger, this is a great way to have thousands of potential readers see your work,  If you are a fan of bloggers, a great way to share your favorites...
    Come and be a part of ... FAVORITE FOOD BLOGGERS! on Pinterest

Monday, September 1, 2014

Star of the Show BLUEBERRY POKE CAKE - 52 Cakes and Pies at Home

Pin It Now!

This is a new twist on a classic old recipe from my past.  The classic "Poke" cake made famous in any number of Ladies Home Journals type magazines from the 50's and 60's.

I can still recall seeing this very cake in my own Church Potluck dessert table almost 45 years ago.  The Ooohs and Aaahs from the Church basement Ladies still ring in my mind.

And I can still recall the very same Ooohs and Aaahs I received when I served this last night!

But the dirty little secret is that this is about as easy as it gets.  Store bought cake mix is transformed into something special with just a few pokes of a chopstick.

Take a look at the photos and instructions below.  It really is easy.  It really is spectacular and you too can get the Ooohs and Aaahs of your guests!  And of course this spectacular looking cake with the extra flavored moisture packed inside will fit into any big family gathering, Pass a plate social or Church PotLuck!

Enjoy!


OK... Here's what I did...


"Star of the Show"
BLUEBERRY
POKE CAKE


Ingredients
  • FOR THE CAKE
  • - I used a White Box Cake Mix, prepared according to the directions on the box (Square Pan (But Round would work as well)
  • Depending on which brand you use, may need additional
  • Large Eggs
  • Vegetable (or Olive) Oil
  • FOR THE SYRUP
  • - 1 Cup Fresh Blueberries
  • 3/4 Cup Sugar
  • 2 Cups Water
  • FOR THE FROSTING
  • - 4 Ounces (1 Brick) Cream Cheese, Softened to room temperature
  • 4 Ounces (1/2 Stick) Butter, Softened to room temperature
  • 2 Cups Powdered SUgar
  • 1 tsp Vanilla
  • FOR THE DECORATION
  • - A Poking Stick (I used a Chopstick)
  • 1 Cup Blueberries
  • 3/4 Cup Raspberries
Cooking Directions
  1. Prepare the cake mix according to the package directions (usually needs Oil and Eggs). This cake needs to be made as a single layer. So make in a Large Round or Square Pan. Allow the cake to cool completely.
  2. While the cake is baking, make the syrup... In a medium heavy bottomed sauce pan, over medium high heat Combine water and blueberries. Bring to boil, add sugar and stir until sugar has dissolved.
  3. Reduce heat and simmer for 20 minutes. Using a slotted spoon, remove skins from the blueberries. Add additional sugar to taste, simmer for another 5 minutes to reduce. Remove from heat and allow to cool for 30 minutes.
  4. While the syrup is cooling, make the cream cheese frosting, in the bowl of a stand mixer, beat the cream cheese and butter together. While the mixer is running at low speed, add the powdered sugar 1/2 cup at a time. Add the vanilla and mix until smooth.
  5. And now time to decorate... Poke holes every half inch throughout the top of the cake. Wiggle the poking stick (I used a chopstick) around a bit for room.
  6. Pour the syrup into each hole, continue to pour until all of the syrup is used.
  7. Refrigerate the cake for an hour.
  8. Turn cake upside down onto a serving plate (I used a cutting board). Carefully trim off 1/4 inch of the entire cake side, exposing the Poked Look.
  9. Frost the top, level off so there is a flat surface to decorate.
  10. For the star look, cut a piece of paper into a star. Lay this paper centered on the frosting.
  11. Now arrange the blueberries decoratively on the top, leaving the star paper blank.
  12. When done, remove the paper and replace with Raspberries. Refrigerate until ready to serve.
  13. Serve chilled and ENJOY!

******************************************************

This simple recipe has been added to my growing list of "52 Cakes and Pies at Home"!

These are the desserts you make for your family.  No fancy amazing wedding cakes, just the rustic beauty of the classics.  From pumpkin pie to cheesecakes to layer cakes, these are what your family craves for dessert.  You may even see a few unusual crusts and frosting ideas to try.

You get the idea. These recipes are simple, delicious and will have your family wanting dessert first...

******************************************************

This recipe has been added to my growing list of "52 Church PotLuck Dishes"!

A list of something NEW worthy of being shown off at a neighborhood BYODish (Bring Your Own Dish) Party, a Family special occasion dinner, Any Big Holiday Gathering or of course that glorious day when you bring a dish to share with your Church family...

Ages ago, literally almost a half century ago I was listening to our pastor talking about a PotLuck Dinner. It happened to be scheduled around a church work day when we were expected to weed, polish and do general cleaning and maintenance around the church (you know, back in the day when there were no no-wax floors and church pews smelled of Old English furniture polish). I am of course paraphrasing, but as I recall the pastor said,

"A potluck, like a church requires work. At a potluck everyone is expected to contribute.. At a church no one should come empty handed and no one should leave unfed".
I will confess that in my youth I brought more store bought plastic spoons and forks than I ever brought covered dishes and crock pots of fresh made love and caring delights. But now that I have become a hobbyist cook, I occasionally am reminded of those days and people from my youth. I reminded and I do wish that I could drop a dish of some new creation on those old tables at my fondly remembered Liberty Baptist Church.  Tables covered with newspapers and loaded with God's bounty prepared with love and caring... Enjoy

***********************PINTEREST*********************

Come and find me on Pinterest... Any of my "52 Ways to cook" Boards are worth following.  If you like this post, please take a second and "Pin" this to your own boards... Better yet, if you are part of a foodie group board please take a second and add this post to your group pins... best way to show your Love!

And BTW, if you are not yet part of a group board, drop me an email at Contact@eRecipeCards.com and request to be added to my group board... FAVORITE FOOD BLOGGERS! (be sure to include your pinterest ID when you write)  Once you are added, any pins you add will be seen by 10s of THOUSANDS of followers of the board (and growing daily).

Rules, only 2... 
  1. In order to join you need to start following the group board as well as at least one of my boards.
  2. And you must ONLY pin original sources, posts from food related bloggers only.  If you are a blogger, this is a great way to have thousands of potential readers see your work,  If you are a fan of bloggers, a great way to share your favorites...
    Come and be a part of ... FAVORITE FOOD BLOGGERS! on Pinterest

FMP