

OK, Here's another post that if you ask 100 bloggers what they do, you will probably get at least 20 different answers.
But, this is what I do, with the program I use and I am content. i am sure there are better, more professional ways to do this, but Bottom Line... This works for me and my Food Blog is better because I use a FREE Photo Editor.
OK, I am going to go through my process, with a whole lot of screen grabs. BUT, it is incredibly easy to get started. In fact, they have a "Getting Started Guide" that explains better than I how it works. BTw, you do know to just click the blue letters to follow the link.
First, you need to download the free Picasa 3 Software. I have been using this for about two years and there has never been a charge. Free does indeed mean FREE!
Take a rainy (snowy) Sunday afternoon and poke about. push some buttons, follow a tutorial or two and learn what is what and how to make the program do what you want. I can edit my photos in about 1 minute per. And they do look better.
Here is my edited picture of a lemon...

And here is the photo I would use on my blog. It has been color corrected, color enhanced, Cropped and resized...

Not perfect (it has a touch too much blue), but certainly better than the original.
Alright, here's the 101 of how I got from A to B...

Alright, here we go. When you open Picasa, On the left side bar you have choices of files. Mine load automatically as the dates the photos were downloaded into my computer. You can change file names as you like, move photos from one file to another. Me, Date loaded works fine.
Find the photo you want to edit, hover your cursor over the image and RIGHT CLICK your mouse. Select "VIEW AND EDIT" from the options that appear.

And here's my lemon in all of it's unedited glory. Good enough, but not great at all. Too dark mainly, and no ... well, no zing to it. Let's fix that...

On the left side, you see a bunch of tiny photos. One of those reads "I'm FELLING LUCKY". You can fiddle and fiddle with all of the buttons, but most of the time, I just hit the "I'm FEELING LUCKY" button and the image is fixed. That's my secret, one button. See the difference between the photo edited with the "I'm FELLING LUCKY" button and the screen grab just above it with no edits. Picture turned brighter and the color has been improved.
So now it's time to crop...
Back to the left side, all those little photos, one of them reads, "CROP"... OK, that's the button we want.

And look at the options. Manual, and lots of different proportions. Don't get hung up on the actual inches for size, we are going to edit the size (resize) later. But go about half way down and you will see , "SQUARE: CD COVER" as an option.
HOORAY, conveniently enough, most of the recipe submissions sites (including eRecipeCards.com), wants you to submit square images! Once you click the square button, you get a standard LIGHT COLORED BOX over a darker back ground. You can move the box and select just the image you want. You can also resixe the light box by dragging the corners. So that you end up with this...

And we are almost done! All that I need to do now is to resize. Now, there are LOTS of benefits to resizing. Best of all, your blog will load faster. My photos as taken are more than 2,000 to 3,000 pixels square. If I left them that size, the photos would take a couple seconds to load if using high speed internet connection. But if I use dial up, they can take up to a minute. Bad for my blog.
By cutting the size down I can confidently add several photos to each post without worrying about the load time.
And of course, a resized photo is MUCH easier to load on eRecipeCards.com as well.
NOW, Picasa offers an advanced feature (Still FREE), called, "PICNIK". In fact, one of the buttons on the left (all those little photos) reads, :EDIT IN PICNIK". You can click that button, and resize easy enough, but I do not use it. Bottom line, it takes several seconds to load an image into PICNIK, edit and save. Actually, several minutes to complete the task. If Picasa is the only photo editor that you have on your computer, go ahead and resize with PICNIK. Better to resize even if it takes a couple of minutes.
OR, I discovered my computer came pre-loaded with Microsoft PAINT. I do not do much with Paint, other than RESIZE. Combined with Picasa, it is easy and takes seconds to resize...
First, at this stage, you are done with the image in Picasa, but it needs to be saved. Left click the top left side option of "FILE" and click "SAVE"!
OK, back to resizing...
Here's what I do...

OK, look at the image above. Still in Picasa, move your courser over the image and right click. On the option list that appears, one of them is, "OPEN WITH". See that little tiny arrow to the left, same row as "Open With". Hover the cursor over the little arrow (do not push anything yet) and magically, more options appear. On my computer, one of those options is, "OPEN IN PAINT". If you have that option, push that option (left click this time).

OK, the image is TOO BIG to even fit on the screen. So, let's resize in just a couple of clicks. In the row of control buttons, third column from the left, you see 3 options... Crop, resize and rotate. We want to hit resize...
And here is what appears...

See the 100. That is the percentage. Just highlight the first 100, I reduce to just 22 percent and hit OK...

And fast as you can say, Bob's your uncle"... A resized photo appears.
BUT
One important step is left. Save the photo.
Still in Paint, the top row, far left side has a dark blue button. Move your cursor over that, left click it and you have more options... One of which is SAVE.
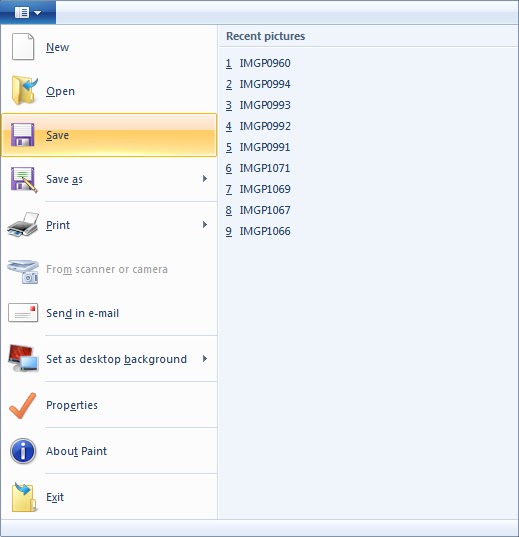
Click that and the photo is SAVED!!! Edited for color and brightness, cropped and now resized!
This was one of the most important ways that I have made my Food Blog BETTER!
Cool! I'm bookmarking this so I can come back to it & try it out! I definitely need help with my photos! Thanks for sharing your tips! :)
ReplyDeleteHi Dave, Thanks for editing my eRecipeCard entry.
ReplyDeleteI found your section How To Make a Food Blog Better very useful. I like the idea with printable recipes.
All the best,
Selena
http://garnishfood.blogspot.com