


 OOOOO... AAAAAAA... Give me 5 bucks.
That's the going rate for one of these little jewels. Or just make a whole bunch for under $10 and they are MUCH easier than you would think.
About the only thing you might need is a small piping bag with a small tip to make the buttons and bow tie. But actually, you can do the same thing with just a toothpick dipped in the chocolate. Other than that, I temper my chocolate in a microwave, use the greens on the strawberries to hold onto them and a glass bowl to melt the chocolate in.
The "value" of these is more in the look and romance of the term, "Chocolate Covered Strawberries". so really you can get just about the same effect if you use a regular Hersey Bar for the chocolates. Of course, if you are making these for a chocolate snob, you may want to spend a little more and get the good stuff.
Me, I compromised and bought 3 Ghiradelli chocolate bars. They worked great for these.

3 bars at $2 each, a Box of a dozen strawberries on sale for $2.50. Total cost for a dozen chocolate covered strawberries... $8.50... About 75 cents each!!!
A few tricks, first and most important, Temper your chocolate. Chocolate is an emulsion. Meaning it is a combination of ingredients that do not mix well. Fortunately, if the chocolate you buy is kept under 90 degrees, the chocolate will melt without the butter fat separating. If you have ever worked with chocolate and had a little pool of butter form around the edges, this is why.
Here's my illustrated tempering chocolate 101 tips...
TIP #1
Divide your chocolate into separate 1/4 of the chocolate you are going to melt.

Tip #2
Melt 3/4ths pf your chocolate slowly. I prefer to melt mine in a microwave, bit if you go old school and melt in a double boiler, just be sure to NOT boil the water. Ideally you will heat the chocolate to only @85 degrees or slightly cooler. I just break up my squares into a microwave safe bowl. Set the timer to 30 seconds and the power level to 50% and stir. Repeat until the chocolate is completely melted but not HOT. the bowl will feel a tad warm, but never hot to the touch.

Tip #3
Chop the remaining 1/4 of the chocolate into small fine pieces. Smaller the better. The residual heat in the microwaved chocolate will melt the remaining amount. It also cools the chocolate down a bit so that it will easily harden or set quickly when you start working. Just stir in the remaining chocolate bits and keep stiring until the chocolate is melted. It will feel noticeable thicker than the chocolate from the microwave. It sets up pretty quick, so you will want to be ready to work. If need be, a couple of seconds in the microwave (50% power) will soften the chocolate up.


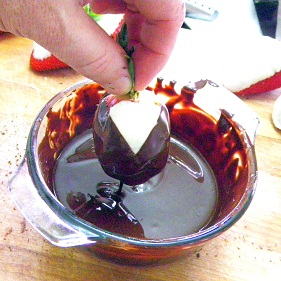
OK, now that we have tempered chocolate, we are ready to work. First thing is to make the white shirt of the tuxedo. You do not need to coat the entire strawberry, just the front section. Look closely at the photo below and you will see what I mean.

Before you dip the strawberries, it is important to dry them with a paper towel before dipping.
Also, there are a few people who like white chocolate, so I always dip a few all the way and do not use any dark chocolate on them. You can decorate those with just a quick flick of some melted chocolate on fork tips. Or wait until you have the dark chocolate melted and flick a few lines of the other color...

And next, it's time to add the chocolate jacket to your tuxedo...
Once you have all of the white finished, temper the dark chocolate in the same way you did the white.
Not much trick, just be careful of how much white you cover up. The white is the front, so dip the back of the strawberry first, Angle the berry and roll to form a lapel over the white. Then roll to the other side for the lapels. They should form a V of white, surrounded by the dark. You will also get nice straight lines.


If you have your chocolate tempered properly, the chocolate will set up pretty quick. I hold mine for about a minute before resting them on parchment paper. This way the strawberries have a hard crisp shell formed before I set them down. This prevents the amateur looking glob of melted chocolate from forming after you set them down.
"I am only one man", meaning I was not able to photograph the button and bow tie accents while i was making these. The chocolate can be added with a small piping bag and tip, or just as easily added a dot at a time with a toothpick. It's easy, don't worry.

These are best if eaten within a day of when they are made. Otherwise the strawberries start to shrink up inside and get mushy.

My white chocolate was stiffening up as I did the last one, but I thought it reminded me of my High School Prom with my ruffled shirt (back when disco was king!).
But i was able to get a nice plate full for my wife. A few different looks for Chocolate Covered Strawberries... Each one under a dollar!
And always more appreciated when the love of your life knows they were hand made just for her!

Dave, I am in LOVE! I am in love with your tuxedo clad strawberries! What a STELLAR idea, I love them! I am going to try to make these if I can get strawberries!
ReplyDeleteKaren
Those are TOO adorable! Fun to do w/ the kids too! Thanks for sharing at Church Supper. Have a Happy Valentines Day and blessed week. ~EMM
ReplyDeleteAwww .... these are so sweet! How can anyone not fall in love with them?
ReplyDeleteThese are so cute! I'd love for you to share them at Mix it up Monday:
ReplyDeletehttp://flourmewithlove.blogspot.com/2012/02/mix-it-up-monday_12.html
I hope to see you soon :)
Ha ha ha, really smart recipe! good one!
ReplyDeleteGreat #chocolatelove bloghop! ;-)
Adorable! How in the world did you get the bow ties down so well? Awesome presentation of the strawberries - they look tasty and eye catching - would definitely excite anyone who received them. Thanks for the tempering tips...most of the time I melt chocolate, I end up with a mass of grainy chocolate and have to keep adding cream until it smooths out. ;)
ReplyDeleteHi Dave, I was pretty busy this weekend so I could not come sooner to see your work.
ReplyDeleteNice job on the strawberries. The tuxedo and bowties are regular and very nice looking. As for the tempering the result is good too, but if you want to have a better control over your chocolate, I would suggest to use a double boiler AND a thermometer (yes, very old school). This way you can be very precise on the temperature curves ; For dark chocolate : 45°-50° C/27°C/32°C, For milk : 45°C/27°C /30°C and for white : 45°C/27°C /29°C.
Nice job overall.
Wowwww
ReplyDeleteThese are sooooooooo cute and adorable - I just love it!
This is a really good thing to do this summer! Thanks for sharing this wonderful recipe! I'll make sure I'll do this at home!
ReplyDelete