Showing posts with label 52 Recipes For Soup. Show all posts

Monday, January 16, 2017

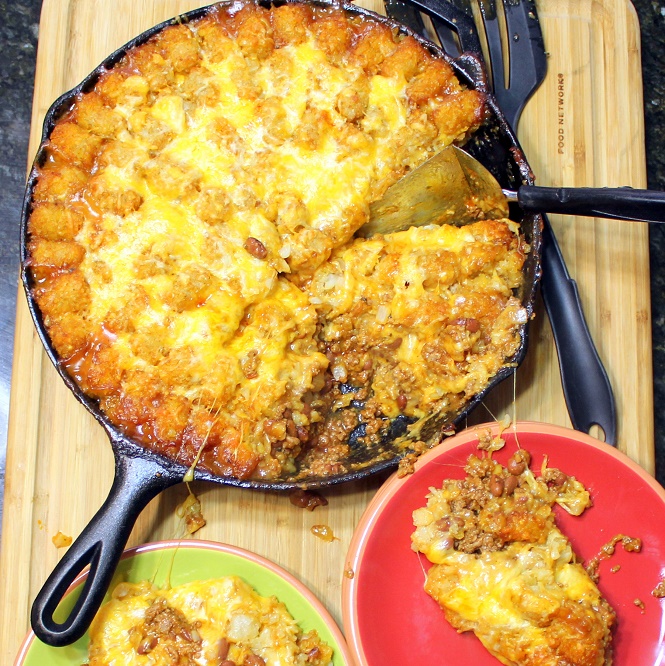
Chili and Tots - EASY Tater Tot One Skillet Upgrade

Pin It Now!

OH BOY, CHILI!

But not just any Chili Recipe, this is incredibly easy, serves up in a casserole form and all topped off with a layer of crunchy cheesy, tasty Tater Tots

  • The recipe is made in a single skillet.  No need to get the kitchen filled with dishes.
  • Comes together fast... Except for cooking time, this takes less than 20 minutes of hands on work.
  • LOADED with plenty of Beans (healthy), vegetables (Well, Onions, healthy as well)!
  • A Kid friendly Tater Tot upgrade.  Look for sales and stock up on these handy frozen wonders.  Topped with crispy crunchy layer of Tater Tots (Kids LOVE this recipe)
  • A layer of Gooey Cheesy goodness throughout and for garnish on the top
  • You can make this the night before, for an easy "pop in the oven" lunch.
Really... What's not to love... And tastes great as well!

Easy to follow recipe below, keep scrolling down.

But I wanted to share a fantastic gift I received... If you don't have one, I highly recommend one of these HEAVY pre-seasoned cast irn skillets.  Large enough to cook most anything.  Pre- Seasoned means the skillet comes ready to cook in.  None of the intimidating tasks that need to be done with a non seasoned skillet... Love this and worth every penny.  And remember Amazon ships free on orders over $25!


Keep scrolling down, recipe below.


 OK, Here's What I Did...

Chili and Tots

Ingredients
  • 1 pound Hamburger
  • 1 Medium Onion, Diced
  • 1 Can (15 Ounces) Chili Beans
  • 1 Can (15 Ounces) Tomato Sauce
    (Pizza Sauce or Pasta Sauce)
  • 2 TBS Chili Powder
  • 1 tsp Garlic Powder
  • 1 tsp Onion Powder
  • 1/2 tsp Red Pepper Flakes
  • 2 Cups Cheddar Cheese
  • 1 Cup additional Cheddar Cheese for topping
  • 2 Pounds Frozen Tater Tots
Cooking Directions
  1. In a very large skillet, Brown Hamburger on medium high heat, breaking up the meat. Once cooked through, add the diced onion and saute with the hamburger for 5 minutes.   Drain the rendered fat from the skillet.. 
  2. Add the seasonings, Chili powder, Onion Powder, Garlic Powder and Red Pepper Flakes.  Stir to evenly mix and evenly flatten the meat in the bottom of the skillet.
  3. Evenly sprinkle 2 cups of cheese over the hamburger
  4. Layer top with frozen tater tots. If not baking right away, cover tightly with foil and chill in fridge until the next morning.
  5. When ready to bake, set oven to 350F with rack on middle position. Once oven reaches 350F, place casserole in oven for about 35 minutes.
    Top with additional 1 cup cheese,
    Bake another 5-10 minutes or until sides are bubbling and top is golden brown. Let rest at room temp 10 minutes, and serve.
  6. Serve Hot and ENJOY!

Saturday, January 7, 2017

WORLD's BEST Black Eyed Peas Sausage Soup

Pin It Now!

 OH BOY SOUP!!!

But not just any soup, this is that traditional New Year's Day "Good Luck" Soup.  For million's, it would be unthinkable not to celebrate the New Year without Black Eyed Peas in some form.  This is without a doubt, the world's best way to have good luck throughout the year.

But, it is also good enough to have anytime of the year.  This is good, not just a gimmick good, I mean really, "Talk about Good" good.

Plenty of sausage for the meat lovers, plenty of vegetables for the health conscious, plenty of color (traditional Collared Greens (can use spinach or even Kale) and the high protein of a full pound of Black Eyed Peas.  Delieicous in so many ways.

You can see in the photos, I added a pan of Mississippi Corn Bread as a side.  See yesterday's post for that easy to follow recipe.  This specialty Corn Bread is indeed the perfect side dish for this soup.  Sturdy enough to pour the soup over without disintegrating into corn dust and with plenty of flavors to compete with the loaded flavors of this BEST EVER BLACK EYED PEAS SOUP!

Keep scrolling down for this easy to follow recipe.

This does call for a couple of specialty items to pull this off with style.  You can certainly make do with any old soup pot, but if you make a lot of soups and stews you will grow to love a Dutch Oven.  Look for one that is Ceramic lined for easy cleaning, HEAVY for even heating and stylish, able to go from oven to table with flair.

And I finally splurged this year for a presentation Crock Pot that travels well... Like these...


IK... Good Luck to all and Happy New Year... Keep scrolling down, the recipe follows.


 OK... Here's what I did...

Black Eyed Peas
Sausage Soup

Ingredients
  • 1 Pound Black Eyed Peas Soup
  • 4 quarts Salted Water to soak the peas overnight
  • 1 Pound Italian Sausage, Browned...  bulk sausage.  If you have links, remove casing
  • 2 Medium Onions, diced
  • 6 Stalks Celery, cut into dime size 1/4 inch slices
  • 1 Head of Fennel, sliced thin then chopped into 1 imch pieces
  • 4 Cloves Garlic, Minced
  • 2 TBS Herbes de Provance
  • 1 TBS each Salt and Pepper
  • 2 TBS Cajun Spices
  • 1 Gallon Chicken Stock
  • 1/2 Cup Parmesan Cheese
  • 1 Bunch Collared Greens, cut into ribbons
  • 1 stick Butter (8 TBS)
  • 8 TBS Flour
Cooking Directions
  1. Place beans in a large bowl and cover with 3 quarts of water. Add 2 tablespoons kosher salt and set aside at room temperature overnight. (See note above)
  2. In a large heavy Dutch Oven Add sausage and cook, breaking it up with a wooden spoon or potato masher until starting to brown, about 8 minutes total. Add onion, Fennel and celery and Saute, stirring, until softened, about 4 minutes. Add garlic, and Seasonings (Savory, Herbes de Provence), Spicy (Cajun Spice), Salt and pepper, until fragrant, about 30 seconds. Add chicken stock and heat to simmer.
  3. Drain and rinse beans, then add to simmering pot.  Continue to simmer, stirring occasionally, until beans are fully softened, about 1 hour. 
  4. Make a thickening Roux.  In a heavy bottomed Saute pan, Melt the butter over medium low heat.  Add the flour and stir to mix.  Continue stirring non stop for about 5 minutes until the roux just starts to darken and there is a hint of a nutty aroma.  Be careful to not burn the roux.  It is important to stir this constantly.
  5. Add the roux to the pot, as well as the Parmesan cheese, stir to mix.  
  6. Add the slivered Collared greens.
  7. Transfer to a Crock Pot Slow cooler and provide a delicious hot soup throughout the day...
    Good Luck to all
    Happy New Year and of course... ENJOY!

Thursday, December 22, 2016

Williamsburg Stew - Leftover Turkey Soup

Pin It Now!

 Oh Boy Soup...

But not just any Soup, this is made from Turkey Day left overs!  The consistency is kind of a soupy Jambalaya.  In fact the recipe sounds very similar to a Jambalaya.  But we become French when we add the Carrots in place of the Cajun Bell peppers.  We add a creamy broth with the addition of Half and half, but the look will certainly remind you of the classic Cajun dish.

I am not sure why this is called a Williamsburg Stew.  I tried to do a little research, but mostly I came up with a beef stew.  But, I adapted the recipe from a very old Southern Living cookbook.  So , we'll stay with their title and call my adaptation a Williamsburg Stew as well.

I especially like the idea of using leftovers right away.  Love Love Love turkey on the day, but there is something special about a steaming hot bowl of soup from a BIG pot on the next day.  Lots of coming and going, set this on the stove and relax for the day.

Not much of a trick at all to make.  I do love using my beloved ceramic lined cast iron dutch oven for this.  Simply the best for soups and stews.  The one listed below has all the bells and whistles without the couple of hundred dollar price tag that comes with some of the best dutch ovens.

Heavy, easy to clean, Ceramic non stick lined, Cooks beautifully with even heating all around and beautiful.  Remember, free shipping from Amazon on orders over $25.


Keep scrolling down, easy to follow recipe to follow.


 OK... Here's what I did...

Williamsburg Stew
Leftover Turkey Soup

Ingredients
  • 1 Turkey Carcus (to make Turkey Stock)
  • 4 Quarts Water
  • about 2-3 Pounds of Meat from the Turkey (1 Leg/thigh and 1 Breast), bones removed, diced
  • 1 Cup butter
  • 1 Cup Flour
  • 2-3 Onions. chopped (3 Cups)
  • 4 Celery Ribs, Chopped (1 and 1/2 Cups)
  • 4 Large Carrots, Chopped (1 and 1/2 Cups)
  • 4 Cloves garlic, Smashed and Minced
  • 1 Cup Long Grain Rice
  • 2 tsp Salt
  • 2 Cups Half and Half
  • 2 tsp Pepper Plus additional to garnish top
  • 2 tsp Cajun Mix Plus Additional to garnish top
  • Serve with additional Cajun Spice and Hot Sauce
Cooking Directions
  1. Place turkey carcass and water in a Crock Pot, set the setting on low and cover.  Simmer for at least 4 hours, but you can simmer for as long as 24 hours.
  2. Strain the Turkey Stock from the bones of the carcus, set aside Stock
  3. Heat butter in Dutch oven; add flour and cook over medium heat stirring constantly 5 minutes.
  4. Stir onion, carrot and celery into roux; cook over medium heat 10 minutes, stirring often.
  5. Add minced garlic and stir to mix.
  6. Add broth, turkey, rice, salt and pepper; bring to a boil. Cover, reduce heat. Simmer 20 minutes.
  7. Add half and half. Heat through.
  8. Season with Salt and Pepper to taste.  Add Cajun Spices to taste.
    Garnish top with additional Pepper and Cajun Spices for color.
    Serve HOT and ENJOY!

Friday, October 28, 2016

SECRET INGREDIENT Jalapeno Cornbread - Jiffy Mix Upgrade

Pin It Now!

 OH BOY CORNBREAD...

But not just any cornbread.  This recipe uses "America's Favorite" CornBread mix but we do a major upgrade from the recipe on the box to make this a family favorite that pops up at a lot of get togethers, Chili feeds and potluck suppers!

I have a secret ingredient that will make this pan memorable.  Memorable since most cornbread becomes grainy, dry and has an unpleasant texture after being left out for only a fraction of an hour.

This cornbread is different because of the secret ingredient... Sour Cream in place of the milk that is called for on the box.

Yeap, Sour Cream will add fat content to your bread.  Fat is not a dirty word, fat in bread will add moistness.  When creamed with Jiffy Mix, the batter looks and acts the same, just has extra fat content... extra moistness in the mix.

For this particular bread I did add some fresh Jalapenos, minced fine.  Be sure to remove the seeds and especially the white inner rib membrane before adding to the bread.  It's the seeds and the white membrane that is the real HOT part of the pepper.

Of course add the pepper "to taste".  If you and your guests like a little extra spice, add extra jalapenos.   If you prefer a calmer bread, add a little less.  You can easily add a minced Green Bell pepper to the batter to get the speckled green look.

Give the secret ingredient a try.  You may never make cornbread the old way again...

And of course, ENJOY!

 OK... Here's what I did...

Jalapeno CornBread
Super-Moist Jiffy Mix Upgrade

Ingredients
  • 2 Boxes Jiffy Mix Cornbread mix
  • 2 Eggs, whipped
  • 1 Cup Sour Cream
  • 4 Jalapeno Peppers, seeds and white membrane removed, minced
  • Non-Stick Spray
  • Serve with Honey or Butter
Cooking Directions
  1. Preheat oven to 400 degrees.
  2. Prepare a 9X13 Casserole pan with non-stick spray.
  3. In a large bowl, combine the Jiffy Mix, Eggs, Sour Cream and Jalapenos
  4. Pour the batter into the pan.  Bake 20 minutes until the top just starts to brown.
  5. Serve Warm with honey or butter
    ... and ENJOY!

Thursday, October 20, 2016

GO CUBS GO Ernie Banks "Let's Make Two pots" CHILI

Pin It Now!

As I am writing this I am basking in the glow of October baseball unlike anything I have ever had in my life.  Last night, my beloved Chicago Cubs won their first post season Pennant series in Wrigley Field in over 100 years... Indeed, party like it's 1908!  50 years of being a Cubs fan and I was reduced to a few tears as I watched the celebration.

50 plus years ago I was a wee lad loving the Cubs of the 60's.  Living just under 200 miles away from the friendly confines I even have a few memories of attending some games live!  The line-up included some of the greatest ball players of all time, Ron Santo, Don Kessinger, Randy Hundley, Fergie Jenkins and possibly the greatest player to ever wear the uniform... ERNIE BANKS!

Ernie is one of those rare childhood heroes who never disappointed.  He played to win as much in his declining years as in his glory years.  He set record after record.  His personal life was a shining example of sportsmanship and enthusiasm.  He knew he had fans that read about his every move and he led his life accordingly.  My hero then and still now.

He became famous for enthusiastically saying, Let's play Two".  Back before the multi million dollar salaries and players changing team loyalties with nonchalance, Ernie loved the game.

And so, I am dedicating this recipe to my hero and the good times in October I am finally having...

Ernie Banks, "Let's Make Two Pots" Chili!

Best to plan ahead, make a couple pots since
A)... the chili is that good that you need two pots to avoid the disappointment of being finished prematurely.
and
B)... You may as well make extra since you now need to have a bowl every time the Cubs (or Royals) play in the post season.  Tastier superstition than not changing your underwear.

OK... enough of my October fantasies, let's talk about this recipe (BTW, keep scrolling down... It's there).

Recently I received a copy of The Chili Cookbook: A History of the One-Pot Classic, with Cook-off Worthy Recipes from Three-Bean to Four-Alarm and Con Carne to Vegetarian!  And sure enough, filled with Chili recipes.

But also SO MUCH MORE.

Chili is one of those dishes that means different thing to different people worldwide.  Robb Walsh, the author, researches and explains many of them.  From the chuck wagon roots of the 19th century cattle drives in Tex-Mex country, to world wide origins of Hungarian goulash and Greek recipes.  Even featuring the Burber Pirate recipe for Tagine.  All lay claim to the "authentic" recipe and all are right.

Me, I love the chili of my youth, the chili of central Illinois... the chili of ground beef (who could afford steak in their chili?) and beans.  Talk to the authentic chili people and they would be vexed by those words.  In Texas my mama's chili would not even be considered chili.  But in Illinois we would not have ever been offered steak and spices chili that wins all the contests in Texas.

This book features all those recipes and more and explains why your chili is indeed authentic.  The prose is rich in history and traditions.  Century old stories and modern twists get equal respect.  Read a few chapters and you get caught up in the glory that is... CHILI!

Here's the legal stuff... "I received this book from Blogging for Books for this review." But the review and opinions are 100% accurate and mine!".  Love this book and highly recommend it!

The recipe (keep scrolling, it's here), I chose to make from the book (one of many I have marked to try) is actually called "Illinois Chilli with Two "L's"".  Has lots of different seasonings and pays homage to my mother's recipe... ground beef, beans and all!

It is also comforting, nostalgically delicious.  the perfect food for the boys of summer to celebrate the last few days in the sun.

Cubs and Royals all the way (you heard it here first)... Go ahead, you'll need to make a double Pot!


 OK... here's what I did...


Ernie Banks
"Let's Make Two Pots"
CHILI


Ingredients
  • 5 Pounds Ground Beef (80/20 percent fat), browned, reserve the rendered fat
  • 2 White Onions, diced
  • 5 Stalks Celery, diced
  • 4 Cups Chicken Stock
  • 2 Cups Tomato Juice
  • 1 TBS Garlic Powder
  • 4 TBS Chili Powder
  • 1 tsp Cayenne Powder
  • 4 TBS Sweet Paprika
  • 4 TBS Cumin
  • 1 tsp Oegano
  • 2 tsp Pepper
  • 2 TBS Brown Sugar
  • 4 - 15 OZ Cans Chili Beans, with liquid, do not rinse
  • 1 - 28 OZ Can Diced Tomatoes with Liquid
  • 1/2 Cup Flour
Cooking Directions
  1. In a large Frying pan, brown the ground beef, reserve the renderings.
  2. Meanwhile, in a VERY LARGE or in two just large dutch ovens or chili pots, combine the Onion, Celery, Chicken Stock, Tomato Juice, Garlic Powder, Chili Powder, chili Powder, Cayenne Pepper, Paprika, Cumin, Oregano, Black pepper, Brown Sugar, Beans with liquid and Tomatoes with liquid, Stir to blend.
  3. Add the Ground beef and again stir to mix. Cover and simmer for 20 minutes.
  4. Warm the rendered fat from the ground beef, add the flour to the renderings and stir to mix. Continue to stir and heat over medium low heat for about 5 minutes until a thickening roux forms.
  5. Check the Chili, taste. Add additional seasonings (more Chili Powder, Cayenne pepper or black Pepper if the chili needs to be spiced up) to taste. Know that as the chili continues to simmer (or sits over night) the spices will intensify.
  6. Stir in the thickening roux to make a thicker gravy.
  7. Serve HOT with dollops of Sour Cream if the chili is too spicy, extra cheese, raw onion, crackers (I like Fritos with this) and Jalapeno Peppers and ENJOY!

*************************************************************************

So,  I am pleased to list this as one of my Growing list of  "52 Recipes for Soup, Chili or Chowder" (Now more than 52 and still growing)

Soup from Scratch is one of the great kitchen joys.  The house smells amazing and the soup warms to the bone.  From broth to chowder, vegetarian to loaded up chili... Even a great idea for a party (love the Potato Soup Bar idea).  Come take a look, sure to have something you might like to try.  All recipes have been tested and WORK!

******************************************************

This recipe has been added to my growing list of "52 Church PotLuck Dishes"!

A list of something NEW worthy of being shown off at a neighborhood BYODish (Bring Your Own Dish) Party, a Family special occasion dinner, Any Big Holiday Gathering or of course that glorious day when you bring a dish to share with your Church family...

Ages ago, literally almost a half century ago I was listening to our pastor talking about a PotLuck Dinner. It happened to be scheduled around a church work day when we were expected to weed, polish and do general cleaning and maintenance around the church (you know, back in the day when there were no no-wax floors and church pews smelled of Old English furniture polish). I am of course paraphrasing, but as I recall the pastor said,

"A potluck, like a church requires work. At a potluck everyone is expected to contribute.. At a church no one should come empty handed and no one should leave unfed".
I will confess that in my youth I brought more store bought plastic spoons and forks than I ever brought covered dishes and crock pots of fresh made love and caring delights. But now that I have become a hobbyist cook, I occasionally am reminded of those days and people from my youth. I reminded and I do wish that I could drop a dish of some new creation on those old tables at my fondly remembered Liberty Baptist Church.  Tables covered with newspapers and loaded with God's bounty prepared with love and caring... Enjoy

***********************PINTEREST*********************

Come and find me on Pinterest... Any of my "52 Ways to cook" Boards are worth following.  If you like this post, please take a second and "Pin" this to your own boards... Better yet, if you are part of a foodie group board please take a second and add this post to your group pins... best way to show your Love!

And BTW, if you are not yet part of a group board, drop me an email at Contact@eRecipeCards.com and request to be added to my group board... FAVORITE FOOD BLOGGERS! (be sure to include your pinterest ID when you write)  Once you are added, any pins you add will be seen by 10s of THOUSANDS of followers of the board (and growing daily).

Rules, only 2... 
  1. In order to join you need to start following the group board as well as at least one of my boards.
  2. And you must ONLY pin original sources, posts from food related bloggers only.  If you are a blogger, this is a great way to have thousands of potential readers see your work,  If you are a fan of bloggers, a great way to share your favorites...
    Come and be a part of ... FAVORITE FOOD BLOGGERS! on Pinterest

Tuesday, October 11, 2016

Best Damn CHICKEN SOUP EVER!!! Crock Pot Easy

Pin It Now!

 OH BOY... Chicken Soup!

But not just any Chicken Soup, This really and truly is THE BEST DAMN CHICKEN SOUP EVER!!! (Well, in my humble opinion).

This soup is brothy, with plenty of chicken stock to help ease the fall/winter aches and pains of daily life.  Just inhaling the aroma as this cooks is a joy.

There is plenty of chili beans added for flavor and a little extra protein.

Plenty of corn... bell peppers, onions (vegetables) for health, presentation colors, flavor and deliciousness!

And PLENTY of flavor.  I use a can of Ro-Tel Tomatoes.  the original version, made with green chilies and loaded with Tex-Mex spiced flavor.  I also added a bit of Cumin.  Cumin is a magical spice I add to almost anything that has cooked tomatoes.  Really brings out that Earthy savory tomato flavor.  Kick in standard Salt and Pepper and you truly do have THE BEST DAMN CHICKEN SOUP... EVER!

I had just a touch of an early Fall cold.  So I made this soup extra brothy to treat my throat.  I added a single can of tomato paste (even more tomato flavoring).  If I were making this just for a nice warm up meal I would have added a second can for extra thick gravy.

After one bowl, my throat was better, fever broke and birds were singing out my window...

BEST Soup EVER!


 OK... Here's what I did...

Best Damn
Chicken Soup EVER!!!

Ingredients
  • 4 Cups Chicken Stock
  • Meat from a precooked, pre-seasoned Rotisserie Chicken Diced (or 4 Chicken breasts, cooked and diced
  • 1 Large can (28 Ounces) Bush's Chili Beans in Chili Sauce, drained and rinsed
  • 1 Can (10 ounces) Ro-Tel Diced Tomatoes and Green Chilis
  • 1 Can (15 OZ) Whole Sweet Corn (can use 2 Cups Frozen Corn)
  • 1 Whole Sweet Onion, Diced
  • 1 Green Bell Pepper, cored, seeded, white membrane removed and diced
  • 1 TBS Cumin
  • 1 tsp Black Pepper
  • 1 tsp Sea Salt
  • 1 Small Can (6 OZ) Tomato Paste (OPTIONAL: one additional can if you want a thicker gravy)
  • Optional, add a dollop of Sour Cream as garnish, flavor and to cool the spices
Cooking Directions
  1. This is a crock pot easy dump recipe.  Dump all the ingredients into a crock pot.  Set the machine on low for soup ready when you get home from work (8-10 hours) or high for a faster cook time, (4 Hours)
  2. Serve Hot with a sandwich or tortilla chips and ENJOY!

Monday, October 10, 2016

Home Made Tortilla Crisps - Taco or Jerk or Cajun Spice mix Flavored (Think Doritos Chips)

Pin It Now!

 OH BOY HOMEMADE CHIPS...

But not just any chips, these are my very favorite thing to serve with soup (like the BEST DAMN CHICKEN SOUP EVER!!! Soup shown in the photos).

Think Doritos.  But Unless I am having a party, I try not to buy a bag of Doritos. I sit and eat the whole bag... Calories Calories.


Plus...

I can flavor these chips as I like.  The BEST DAMN CHICKEN SOUP EVER!!! Soup shown in the photos has a Tex Mex spice.  So I added a sprinkle of Taco seasoning on each crisp.  Like a wine pairing, I pair my crisps ;)

  Very simple really.  I can whip these up with just a minute of hands on work and 5-10 minutes of cooking time.  Time to reheat the soup.

Cut soft tortillas into the shape you like...
Brush with melted butter...
Dust with spice...
Bake...

and of course... ENJOY!


  OK... Here's what I did...

Home made
Tortilla Crisps
Think Doritos Chips

Ingredients
  • 6 Soft Tortillas
  • 1/2 Cup (1 Stick) Butter, melted
  • 6 tsp Taco Flavored Spice Mix
    (can substitute spice mix of your choice for different flavored crisps)
Cooking Directions
  1. Preheat the oven to 375 degrees,
  2. Using a pizza cutter cut the tortillas into strips or pie shaped triangles
  3. Lay the tortillas in a single layer on a cookie sheet.
  4. Brush each strip or triangle with the melted butter
  5. Sprinkle the spice on each tortilla piece.
  6. Bake in oven for about 5 -10 minutes until the crisps begin to get golden brown and delicious, and have hardened to a texture similar to a Doritos chip.  Baking time mostly depends on how you like your crips.  I like them crispy, my wifr likes hers with a little doft chew texture in the center.
  7. Serve with Soup and ENJOY!

Saturday, October 8, 2016

Cheddar Cheese Mustard Swirl Honey Wheat Bread BREAD MACHINE EASY - Photo DIY Essay

Pin It Now!

 Oh Boy Fresh Made Bread...

But not just any fresh made bread, this has such an incredible presentation.  Beautiful stunning presentation with the swirled braided look on top.  But the star of the show is the swirl center with ribbons of cheese throughout.

Such a a winner.

I like to use a wheat dough recipe (with honey) for this recipe.  Adds a little extra strength to the dough to hold up to all the extra moisture added with the cheese and mustard.

This is very easy to do.  Just takes a little know how.  So, here's a photo essay to give you that know how...


First, run the bread machine (keep scrolling down for the easy to follow recipe).

On a lightly floured surface, roll the dough out to a large rectangle...

 Next, slather the Mustard evenly on top of the rectangle of dough.
 Then Sprinkle the cheese on top of the mustard.
 And then roll the dough up tight to form a long tube.
 Now, Slice the tube lengthwise.  Some of the cheese will spill out.  Just tuck it back in.
 Start your braid look.  Put half the tube on top of the center of the other half (Open part on top of each half).
 And just tuck under both half until you have a braid
 Cut in half, put each half into a prepared bread loaf pan.
 Put in a warm dry spot, cover with a towel and allow a second rise for 1 hour, until the dough has risen double.
Bake in a preheated 350 degree oven for 25 minutes.  Allow to cool in the pans for 20 minutes before removing and slicing.

And that's it... easy peasy, spectacular, fun presentation and DELICIOUS!

Keep scrolling down for the easy to follow recipe.


 OK... Here's what I did...


Cheddar Cheese Swirl
Honey Wheat Bread
BREAD MACHINE EASY


Ingredients
  • 1 Cup plus 2 TBS Warm (100 degrees) 2% Milk
  • 2-1/2 Cups White Bread Flour
  • 1/2 Cup Wheat FLour
  • 1-1/2 TBS Powdered Milk
  • 2 TBS Honey
  • Large pinch Salt
  • 2 TBS Butter
  • 1 package (2-1/4 Oz) Bread Machine Fast Acting Yeast
  • FOR THE CHEDDAR MUSTARD SWIRL
    1/4 Cup Plus an additional 1/4 Cup Whole Grain Mustard
  • 1 Cup Plus an additional 1 Cup Cheddar Cheese
Cooking Directions
  1. Set your bread machine to the "Dough" setting. This recipe makes 2 swirled loaves.
  2. Put all of the ingredients in the machine in the order listed. NOTE: be sure to warm the milk slightly to about 100 degrees but NO HOTTER than 120. I microwave mine for 30 seconds.
  3. Run the machine according to manufacturer's instructions. Meanwhile prepare the loaf pan(s) with nonstick spray.
  4. When the machine has run it's course, the dough should be rising, double in size. Remove from the machine box and knead for just a minute. You may need to add a sprinkle of flour if the dough is too sticky.  Prepare 2 standard size loaf pans with non-stick spray
  5. Divide dough into 2 equal pieces.  On a floured surface, roll the first dough ball into a flat rectangle, about 12X24 inches.
  6.  Spread the first 1/4 Cup Mustard evenly over the flat bread dough.  Then sprinkle the first 1 cup cheese just as evenly over the mustard.
  7. Roll the dough into a log starting with the short end – picture rolling a jelly roll. Pinch the seam.
  8. Slice the roll in half the entire length of the roll and face the cut sides up as best you can. Cheese will spill out – just tuck it back into place.
  9. Pinch the farthest end from you. Carefully bring the piece on the left side over the piece on the right side. Repeat, completing the twist. Pinch the end closest to you.
  10. Carefully transfer the twist into your prepared loaf pan.
  11. Repeat with second dough ball.
  12. Preheat the oven to 350 degrees. Transfer the loaf pan(s) to the top of the oven, cover with a towel and allow the bread to rise a second time for 1 hour.
  13. Move to the oven and bake for about 25 minutes.
  14. Allow to cool in the pans for 30 minutes before removing and slicing.
  15. Serve Warm and ENJOY!

FMP