Friday, January 31, 2014

Coconut Cream Pie Scratch DIY - 52 Cakes and Pies at Home

Pin It Now!


This is a very easy pie to make.  But it does require a little work.  You can cut some of that work by using a store bought frozen pie shell.  But really, why would you when it would be just as easy to use a Scratch made DIY BLIND BAKED PIE SHELL.

I just did a post with the recipe I was given my my Mother-in-Law.  Mother Marie is an Old School baker from back int he June Cleaver days (she turns 80 this year).  She is from a big family (over 100 cousins for any family gathering) and has been known to bake over a dozen pies every Christmas or Thanksgiving.  an OLD SCHOOL PRO.  So, click the photo to the right or these blue lettering for a true old school ALWAYS DEPENDABLE Scratch DIY Recipe.

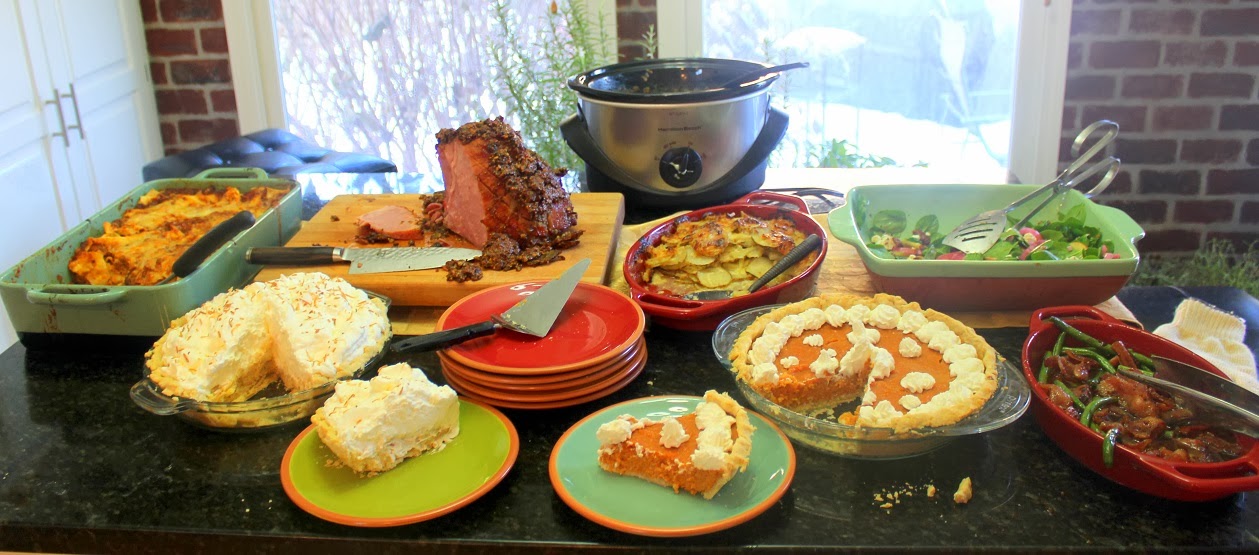
I was trying for an old school effect for this meal.  I was making these pies for my own Christmas Dinner.  A little more modest, around 10 folks came, but deserving of something special (like this pie).  But if you want to try something really interesting, you can go a bit more "New School" with this Pretzel Crust for a Sweet and Salty Pie.  Again, for that recipe click those blue letters or the photo to the left.

Or again, as I said, cheat a bit and make the scratch filling with a store bought frozen crust.

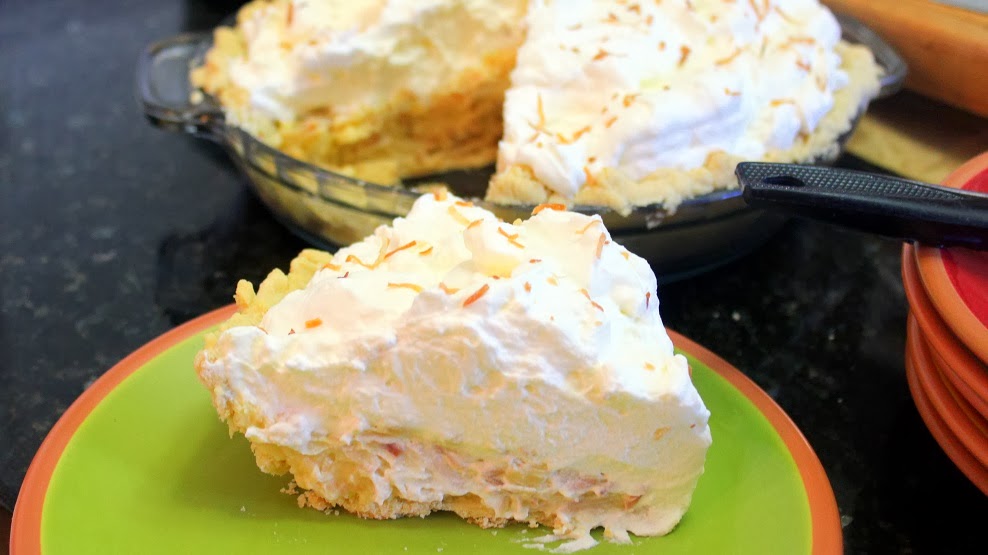
Either way, I love this pie.  DECADENTLY rich and filling.  Beautiful with the extra sprinkling of toasted coconut on top of a thick dome of REAL sweetened Whipped Cream.

The home made custard filling is simple to do.  Just take your time, be careful tempering in the egg yolks into a sugar milk mix (tempering instructions are in the recipe).

Once properly chilled (make this several hours or even a day ahead of time), the pie is set and travels well.  WOuld be a welcome treat for any Family gathering, any Neighborhood PotLuck or for my personal favorite, a Big Church Shared Meal!  The Ooohs and Aaahs of the dramatic domed presentation will make this a memorable addition!

Enjoy!

Keep scrolling down for a look at this easy to follow Scratch Pie Recipe sure to delight!!!


OK... Here's what I did...


Coconut Cream Pie Scratch DIY


Ingredients
  • 1 Blind Baked Pie Shell
  • OR a Blind Baked Pretzel Pie Shell
  • OR a Store bought Frozen Shell
  • 2-1/4 Cups Half and Half
  • 3/4 Cup Sugar
  • 3 Large Eggs, Yolk only
  • 1/4 Cup Cornstarch
  • 1 tsp Vanilla
  • 2 TBS Butter
  • 1-3/4 Cups plus 1/4 Cup for garnish Toasted Coconut
  • 1-2 Cups Sweetened Whipped Cream
Cooking Directions
  1. Preheat the oven to 300 degrees. Spread 2 cups sweetened coconut onto a parchment lined baking sheet. Bake in oven for about 10-12 minutes until coconut has just started to turn brown. be careful to not over bake.
  2. Meanwhile, In a saucepan, whisk the 2 cups of the Half and Half with 3/4 cup sugar.
  3. Place the pan over medium heat and bring the liquid up to a simmer. Whisk the egg yolks together. Temper the hot milk into the egg yolks (add a couple TBS of the milk into eggs, whisk like crazy so they do not cook in the hot mixture. Continue to add small amounts and whisk until fully incorporated.
  4. Whisk the egg mixture into the hot milk mixture. In a small bowl, dissolve the cornstarch in the remaining milk, making a slurry. Whisk the slurry into the hot milk mixture.
  5. Bring the liquid up to a boil and reduce to a simmer. Cook the mixture, stirring constantly, until the filling is thick, about 10 minutes.
  6. Fold in the vanilla, toasted coconut, and butter. Mix well. Pour the filling into the prepared pan and cool the pie completely, at least 3 hours
  7. Make sweetened Whipped cream, vigorously whip 1-2 Cups Whipping cream until soft peaks form (use a stand mixer or a good strong right arm). Add 2 TBS Confectioners Sugar to the soft whipped cream. Continue to whisk until Stiff peaks form/ Add a small drizzle (less than a TBS) of white Corn Syrup and whisk a few more turns.
  8. Top the chilled pie with the sweetened whipped cream. If just 1 Cup, a level top. If 2 cups (as shown in the photo), make a dramatic tall dome). Garnish with remaining toasted coconut. Return pie to the refrigerator for the whipped cream to set, another hour.
  9. Serve chilled and ENJOY!


******************************************************

This simple recipe has been added to my growing list of "52 Cakes and Pies at Home"!

These are the desserts you make for your family.  No fancy amazing wedding cakes, just the rustic beauty of the classics.  From pumpkin pie to cheesecakes to layer cakes, these are what your family craves for dessert.  You may even see a few unusual crusts and frosting ideas to try.

You get the idea. These recipes are simple, delicious and will have your family wanting dessert first...

******************************************************

This recipe has been added to my growing list of "52 Church PotLuck Dishes"!

A list of something NEW worthy of being shown off at a neighborhood BYODish (Bring Your Own Dish) Party, a Family special occasion dinner, Any Big Holiday Gathering or of course that glorious day when you bring a dish to share with your Church family...

Ages ago, literally almost a half century ago I was listening to our pastor talking about a PotLuck Dinner. It happened to be scheduled around a church work day when we were expected to weed, polish and do general cleaning and maintenance around the church (you know, back in the day when there were no no-wax floors and church pews smelled of Old English furniture polish). I am of course paraphrasing, but as I recall the pastor said,

"A potluck, like a church requires work. At a potluck everyone is expected to contribute.. At a church no one should come empty handed and no one should leave unfed".
I will confess that in my youth I brought more store bought plastic spoons and forks than I ever brought covered dishes and crock pots of fresh made love and caring delights. But now that I have become a hobbyist cook, I occasionally am reminded of those days and people from my youth. I reminded and I do wish that I could drop a dish of some new creation on those old tables at my fondly remembered Liberty Baptist Church.  Tables covered with newspapers and loaded with God's bounty prepared with love and caring... Enjoy

***********************PINTEREST*********************

Come and find me on Pinterest... Any of my "52 Ways to cook" Boards are worth following.  If you like this post, please take a second and "Pin" this to your own boards... Better yet, if you are part of a foodie group board please take a second and add this post to your group pins... best way to show your Love!

And BTW, if you are not yet part of a group board, drop me an email at Contact@eRecipeCards.com and request to be added to my group board... FAVORITE FOOD BLOGGERS! (be sure to include your pinterest ID when you write)  Once you are added, any pins you add will be seen by 10s of THOUSANDS of followers of the board (and growing daily).

Rules, only 2... 
  1. In order to join you need to start following the group board as well as at least one of my boards.
  2. And you must ONLY pin original sources, posts from food related bloggers only.  If you are a blogger, this is a great way to have thousands of potential readers see your work,  If you are a fan of bloggers, a great way to share your favorites...
    Come and be a part of ... FAVORITE FOOD BLOGGERS! on Pinterest

Thursday, January 30, 2014

Scratch PIE CRUST - OLD SCHOOL - EASY DIY plus BLIND BAKING TIPS - 52 Cakes and Pies at Home

Pin It Now!

Old School baby!!!

And what could be more old school than hunting down my Mother-in-Law, veteran baker from the golden years of the 40's and 50's (she turns 80 this year).  She raised her own three children but she is also a small town girl from a HUGE extended family.  She remembers baking the pies for the family gatherings including over 100 cousins.

She knows pies.

I have updated this a bit with a food processor.  Mother Marie uses a pastry blender to "cut" in the shortening to make the crumbles of flour shown in the third photo.  But I am ahead of myself.

In this day and age, the question must be asked, Why make a pie shell from scratch?

It may sound odd, but it is just easier to have this skill at your fingertips than to depend on the freezer section.  All of the ingredients are in most people's kitchen all the time, making pie at your fingertips instead of needing a trip to the store.

Once you go the Old School DIY method and have it down pat, you will notice an industrial bland taste.  This recipe is easily adapted to add new flavors and textures.  Such as adding almond meal in place of some of the flour... But that's a post for another day.

A few terms...

Blind Baking is to bake a pie shell without a filling.  You will need this to fill with cream and custard pies that do not need to be baked.  Pies such as a Banana Cream, Coconut Cream, etc.

This is as opposed to a "raw" pie shell that is then filled and baked... Pumpkin Pie would be the best example that everyone knows about.

This "Old School" DIY Scratch recipe works for both types of pies. Most recently for my Christmas dinner I made a Coconut Cream pie (that will be my next post) which needed this blind baking technique.  I also made a Sweet Potato Pie, which needed to be baked along with the filling.

The recipe does give you enough to make 2 pie crusts.  Great if making two pies but also these freeze just fine.

There is a step in the recipe where you chill the dough for an hour.  if you plan on freezing one, just wrap tightly in cling wrap and move the disc to the freezer.  Be sure to date the package ad use within 2 months (never a problem for me).

So, thanks Mother Marie... You made me a pie baker!

Here's my two pies... the one on the right is the Coconut Cream without any whipped cream topping.  This was "Blind Baked" and then filled.  The one on the left is that Sweet potato Pie... The shell was filled and then baked along with the filling.

Easy Peasy, versatile and old school flakey!


OK... Here's what I did...

My Mother-in-Law's Lard/Shortening Crust recipe

Ingredients
  • Makes 2 pie crust, or one to freeze for later and one to cut into 6 tart size
  • 3 Cups AP Flour
  • 1 Cup Lard (COLD from Refrigerator) ... Can substitute Shortening
  • 1 Pinch Salt
  • 1/4 Cup Water
  • 1 Large Egg
  • 1 tsp White Vinegar
Cooking Directions
  1. Mix Flour, Lard and Salt until crumbly
  2. Add water, egg and vinegar and mix until just combined. DO NOT OVER MIX as this will make the crust dense and tough, not flaky.
  3. Divide into two equal parts, flatten into disc shapes and wrap with cling wrap.
  4. refrigerate for an hour (or at this stage, freeze.thaw completely before using)
  5. Roll out chilled dough and use as you will in the recipe of your choice!!!... 
  6. TIP - Easiest to roll out between two sheets of Saran Wrap, Flip onto the pie plate (this is the hardest part, but as all skills once mastered, will be no problem).
  7. TIP - If blind baking, using a fork, pierce several holes in the bottom of the crust to prevent the bottom from bubbling up as shown in the photos.  Bake in preheated 375 degree oven for 20-25 minutes until crust begins to bake to a golden brown.
  8. Make your pie and ENJOY... Nothing beats scratch made pies!!!

******************************************************

This simple recipe has been added to my growing list of "52 Cakes and Pies at Home"!

These are the desserts you make for your family.  No fancy amazing wedding cakes, just the rustic beauty of the classics.  From pumpkin pie to cheesecakes to layer cakes, these are what your family craves for dessert.  You may even see a few unusual crusts and frosting ideas to try.

You get the idea. These recipes are simple, delicious and will have your family wanting dessert first...

***********************PINTEREST*********************

Come and find me on Pinterest... Any of my "52 Ways to cook" Boards are worth following.  If you like this post, please take a second and "Pin" this to your own boards... Better yet, if you are part of a foodie group board please take a second and add this post to your group pins... best way to show your Love!

And BTW, if you are not yet part of a group board, drop me an email at Contact@eRecipeCards.com and request to be added to my group board... FAVORITE FOOD BLOGGERS! (be sure to include your pinterest ID when you write)  Once you are added, any pins you add will be seen by 10s of THOUSANDS of followers of the board (and growing daily).

Rules, only 2... 
  1. In order to join you need to start following the group board as well as at least one of my boards.
  2. And you must ONLY pin original sources, posts from food related bloggers only.  If you are a blogger, this is a great way to have thousands of potential readers see your work,  If you are a fan of bloggers, a great way to share your favorites...
    Come and be a part of ... FAVORITE FOOD BLOGGERS! on Pinterest

Wednesday, January 29, 2014

CITY HAM - Pistachio Crusted Baked Ham - 52 Church PotLuck Main Course

Pin It Now!

Here's one of those memories from my youth.  50 some odd years ago I can recall many a Sunday sitting in my family pew at the Liberty Baptist Church in Pekin Illinois.  That church at that time never let an occasion pass by without a Church Potluck dinner.  Usually Sunday after services, sometimes everyone brought something (I can sill recall those lines of Crock Pots... Or the hunt for a spare plug somewhere during Sunday School... But I digress).

But today I am recalling those days when the Church Basement Ladies would slow roast a couple of hams for lunch.  Everyone brought side dishes and an amazing table of desserts (my favorites), but the main course was cooked during service.  The smells carrying through the building, making those pews and that days' sermon especially loooong and hard to sit through.

For whatever reason, ham seems to have gotten the short sheet disrespect since those glorious days of my youth.  I just don't bake them enough.  No good reason since I always look forward to the meal when a ham is in the oven.  This last Christmas I hosted dinner for 10 people.  Most of the same people who came over for Thanksgiving so I wanted to try something new besides a turkey.

Ham came to mind and it brought all those memories back... and it was... Glorious!

First up, let's talk about city hams vs country hams... Here's a "REAL SIMPLE" Magazine comparison...

Ham (a.k.a. city ham): The most popular variety of this versatile meat. The majority of supermarket hams are wet-cured, or injected with a brine made of salt, sugar, seasonings, and curing agents, lending the meat a mild, juicy flavor. (Many producers also smoke their hams for additional depth.) Bone-in city hams tend to be moister and more flavorful than the boneless variety. Both types usually come ready to eat, although they benefit from oven warming. Note: City ham should not be confused with fresh ham, which is a raw hind leg of pork sold at butcher shops and specialty meat markets.

Country ham: A southern favorite, these hams are dry-cured, meaning they’re rubbed with salt and seasonings, smoked, then aged anywhere from 4 months to 3 years. Salty and chewy, the intensely flavored meat is usually served with biscuits or incorporated into casseroles and salads. It’s sold both uncooked and cooked, and mostly bone-in.


Here's my version... City Hams are cheaper, easier to cook and are best simply cooked, sliced and served.  A Country Ham is best when used for other things... Like a casserole.  The heavy salting process makes a country ham less appealing as a slice and serve dish.

This recipe is very easy... only 4 ingredients (including a shot of Kentucky Bourbon which I doubt those Southern Baptist church basement ladies used in their recipe... But you never know since most of the congregation (including all the kids, all the men and especially the pastor) was a little afraid of them and rarely ventured into the church kitchen... but I digress.

REALLY EASY, Really Delicious and nostalgically perfect for a big holiday meal (or just a Sunday Supper).

I just LOVE this nutty crusty coating on the ham.  Distinctive look and delicious taste.  As you carve, pieces will chip off.  In the instructions it is advised to use a paper towel and pat dry the ham before applying the mustard paste.  DO NOT SKIP THIS PART as the mustard paste will NOT stick to the ham if it is sealed wet.

Easy and Best Ham Ever... just have to build more memories around this one.


 OK... Here's what I did...


Pistachio Crusted Ham

Ingredients
  • 1 City STyle Brined Ham
  • 1/2 Cup Brown Mustard, Country style with seeds
  • 2 Cups Dark Brown Sugar
  • 1 Shot Kentucky Bourbon
  • 2 Cups Crushed Pistachio nut chips
Cooking Directions
  1. Preheat oven to 250 degrees
  2. Rinse ham, hand rub the outer coating off the ham. Using a SHARP small paring knife, score the ham from bottom to top, spiraling clockwise as you cut. (If you're using a paring knife, be careful to only cut through the skin and first few layers of fat). Rotate the ham after each cut so that the scores are no more than 2-inches across. Once you've made it all the way around, move the knife to the other hand and repeat, spiraling counter clockwise. The aim is to create a diamond pattern all over the ham. (Don't worry too much about precision here.)
  3. Tent the ham with heavy duty foil, insert a remote probe thermometer, and cook for 3 to 4 hours or until the internal temperature at the deepest part of the meat registers 130 degrees.
  4. Remove and use tongs to pull away the diamonds of skin and any sheets of fat that come off with them. This leaves a clean surface to add the crusty mustard.
  5. Raise the temperature to 350 degrees.
  6. In a mixing bowl, mix the Mustard, Brown Sugar, Bourbon and nuts to form a paste.
  7. Pat the ham dry and add an even layer of the mustard paste all around the ham.
  8. Clean the thermometer probe and reinsert. Bake uncovered until internal temperature reaches 140 degrees (about another hour).
  9. Allow to rest for a half an hour before carving
  10. Serve warm and ENJOY!

The Ham fit right in  for the BIG DAY Meal!


******************************************************

This recipe has been added to my growing list of "52 Church PotLuck Dishes"!

A list of something NEW worthy of being shown off at a neighborhood BYODish (Bring Your Own Dish) Party, a Family special occasion dinner, Any Big Holiday Gathering or of course that glorious day when you bring a dish to share with your Church family...

Ages ago, literally almost a half century ago I was listening to our pastor talking about a PotLuck Dinner. It happened to be scheduled around a church work day when we were expected to weed, polish and do general cleaning and maintenance around the church (you know, back in the day when there were no no-wax floors and church pews smelled of Old English furniture polish). I am of course paraphrasing, but as I recall the pastor said,

"A potluck, like a church requires work. At a potluck everyone is expected to contribute.. At a church no one should come empty handed and no one should leave unfed".
I will confess that in my youth I brought more store bought plastic spoons and forks than I ever brought covered dishes and crock pots of fresh made love and caring delights. But now that I have become a hobbyist cook, I occasionally am reminded of those days and people from my youth. I reminded and I do wish that I could drop a dish of some new creation on those old tables at my fondly remembered Liberty Baptist Church.  Tables covered with newspapers and loaded with God's bounty prepared with love and caring... Enjoy

***********************PINTEREST*********************

Come and find me on Pinterest... Any of my "52 Ways to cook" Boards are worth following.  If you like this post, please take a second and "Pin" this to your own boards... Better yet, if you are part of a foodie group board please take a second and add this post to your group pins... best way to show your Love!

And BTW, if you are not yet part of a group board, drop me an email at Contact@eRecipeCards.com and request to be added to my group board... FAVORITE FOOD BLOGGERS! (be sure to include your pinterest ID when you write)  Once you are added, any pins you add will be seen by 10s of THOUSANDS of followers of the board (and growing daily).

Rules, only 2... 
  1. In order to join you need to start following the group board as well as at least one of my boards.
  2. And you must ONLY pin original sources, posts from food related bloggers only.  If you are a blogger, this is a great way to have thousands of potential readers see your work,  If you are a fan of bloggers, a great way to share your favorites...
    Come and be a part of ... FAVORITE FOOD BLOGGERS! on Pinterest

Tuesday, January 28, 2014

Potato Pancake Slider Size Latke Appetizer Bar - 52 Breakfast Ideas

Pin It Now!

This has always been a favorite meal of mine.  I have told this story before, but take an impressionable boy from the corn fields of Illinois and transplant him to New York City, just about everything is exotic... Even these simple little pancakes made out of hash browns (a little more than that, but mostly hash browns).  At the time (40 some years ago), I was amazed at the little gems and even more amazed at the variety of toppings.

This meal has become my Christmas morning tradition.  Including this past year.  But in addition to Christmas morning, I made a second batch, smaller, silver dollar size, added some pretty bowls and served them up as appetizer for my big Christmas Dinner.

They were served up hot from the pan.  It was a great opportunity to grab some help from one of our guests (don't be brave, when a guest asks if there is anything they can do to help... Grab'em!).  It's always nice when everyone gets involved in those big events.

And just set up the plates and a few bowls of choices and it became a wonderful conversation starter and a delicious start of the meal.

My choice of topics ranged from the simple... Sour Cream
To the unusual... Apple Sauce
To the unexpected... Pickled Red Onions
To the Exotic... Sugar Cured Salmon

As I am writing this, it is the week before the Super Bowl.  Every blogger and their brother is showing off their sports themed appetizers.  This was a fun choice and for me at least will always remind me of that ruddy cheeked little farm (farm town at least) boy from Illinois with his first trip to the big city.  Enjoy!


OK... here's what I did...

Potato Slider Size Pancake Latke Appetizer Bar

Ingredients

5 medium Potatoes, grated
1 medium Red Onion, grated
4 large Eggs
2 rounded TBS Flour
1 big Pinch Salt
several turns of a pepper grinder
4 TBS Olive Oil
Sour Cream to garnish (optional)
Pickled Red Onions to garnish (optional)
Apple Sauce to garnish (optional)
Sugar Cured Salmon to garnish (optional)

Cooking Instructions
  1. VERY IMPORTANT...
    squeeze as much liquid as possible out of the potatoes and onions after they are grated and before you mix with the other ingredients.  
  2. Preheat the oil in a heavy bottomed skillet over medium heat
  3. Mix everything else together, form into pancakes
  4. Fry until golden brown and delicious
  5. serve along side bowls of toppings
  6. Serve HOT and enjoy

******************************************************

This simple recipe has been added to my growing list of "52 Breakfast Ideas!"

It's the most important meal of the day.  From fancy to simple, there are always ways to dress up a breakfast dish.  These are the meals that make Bed and Breakfast Inns legendary (and usually easier than you think).

Here's your chance to make your guests Ooh and Aah!

***********************PINTEREST*********************

Come and find me on Pinterest... Any of my "52 Ways to cook" Boards are worth following.  If you like this post, please take a second and "Pin" this to your own boards... Better yet, if you are part of a foodie group board please take a second and add this post to your group pins... best way to show your Love!

And BTW, if you are not yet part of a group board, drop me an email at Contact@eRecipeCards.com and request to be added to my group board... FAVORITE FOOD BLOGGERS! (be sure to include your pinterest ID when you write)  Once you are added, any pins you add will be seen by 10s of THOUSANDS of followers of the board (and growing daily).

Rules, only 2... 
  1. In order to join you need to start following the group board as well as at least one of my boards.
  2. And you must ONLY pin original sources, posts from food related bloggers only.  If you are a blogger, this is a great way to have thousands of potential readers see your work,  If you are a fan of bloggers, a great way to share your favorites...
    Come and be a part of ... FAVORITE FOOD BLOGGERS! on Pinterest

Monday, January 27, 2014

Chicken Enchiladas, Cheesy and Spicy FREEZABLE CASSEROLE - 52 Church PotLuck Main Course

Pin It Now!

I love Enchiladas.  I have a scratch recipe for them that includes a fresh made cheese sauce, a really amazing Spanish Rice and even a Pico de gayo loaded with Pineapple... Those Chicken Enchiladas are REALLY GOOD... Also really really time consuming.  Really really time consuming.  I will of course make those again, they are good and some days I am in the mood for something time consuming (that is really good).  But this recipe has plenty of advantages those pineapple chicken 'chilladas does not have...

FAST.  The ingredient list uses plenty of real time saving pre-packaged ingredients.  I use a jar of spicy cheese sauce (dip) in place of the fresh made cheese sauce.  I also add a can of this, can of that and even the chicken meat from a store bought, pre-cooked, pre-seasoned Rotisserie Chicken.  Total hand on time, less than 30 minutes.

I do have a quick recipe for a brown spicy Enchilada Sauce, but that;s only 5 ingredients.  Only trick to that is to simmer long enough to reduce the sauce.  You make a roux (easy) of oil and spices mixed with a little flour that acts as a thickener as the sauce cooks.  Only takes about 20 minutes.  Time for you to assemble and prep the rest of the ingredients.

As to taste... WONDERFUL!  Spicy like Tex-Mex food should be.  Plenty of layers of flavors, cheesy, tomatoes, black beans, chicken and that fantastic sauce.

And if you want to double up and freeze a casserole for later (or divide in half for a smaller meal now and one for later), this freezes perfect.  Here's a few tips

First, be sure the actual baking dish is freezer to oven safe. Those ubiquitous Pyrex brand clear dishes work best. You can also use a Foil disposable pan to freeze and bake, then transfer into a presentation dish to serve.

Second, always best to thaw the casserole in the refrigerator for 24-48 hours before baking. You can bake a frozen casserole right from the freezer. But the edges will be baked more crispy than the center by the time it is finished. To go straight from freezer to oven to table, just increase the baking time by 30 minutes. But again, you will have better results if you plan ahead and thaw the meal as much as possible. Leaving the casserole out on the counter for 2 hours (covered with the foil) also helps. The casserole will not be thawed completely but will cook more evenly. If you do this, only cook for another 20 minutes. As usual, but even more so, keep an eye on the dish as it cooks. Once the liquid is bubbling and the top is crispy crunchy, the dish is done no matter how much time you cook.

Third, 60 days... Two Months. NO MORE... Prepare and freeze, but date the dish. Cook and serve within 60 days for best results. Any longer and you will have freezer burn and the dish will start to turn on you. Personally, I am a 30 day guy,but I have baked these right at 60 days and it was fine.

OK.. Read over the recipe. The freezing tips are in italics. Enjoy and let me know what you think of this rather unique but decadently GREAT Spicy Cheesy Enchiladas!


OK... Here's what I did...
Note: I made a single 9X13 Oven Safe Pan.  If you like, divide in two, 2 8X8 Freezer safe/Oven Safe (Pyrex works great) Pans, Enjoy one now, freeze one for later.


Chicken Enchiladas
(A FREEZABLE Casserole)

Ingredients
  • 2 TBS Olive Oil
  • 4 TBS Chili Powder
    (for a less spicy Enchilada, cut this in half)
  • 1 tsp Ground Cumin
  • 2 TBS Flour
  • 1 Cup Marinara Sauce
    (can use store bought Pasta/Spaghetti Sauce)
  • 2 Cups Chicken Stock
  • 1 Jar Salsa Con Queso Cheese Sauce (Queso Dip)
  • 1 Cup Grated Cheddar Cheese for Garnish
  • 1 Medium Rd Onion, Diced
  • 4 Cloves Garlic, Minced
  • Meat removed from a Store Bought pre-cooked, pre-seasoned
    Rotisserie Chicken
  • 2 Can Black beans, drained, rinsed
  • 2 Can Diced Tomatoes, drained
  • 8 Large Flour Tortillas
  • 1/4 Cup Pico De Gallo
    (Salsa) for Garnish
Cooking Directions
  1. FIrst, make the Spicy Brown Sauce... Over medium high heat, in a medium sauce pan, heat the oil, add the Chili Powder and the Cumin. Stirring constantly until the oil just starts to smoke, about 1 minute.
  2. Add the Flour and stir for an additional minute.
  3. Add the Pasta Sauce and Chicken Stock and stir to mix. Set heat to maintain a low boil, stir occasionally for about 20 minutes, until the sauce begins to thicken.
  4. Add the Onions and Garlic and drop the heat to a low simmer.
  5. Meanwhile, Preheat the oven to 350 degrees. Drain and rinse the Black Beans, drain the Tomatoes and mix those two.
  6. Prepare a 9X13 Oven Safe Casserole Dish with nonstick spray.
  7. Set up a "loading your Enchiladas system, Bowl of Chicken, next to a bowl of Beans/Tomato mix, Next To Cheese Sauce, next to the Brown Cooked Enchilada Sauce with a board for a flat tortilla in the center.
  8. When the Sauce has thickened, Spoon half of the Black Bean/Tomato mix into the bottom of the Casserole pan. Also add 1 Cup of the Brown Enchilada Sauce to the mix. Stir to even out the mix.
  9. Now, make the Enchiladas... Lay out a tortilla. Add a quarter cup of the Chicken in a line down the center of the tortilla. Top this with a quarter cup of the beans/tomatoes... Then a couple TBS of the Cheese Sauce and finally with a TBS of the Enchilada Sauce.
  10. Roll each tortilla into an Enchilada shape. Place Seam Side down on top of the Sauced Tomato/Bean mix in the Casserole Pan... Repeat for all 8 Enchiladas.
  11. Top with remaining Cheese Sauce and remaining Brown Enchilada Sauce.
  12. At this stage, if you are making two casseroles, or plan to freeze the large one... cover the freezer casserole with Aluminum Foil, pushing the foil down so there is as little air between top of casserole and the foil as possible (prevents freezer burn). Allow this to cool on the countertop to room temperature and then pop in the freezer. When you want to cook this, just transfer to the refrigerator 24-48 hours before you plan to cook and cook as directed below. If you do not have the time to thaw in the refrigerator, cook as directed an additional 30 minutes.
  13. Bake for 30 minutes until the sauce begins to bubble at the edges.
  14. Garnish with additional Cheddar Cheese right from the oven, then add 1/4 Cup Salsa Best to use a spatula, cut the enchiladas in half and serve two 1/2 Enchiladas instead of a single long one. Serve HOT and ENJOY!

******************************************************

This recipe has been added to my growing list of "52 Church PotLuck Dishes"!

A list of something NEW worthy of being shown off at a neighborhood BYODish (Bring Your Own Dish) Party, a Family special occasion dinner, Any Big Holiday Gathering or of course that glorious day when you bring a dish to share with your Church family...

Ages ago, literally almost a half century ago I was listening to our pastor talking about a PotLuck Dinner. It happened to be scheduled around a church work day when we were expected to weed, polish and do general cleaning and maintenance around the church (you know, back in the day when there were no no-wax floors and church pews smelled of Old English furniture polish). I am of course paraphrasing, but as I recall the pastor said,

"A potluck, like a church requires work. At a potluck everyone is expected to contribute.. At a church no one should come empty handed and no one should leave unfed".
I will confess that in my youth I brought more store bought plastic spoons and forks than I ever brought covered dishes and crock pots of fresh made love and caring delights. But now that I have become a hobbyist cook, I occasionally am reminded of those days and people from my youth. I reminded and I do wish that I could drop a dish of some new creation on those old tables at my fondly remembered Liberty Baptist Church.  Tables covered with newspapers and loaded with God's bounty prepared with love and caring... Enjoy

***********************PINTEREST*********************

Come and find me on Pinterest... Any of my "52 Ways to cook" Boards are worth following.  If you like this post, please take a second and "Pin" this to your own boards... Better yet, if you are part of a foodie group board please take a second and add this post to your group pins... best way to show your Love!

And BTW, if you are not yet part of a group board, drop me an email at Contact@eRecipeCards.com and request to be added to my group board... FAVORITE FOOD BLOGGERS! (be sure to include your pinterest ID when you write)  Once you are added, any pins you add will be seen by 10s of THOUSANDS of followers of the board (and growing daily).

Rules, only 2... 
  1. In order to join you need to start following the group board as well as at least one of my boards.
  2. And you must ONLY pin original sources, posts from food related bloggers only.  If you are a blogger, this is a great way to have thousands of potential readers see your work,  If you are a fan of bloggers, a great way to share your favorites...
    Come and be a part of ... FAVORITE FOOD BLOGGERS! on Pinterest

FMP