Wednesday, March 5, 2014

Egg Salad - Goin' Old School - 52 Church PotLuck Dishes

Pin It Now!

What's more old school than Egg Salad?  This here is a basic recipe your Grandma would be proud of, with just a few interesting extras and a couple of tips.

From "How to Boil Eggs" to an unusual ingredient (Sour Cream), this is the BEST Egg Salad I have ever had.

I made up a big bowl of this for a breakfast snack and lunch sandwiches on Ash Wednesday.  This is part of my on going efforts to keep my wife out of Purgatory.  She observes Lent Old School style (Catholic Grade School old school style).  Which means no meat on Friday (and Ash Wednesday) during Lent.

I do not observe the season myself (well, I guess I do just cause I eat what my wife eats, but she gets more out of it than I do). However, I did a little checking. In the 50's, the church would make eating meat a mortal sin and you were doomed to hell (or at the least purgatory) if you had those ribs you wanted. But, thanks to the Vatican II conference of the early 60's, meat eating was no longer a mortal sin.

It does beg the question of what happened to those souls that ate meat during the time it was a mortal sin? But, in the end, it is probably a moot point, as the type of people who eat meat on Friday are likely to be the type of people who commit other sins and they end up in Hell anyway...

But I digress...

This bowl would fit into any big PotLuck gathering.  Everybody loves egg salad!  It's basic, but it is nostalgically good... Enjoy


OK... Here's what I did...


Egg Salad -
Goin' Old School


Ingredients
  • 6 Large Hard Cooked Eggs, peeled
  • 1/2 Cup Celery, Small Dice
  • 1/2 Cup Green Onions, Small Chop, White and Green Parts
  • 2 TBS Mayonnaise
  • 2 TBS Sour Cream
  • 2 TBS Pickle Relish
  • 2 TBS Yellow Mustard
  • Sweet Paprika to Garnish
Cooking Directions
  1. Best way to hard cook an egg... Single layer in a large pot, do not crowd, make sure there is room between eggs. Cover with cold water (one inch above the eggs). Over high heat, bring water to a full boil. Immediately remove from heat and cover.pot (still with eggs and HOT water) tightly with a lid. Allow to sit for 15 minutes. Then run COLD water over the eggs to cool quickly. This cooks the yolks perfectly as well as keeping the whites soft (boiling eggs will toughen the white parts). Peel eggs.
  2. Save two whole yolks, set the other eggs, white and yolks aside.
  3. In a mixing bowl, break up the 2 egg yolks, add Mayo, Sour Cream, Mustard and Pickle Relish and mix until combined
  4. Add the wet ingredients to the chopped egg. NOTE Only add about 1/2 the wet at a time. The amount of wet ingredients use is a matter of your choice. Some people like more than others.
  5. Garnish with sprinkles of Sweet Paprika.
  6. Keep chilled in the fridge, serve on toast and ENJOY!

******************************************************

This recipe has been added to my growing list of "52 Church PotLuck Dishes"!

A list of something NEW worthy of being shown off at a neighborhood BYODish (Bring Your Own Dish) Party, a Family special occasion dinner, Any Big Holiday Gathering or of course that glorious day when you bring a dish to share with your Church family...

Ages ago, literally almost a half century ago I was listening to our pastor talking about a PotLuck Dinner. It happened to be scheduled around a church work day when we were expected to weed, polish and do general cleaning and maintenance around the church (you know, back in the day when there were no no-wax floors and church pews smelled of Old English furniture polish). I am of course paraphrasing, but as I recall the pastor said,

"A potluck, like a church requires work. At a potluck everyone is expected to contribute.. At a church no one should come empty handed and no one should leave unfed".
I will confess that in my youth I brought more store bought plastic spoons and forks than I ever brought covered dishes and crock pots of fresh made love and caring delights. But now that I have become a hobbyist cook, I occasionally am reminded of those days and people from my youth. I reminded and I do wish that I could drop a dish of some new creation on those old tables at my fondly remembered Liberty Baptist Church.  Tables covered with newspapers and loaded with God's bounty prepared with love and caring... Enjoy

*************************************************************************

So,  I am pleased to list this as one of my Growing list of  "52 Specialty Salad Recipes"!!!

Sometimes they are the main course, sometimes a lunch and sometimes they are the side dish... And if you count Jell-o salad you can even make a dessert of a salad.  Here are a few of my favorite salads that get far more Ooohs and Aaahs than that simple chopped head of lettuce.

Links include Potato Salads, Cole Slaws, and Plenty of greens and fixins' Salads... And more than a few matching FRESH MADE Jam Jar make it yourself Salad Dressings!

****************************PINTEREST**************************

Come and find me on Pinterest... Any of my "52 Ways to cook" Boards are worth following.  If you like this post, please take a second and "Pin" this to your own boards... Better yet, if you are part of a foodie group board please take a second and add this post to your group pins... best way to show your Love!

And BTW, if you are not yet part of a group board, drop me an email at Contact@eRecipeCards.com and request to be added to my group board... FAVORITE FOOD BLOGGERS! (be sure to include your pinterest ID when you write)  Once you are added, any pins you add will be seen by 10s of THOUSANDS of followers of the board (and growing daily).

Rules, only 2... 
  1. In order to join you need to start following the group board as well as at least one of my boards.
  2. And you must ONLY pin original sources, posts from food related bloggers only.  If you are a blogger, this is a great way to have thousands of potential readers see your work,  If you are a fan of bloggers, a great way to share your favorites...
    Come and be a part of ... FAVORITE FOOD BLOGGERS! on Pinterest

Sunday, March 2, 2014

Sage Strata - Savory Layered Bread Pudding Breakfast Casserole - 52 Breakfast Ideas

Pin It Now!

"Starta" is an Italian word that means layers.

A STRATA Dish calls for separate layers of a little bit of bread pudding (the bottom), a middle layer of  a little bit of Filling (in this case a mic of Sage Sausage and a few vegetables (Onions, Celery, Bell Peppers) and all topped with a baked cheese omelette (A FRITTATA if you want another Italian word).

All this sounds very Italian but in fact, the good old US of A can lay claim to the dish.  FIrst appearing in cookbooks at the turn of the last century (the 1900's) and not really becoming popular until the 1980's.

OK, enough history.  Basically a Strata is a layered dish.  most of the time an egg style dish.

And that's exactly what this dish is, layers of bread pudding texture, layers of filling and all topped with a new and different textured egg dish.  Only takes a few minutes of hands on work, a perfect way to get a breakfast style meal into a dinner (although makes a heck of a breakfast as well.

Enjoy


OK... Here's what I did...


Sage Strata - Savory Layered Bread Pudding Breakfast Casserole


Ingredients
  • 1 Pound Sage Sausage,Browned
  • 2 TBS Butter
  • 1 Medium Green Pepper, Diced
  • 1/2 Large Sweet Onion, Diced
  • 2 Stalks Celery, Diced
  • 2 Cups Day old Bread, Cubed
  • 4 Ounces Cheddar Cheese, Grated and divided, safing about 1/2 a cup of cheese to top the casserole.
  • 3 Cups 1/2 and 1/2 (can substitute Whole Milk)
  • 12 Large Eggs, lightly beaten
  • 2 TBS Dijon Mustard
  • Salt and Pepper to taste
Cooking Directions
  1. Preheat oven to 375 Degrees, Prepare a 9X13 Baking dish with non-stick spray. (Or for presentation, prepare individual oven safe baking dishes as shown in photos).
  2. Brown the Sausage, Drain and set aside.
  3. In a medium Saute pan, Melt the butter of medium high heat. Add the Onions,Peppers and Celery and saute for about 5 minutes until the vegetables are softened and the onions turn translucent, Mix with the Sausage.
  4. Meanwhile, whisk together eggs, 1/2 and 1/2 (or milk), Mustard and salt and pepper.
  5. Spread a layer of the bread cubes on the bottom of the Casserole dish(es). Note... The more stale the bread cubes the better. If using fresh bread, take a few minutes to toast the cubes in a 200 degree oven. This helps the bread to absorb the egg mix.
  6. Pour about 1/2 of the egg mix on top of the bread.
  7. Add a layer of about 3/4 of the Cheese.
  8. Add the Sausage vegetable mix on top of the soggy bread.
  9. Top with remaining egg mix.
  10. Top with remaining cheese.
  11. Bake for 1 hour until egg top is set and the top is golden brown and delicious. If making individual servings, check at 45 minutes and each additional 5 minutes until desired doneness.
  12. Serve HOT from the Oven and ENJOY!!!

******************************************************

This simple recipe has been added to my growing list of "52 Breakfast Ideas!"

It's the most important meal of the day.  From fancy to simple, there are always ways to dress up a breakfast dish.  These are the meals that make Bed and Breakfast Inns legendary (and usually easier than you think).

Here's your chance to make your guests Ooh and Aah!

***********************PINTEREST*********************

Come and find me on Pinterest... Any of my "52 Ways to cook" Boards are worth following.  If you like this post, please take a second and "Pin" this to your own boards... Better yet, if you are part of a foodie group board please take a second and add this post to your group pins... best way to show your Love!

And BTW, if you are not yet part of a group board, drop me an email at Contact@eRecipeCards.com and request to be added to my group board... FAVORITE FOOD BLOGGERS! (be sure to include your pinterest ID when you write)  Once you are added, any pins you add will be seen by 10s of THOUSANDS of followers of the board (and growing daily).

Rules, only 2... 
  1. In order to join you need to start following the group board as well as at least one of my boards.
  2. And you must ONLY pin original sources, posts from food related bloggers only.  If you are a blogger, this is a great way to have thousands of potential readers see your work,  If you are a fan of bloggers, a great way to share your favorites...
    Come and be a part of ... FAVORITE FOOD BLOGGERS! on Pinterest

Saturday, March 1, 2014

Ramen Noodle Chicken Soup for the Sick Soul - 52 Ramen Noodle Upgrades

Pin It Now!

I'm sick.. Cough Cough Moan

Achy, Fever, head so full I think it will explode.  So Sick and tired of Winter... sigh.

But this helped... And ready on just about 5 minutes.

And very very Tasty.

Oh and if you are not sick, go ahead and add some peas or corn or potatoes and make something more substantial.

Cough Cough Moan


Keep scrolling down for this easy to follow recipe...

OK... Here's what I did...


Ramen Noodle Chicken Soup for the Sick Soul


Ingredients
  • 1 Package Chicken Ramen Noodles
  • 2 Cup Chicken Stock (can substitute water with the flavor packet)
  • 1 Cup Diced Cooked Chicken (I used meat from a Rotisserie Chicken)
  • 3 Green Onions Sliced, green and white parts
  • Salt and Pepper to Taste (Do not add additional salt if using the flavor packet)
Cooking Directions
  1. Be sick... headache, cough, fever (optional)
  2. Heat to simmer the Chicken Stock (Optional, can substitute water... if using water, add the flavor packet. If using stock, discard the flavor packet).
  3. break up the noodles to dime size pieces (Optional, can keep long noodles if you like. I like to break them up spoonable size)
  4. Add noodles to simmering stock. Add chicken and green onions. Stir to combine... allow to simmer for @3 minutes only, just long enough to heat  the noodles so they break apart and are limp.  (Optional, over cook the noodles according to package directions until they loose their texture, not recommended)
  5. Taste, add additional Optional seasonings as needed.
  6. Curl up under a heavy blanket, binge watch The Walking Dead on Netflix (Optional but fitting, I sounded just like one of the Zombies), eat HOT and try to Enjoy
Cough Cough Moan Slurp Aahh Aahh that's better


*************************************************************************

So,  I am pleased to list this as one of my Growing list of  "52 Recipes for Soup, Chili or Chowder" (Now more than 52 and still growing)

Soup from Scratch is one of the great kitchen joys.  The house smells amazing and the soup warms to the bone.  From broth to chowder, vegetarian to loaded up chili... Even a great idea for a party (love the Potato Soup Bar idea).  Come take a look, sure to have something you might like to try.  All recipes have been tested and WORK!
*************************************************************************

So, I am pleased to add this as one of my growing list of "52 Uses For a Rotisserie Chicken"  (Now close to 100!)

MUCH more than a chicken sandwich.  From Scratch Pizza to Chinese Take Out recipes, Lots of Soups and Chili... Appetizers to Main Courses (Still can't find a dessert, but I am looking).  More than enough ideas for that store bought bird to shine with just a little extra work.  All recipes have been tested and WORK!

****************************PINTEREST**************************

Come and find me on Pinterest... Any of my "52 Ways to cook" Boards are worth following.  If you like this post, please take a second and "Pin" this to your own boards... Better yet, if you are part of a foodie group board please take a second and add this post to your group pins... best way to show your Love!

And BTW, if you are not yet part of a group board, drop me an email at Contact@eRecipeCards.com and request to be added to my group board... FAVORITE FOOD BLOGGERS! (be sure to include your pinterest ID when you write)  Once you are added, any pins you add will be seen by 10s of THOUSANDS of followers of the board (and growing daily).

Rules, only 2... 
  1. In order to join you need to start following the group board as well as at least one of my boards.
  2. And you must ONLY pin original sources, posts from food related bloggers only.  If you are a blogger, this is a great way to have thousands of potential readers see your work,  If you are a fan of bloggers, a great way to share your favorites...
    Come and be a part of ... FAVORITE FOOD BLOGGERS! on Pinterest

Friday, February 28, 2014

Cajun Cheesy Chicken and Pasta (FREEZABLE Mac and Cheese Casserole) - 52 Church PotLuck Main Course

Pin It Now!

I love a good scratch Mac and Cheese... and this is about as good as it gets.

Made easy with Cream cheese to add to the creaminess, and the chicken comes from a store bought pre-cooked, pre-seasoned Rotisserie Chicken.

This does come with a bit of a kick, Cajun spices, hot sauce and even the BAM of Garlic.  Consider personal taste and your audience.  If you have a house of adults that love the spice... go for it!  If you have a few young'uns or "spice sensitive"" adults, simply cut the spices in half (or even less) so only a hint of Cajun comes through.

So... if you want to double up and freeze a casserole for later (or divide in half for a smaller meal now and one for later), this freezes perfect. Here's a few tips

First, be sure the actual baking dish is freezer to oven safe. Those ubiquitous Pyrex brand clear dishes work best. You can also use a Foil disposable pan to freeze and bake, then transfer into a presentation dish to serve.

Second, always best to thaw the casserole in the refrigerator for 24-48 hours before baking. You can bake a frozen casserole right from the freezer. But the edges will be baked more crispy than the center by the time it is finished. To go straight from freezer to oven to table, just increase the baking time by 30 minutes. But again, you will have better results if you plan ahead and thaw the meal as much as possible. Leaving the casserole out on the counter for 2 hours (covered with the foil) also helps. The casserole will not be thawed completely but will cook more evenly. If you do this, cook for another 20 minutes. As usual, but even more so, keep an eye on the dish as it cooks. Once the liquid is bubbling and the top is crispy crunchy, the dish is done no matter how much time you cook.

Third, 60 days... Two Months. NO MORE... Prepare and freeze, but date the dish. Cook and serve within 60 days for best results. Any longer and you will have freezer burn and the dish will start to turn on you. Personally, I am a 30 day guy,but I have baked these right at 60 days and it was fine.

OK.. Read over the recipe. The freezing tips are in italics. Enjoy and let me know what you think of this rather unique take on a meatloaf!!


OK... Here's what I did...


Cajun Cheesy Chicken and Pasta (Mac and Cheese)


Ingredients
  • 1 Box (1 pound) Pasta (I like the screw shaped, holds more cheese sauce)
  • 1 Pound (about 3 cups) Cooked Chicken (I used meat from a Store Bought Pre-Cooked Rotisserie Chicken)
  • 8 Ounces (save @1/2 Cup for Garnish) Cheddar Cheese, freshly shredded
  • 1 Brick (8 Ounces) Cream Cheese
  • 3 TBS Butter
  • 1 Cup Diced Onion
  • 4 Cloves Garlic, minced
  • 1/2 Cup Green Onions, Sliced, green and white parts
  • 4 Large Eggs, Beaten
  • 1 (12 Ounce) Can Evaporated Milk
  • 3 TBS Flour
  • 1 TBS Yellow Mustard
  • 1-3 TBS Cajun Spices (to Taste)
  • 10 drops Tabasco Hot Sauce
  • Salt and Pepper to taste
Cooking Directions
  1. Preheat oven to 350 degrees, spray a 9X13 Freezer to oven to table Safe Baking Dish (Pyrex) with non-stick spray.
  2. Prepare pasta according to directions on the box EXCEPT, cook very al Dente, 2 minutes less than what is suggested on the box).
  3. When finished, drain, mix in the Chicken, all but 1/2 cup of shredded Cheddar Cheese and Cream Cheese with the pasta. While the pasta is cooking, in a large skillet, Melt the butter over medium heat. Add the onion and saute for about 5 minutes, until the onion turns translucent, about 5 minutes. Add the garlic and saute for 1 more minute. Stir in Green Onions.
  4. Stir this into the cheesy pasta mix.
  5. In a mixing bowl, whisk together the eggs, evaporated milk, flour mustard, hot sauce, Cajun Spices and salt and pepper. Whisk vigorously until smooth. Pour this over the pasta
  6. Top with remaining 1/2 Cup of Cheddar
  7. Bake for 30 minutes, until the edges are bubbly and the top has crusted to a golden brown.
  8. At this stage, I froze a smaller casserole dish filled with the cooked Mac and Cheese. ... cover the freezer casserole with Aluminum Foil, pushing the foil down so there is as little air between top of casserole and the foil as possible (prevents freezer burn). Pop in the freezer. When you want to cook this, just transfer to the refrigerator 24-48 hours before you plan to thaw and cook. If you do not have the time to thaw in the refrigerator, thaw in the microwave slowly. This dish needs to be completely thawed before re-cooking.  Be sure to date the dish and 
  9. Serve HOT and Enjoy

******************************************************

This recipe has been added to my growing list of "52 Church PotLuck Dishes"!

A list of something NEW worthy of being shown off at a neighborhood BYODish (Bring Your Own Dish) Party, a Family special occasion dinner, Any Big Holiday Gathering or of course that glorious day when you bring a dish to share with your Church family...

Ages ago, literally almost a half century ago I was listening to our pastor talking about a PotLuck Dinner. It happened to be scheduled around a church work day when we were expected to weed, polish and do general cleaning and maintenance around the church (you know, back in the day when there were no no-wax floors and church pews smelled of Old English furniture polish). I am of course paraphrasing, but as I recall the pastor said,

"A potluck, like a church requires work. At a potluck everyone is expected to contribute.. At a church no one should come empty handed and no one should leave unfed".
I will confess that in my youth I brought more store bought plastic spoons and forks than I ever brought covered dishes and crock pots of fresh made love and caring delights. But now that I have become a hobbyist cook, I occasionally am reminded of those days and people from my youth. I reminded and I do wish that I could drop a dish of some new creation on those old tables at my fondly remembered Liberty Baptist Church.  Tables covered with newspapers and loaded with God's bounty prepared with love and caring... Enjoy

***********************PINTEREST*********************

Come and find me on Pinterest... Any of my "52 Ways to cook" Boards are worth following.  If you like this post, please take a second and "Pin" this to your own boards... Better yet, if you are part of a foodie group board please take a second and add this post to your group pins... best way to show your Love!

And BTW, if you are not yet part of a group board, drop me an email at Contact@eRecipeCards.com and request to be added to my group board... FAVORITE FOOD BLOGGERS! (be sure to include your pinterest ID when you write)  Once you are added, any pins you add will be seen by 10s of THOUSANDS of followers of the board (and growing daily).

Rules, only 2... 
  1. In order to join you need to start following the group board as well as at least one of my boards.
  2. And you must ONLY pin original sources, posts from food related bloggers only.  If you are a blogger, this is a great way to have thousands of potential readers see your work,  If you are a fan of bloggers, a great way to share your favorites...
    Come and be a part of ... FAVORITE FOOD BLOGGERS! on Pinterest

Thursday, February 27, 2014

Tri Citrus Cake with Lemon Curd - 52 Church PotLuck Desserts

Pin It Now!

Now we are gettin FANCY!!!

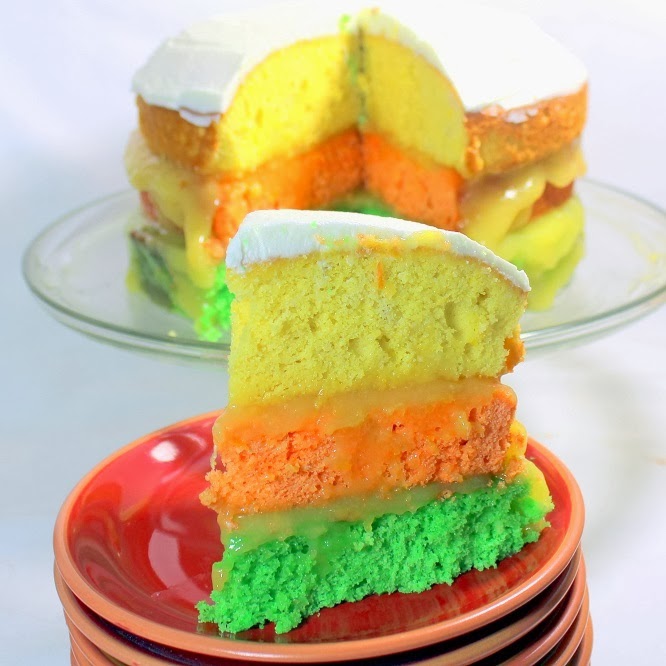
This cake is a celebration of Citrus!  Each layer has a distinctive taste of Lemons or Oranges or Limes.  Not so subtle differences are achieved with the zest of the fruit.  Built in BIG FLAVOR Enhancement comes from a couple of layers of Pucker Up Lemon Curd (yesterday's Post, go ahead and click the blue letters to see the recipe).

There are a couple of tricks to get the curd to behave.  The pressure of a layer cake will cause the curd to seep out the sides.  Even after a night in the fridge, the curd is still soft enough to seep out the sides as you cut the cake.  So be sure to follow the directions, especially to cut the muffin top portion of the cake off so that you have a flat surface.  Then apply the curd one layer at a time so that there is time for some to seep into the nooks and crannies. Slice carefully with a thin sharp knife and all works well!

the distinctive look and various flavors will make this a crowd pleaser.  Lots of OOHS and AAHS When it's served and when it's eaten!


OK... Here's what I did...


Tri Citrus Cake
with Lemon Curd


Ingredients
  • 5-1/4 Cups Flour
  • 7 tsp Baking Powder
  • 1 tsp Salt
  • 1-1/3 Cup Shortening
  • 3-1/2 Cups Sugar
  • 6 Large Eggs, room temperature
  • 2-1/4 Cups Milk
  • 3 tsp Vanilla
  • For the Lime Layer, 3 tsp Lime Zest
  • Several Drops Green Food Coloring for desired look.
  • For the Orange Layer, 3 tsp Orange Zest
  • Several Drops Orange Food Coloring for desired look.
  • For the Lemon Layer, 3 tsp Lemon Zest
  • Several Drops Yellow Food Coloring for desired look.
  • 2 Cups Pucker Up Lemon Curd, divided
  • 1 Cup Buttercream Frosting
Cooking Directions
  1. Preheat oven to 350 degrees.
  2. Prepare three 9-inch Springform cake pans. Sift together the flour, baking powder, and salt. Set aside.
  3. In a large bowl, cream together the shortening and sugar until light and fluffy. Beat in the eggs one at a time, mixing until each egg is incorporated; stir in the vanilla. Beat in the flour mixture alternately with the milk. Divide batter into 3 bowls.
  4. In the first bowl, stir in lemon zest and yellow food coloring; pour into prepared pan. In the second bowl, stir in orange zest and orange food coloring; pour into second prepared pan. In the last bowl, stir in the lime zest and green food coloring; pour into third prepared pan.
  5. Bake in the preheated oven until a toothpick inserted into the center of each cake layer comes out clean, about 35 minutes. Let cool in pan for 5 minutes, then turn out onto a wire rack and cool completely.
  6. Take a LONG Serrated Bread knife and carefully cut the "muffin top" portion of 2 of the layers off so that you have two layers with flat tops.
  7. Add 1 Cup Lemon Curd onto the two flat layers. spread to within 1/2 inch of the edge. By cutting the muffin top off you expose the nooks and crannies of the cake providing surface area for the curd to seep into the cake, Move each layer to a refrigerator for several hours (over night). DO NOT STACK THEM YET OR THE CURD WILL SEEP OUT.
  8. Assemble the cake: stack the layers together with the Lemon Filling in between the layers. Frost and with ButterCream Frosting. Refrigerate until serving.
  9. Serve Chilled and ENJOY!

******************************************************

This simple recipe has been added to my growing list of "52 Cakes and Pies at Home"!

These are the desserts you make for your family.  No fancy amazing wedding cakes, just the rustic beauty of the classics.  From pumpkin pie to cheesecakes to layer cakes, these are what your family craves for dessert.  You may even see a few unusual crusts and frosting ideas to try.

You get the idea. These recipes are simple, delicious and will have your family wanting dessert first...

******************************************************

This recipe has been added to my growing list of "52 Church PotLuck Dishes"!

A list of something NEW worthy of being shown off at a neighborhood BYODish (Bring Your Own Dish) Party, a Family special occasion dinner, Any Big Holiday Gathering or of course that glorious day when you bring a dish to share with your Church family...

Ages ago, literally almost a half century ago I was listening to our pastor talking about a PotLuck Dinner. It happened to be scheduled around a church work day when we were expected to weed, polish and do general cleaning and maintenance around the church (you know, back in the day when there were no no-wax floors and church pews smelled of Old English furniture polish). I am of course paraphrasing, but as I recall the pastor said,

"A potluck, like a church requires work. At a potluck everyone is expected to contribute.. At a church no one should come empty handed and no one should leave unfed".
I will confess that in my youth I brought more store bought plastic spoons and forks than I ever brought covered dishes and crock pots of fresh made love and caring delights. But now that I have become a hobbyist cook, I occasionally am reminded of those days and people from my youth. I reminded and I do wish that I could drop a dish of some new creation on those old tables at my fondly remembered Liberty Baptist Church.  Tables covered with newspapers and loaded with God's bounty prepared with love and caring... Enjoy

***********************PINTEREST*********************

Come and find me on Pinterest... Any of my "52 Ways to cook" Boards are worth following.  If you like this post, please take a second and "Pin" this to your own boards... Better yet, if you are part of a foodie group board please take a second and add this post to your group pins... best way to show your Love!

And BTW, if you are not yet part of a group board, drop me an email at Contact@eRecipeCards.com and request to be added to my group board... FAVORITE FOOD BLOGGERS! (be sure to include your pinterest ID when you write)  Once you are added, any pins you add will be seen by 10s of THOUSANDS of followers of the board (and growing daily).

Rules, only 2... 
  1. In order to join you need to start following the group board as well as at least one of my boards.
  2. And you must ONLY pin original sources, posts from food related bloggers only.  If you are a blogger, this is a great way to have thousands of potential readers see your work,  If you are a fan of bloggers, a great way to share your favorites...
    Come and be a part of ... FAVORITE FOOD BLOGGERS! on Pinterest

Wednesday, February 26, 2014

Pucker up Baby LEMON CURD - 52 Cakes and Pies at Home

Pin It Now!

Lemon Curd... It's a dessert topping or spread.  It's often confused with a custard or pudding.  But the difference is about as far as a cup of coffee compared to a glass of water.

Pucker up indeed.  A Lemon Curd is as intense a lemon flavor as you can get.  If you like that pucker sensation, this recipe is for you.

Curds are different from pie fillings or custards in that they contain a higher proportion of juice and zest, which gives them a more intense flavor.  Also, curds containing butter have a smoother and creamier texture than both pie fillings and custards; both contain little or no butter and use cornstarch or flour for thickening. Additionally, unlike custards, curds are not usually eaten on their own.

This is a ye olde timey dish.  hink 18th 19th century formal British Teas and you probably found a curd.  Spread on a toast point or as a filling for tiny tea cakes, you just can't match that intense flavor.

Mostly I make this when I want something special for a cake filling.  Recently I made a three colored Citrus cake (One layer orange, One Lime and one lemon... See my next post for that recipe!).  This curd was an excellent choice for the filling.

And I had enough left over to spread on a toast point come tea time ;)


OK... Here's what I did...

Pucker up Baby
LEMON CURD


Ingredients
  • 6 Medium Lemons
  • 1/2 Cup Butter, Softened
  • 2 Cups Sugar
  • 4 Large Eggs
Cooking Directions
  1. Grate zest from lemons to equal 2 Tbsp. Cut lemons in half; squeeze juice into a measuring cup to equal 1 cup.
  2. Beat butter and sugar at medium speed with an electric mixer until blended. Add eggs, 1 at a time, beating just until blended after each addition. Gradually add lemon juice to butter mixture, beating at low speed just until blended after each addition; stir in zest. (Mixture will look curdled.) Transfer to a 3-qt. microwave-safe bowl.
  3. Microwave at HIGH 5 minutes, stirring at 1-minute intervals. Microwave, stirring at 30-second intervals, 1 to 2 more minutes or until mixture thickens, coats the back of a spoon, and starts to mound slightly when stirred.
  4. Place heavy-duty plastic wrap directly on warm curd (to prevent a film from forming), and chill 4 hours or until firm. Store in an airtight container in refrigerator up to 2 weeks.
  5. And plan to ENJOY!!!

******************************************************

This simple recipe has been added to my growing list of "52 Cakes and Pies at Home"!

These are the desserts you make for your family.  No fancy amazing wedding cakes, just the rustic beauty of the classics.  From pumpkin pie to cheesecakes to layer cakes, these are what your family craves for dessert.  You may even see a few unusual crusts and frosting ideas to try.

You get the idea. These recipes are simple, delicious and will have your family wanting dessert first...

***********************PINTEREST*********************

Come and find me on Pinterest... Any of my "52 Ways to cook" Boards are worth following.  If you like this post, please take a second and "Pin" this to your own boards... Better yet, if you are part of a foodie group board please take a second and add this post to your group pins... best way to show your Love!

And BTW, if you are not yet part of a group board, drop me an email at Contact@eRecipeCards.com and request to be added to my group board... FAVORITE FOOD BLOGGERS! (be sure to include your pinterest ID when you write)  Once you are added, any pins you add will be seen by 10s of THOUSANDS of followers of the board (and growing daily).

Rules, only 2... 
  1. In order to join you need to start following the group board as well as at least one of my boards.
  2. And you must ONLY pin original sources, posts from food related bloggers only.  If you are a blogger, this is a great way to have thousands of potential readers see your work,  If you are a fan of bloggers, a great way to share your favorites...
    Come and be a part of ... FAVORITE FOOD BLOGGERS! on Pinterest

Tuesday, February 25, 2014

SECRET INGREDIENT Apple Oatmeal Crisp - 52 Church PotLuck Desserts

Pin It Now!

I love secret ingredients...

They are little extras that add an additional layer of flavor to a dish.  Something difficult to pick out yet adds a distinctive that sets similar dishes apart.

And that is what is happening here.  This is a basic apple crisp recipe.  You've seen and probably made this for decades.  Sliced apples, butter, brown sugar, seasonings, combined with a crumbly top.  Add some oatmeal and you have a pretty good Apple Crisp...

The secret ingredient here is a cup of white grape juice.  Something crisp, clean tasting... Something with an indistinguishable little snappy extra!

It's just an Apple Crisp recipe that people will find a little extra something something!!!


Keep scrolling down for this easy to follow recipe...


OK... Here's what I did...


SECRET INGREDIENT
Apple Oatmeal Crisp


Ingredients
  • 1 Cup White Grape Juice (the Secret Ingredient)
  • 1 Cup (Divided) Packed Brown Sugar
  • 3 TBS Butter, melted
  • 1-1/4 Cups (Divided) Flour
  • Pinch of Salt
  • 2 tsp (divided) Cinnamon
  • 2 tsp (divided) Nutmeg
  • 5-6 Medium to Large Apples (I used Fuji), cored and sliced
  • 1 Cup Oatmeal
  • 1 Stick (8 TBS) Butter, room temperature, cut into 16 thin slices
  • Serve with Ice Cream or Frozen Yogurt
Cooking Directions
  1. Preheat oven to 350 degrees
  2. In a large mixing bowl, add Grape Juice, 1/2 Cup Brown Sugar, Melted Butter, 1/4 Cup Flour, Salt, 1 tsp Cinnamon and 1 tsp Nutmeg. Whip until smooth.
  3. Arrange the Apple Slices in a 9X9 inch square baking dish and pour the liquid over the slices.
  4. In another mixing bowl, mix 3/4 Cup Brown Sugar, 1 tsp each cinnamon and nutmeg, 1 Cup Flour, 1 Cup Oatmeal and Butter. Using your hands, dig in and mix until well combined and the mix resembles a coarse crumb like texture (the secret is to have the butter sliced and room temperature soft).
  5. Sprinkle the oatmeal mix over the apples in an even layer.
  6. Bake for 60 minutes, until apples are soft and the oatmeal has browned.
  7. Remove from oven and allow to mostly cool.
  8. Serve WARM, top with a 1/2 scoop of ice cream and ENJOY!

******************************************************

This recipe has been added to my growing list of "52 Church PotLuck Dishes"!

A list of something NEW worthy of being shown off at a neighborhood BYODish (Bring Your Own Dish) Party, a Family special occasion dinner, Any Big Holiday Gathering or of course that glorious day when you bring a dish to share with your Church family...

Ages ago, literally almost a half century ago I was listening to our pastor talking about a PotLuck Dinner. It happened to be scheduled around a church work day when we were expected to weed, polish and do general cleaning and maintenance around the church (you know, back in the day when there were no no-wax floors and church pews smelled of Old English furniture polish). I am of course paraphrasing, but as I recall the pastor said,

"A potluck, like a church requires work. At a potluck everyone is expected to contribute.. At a church no one should come empty handed and no one should leave unfed".
I will confess that in my youth I brought more store bought plastic spoons and forks than I ever brought covered dishes and crock pots of fresh made love and caring delights. But now that I have become a hobbyist cook, I occasionally am reminded of those days and people from my youth. I reminded and I do wish that I could drop a dish of some new creation on those old tables at my fondly remembered Liberty Baptist Church.  Tables covered with newspapers and loaded with God's bounty prepared with love and caring... Enjoy

***********************PINTEREST*********************

Come and find me on Pinterest... Any of my "52 Ways to cook" Boards are worth following.  If you like this post, please take a second and "Pin" this to your own boards... Better yet, if you are part of a foodie group board please take a second and add this post to your group pins... best way to show your Love!

And BTW, if you are not yet part of a group board, drop me an email at Contact@eRecipeCards.com and request to be added to my group board... FAVORITE FOOD BLOGGERS! (be sure to include your pinterest ID when you write)  Once you are added, any pins you add will be seen by 10s of THOUSANDS of followers of the board (and growing daily).

Rules, only 2... 
  1. In order to join you need to start following the group board as well as at least one of my boards.
  2. And you must ONLY pin original sources, posts from food related bloggers only.  If you are a blogger, this is a great way to have thousands of potential readers see your work,  If you are a fan of bloggers, a great way to share your favorites...
    Come and be a part of ... FAVORITE FOOD BLOGGERS! on Pinterest

FMP