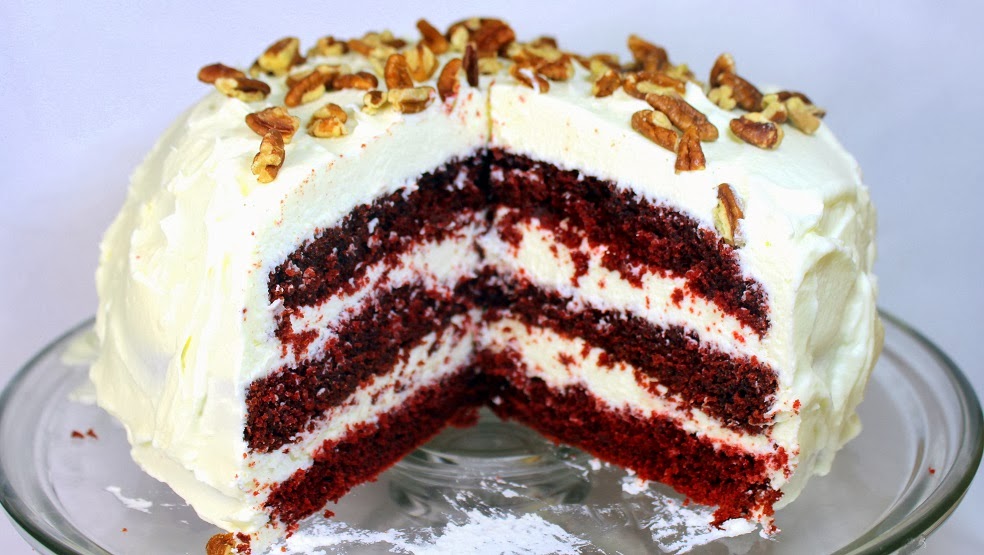
 OK, this post is all about the frosting. Come back next post for the recipe for that beautiful deep colored Almost Traditional Red Velvet Cake.
This "whipped" Buttercream frosting is a tad different than the heavy stiff frosting you probably imagine. Take a look at the photo and I am sure many are thinking this is way too sweet, too much frosting compared to the amount of cake. The goal is almost an equal layer of cake to an equal amount of frosting.
The trick is indeed whipping. Using the whisk attachment, once all the ingredients have been incorporated you whisk for several minutes, adding air to add volume to the frosting. Nearly doubling in size.
So... you betcha this is a sweet icing.... a sweet cake. But the icing, considering the amount between each layer is not as sweet as you imagine.
One tip is to ice the layers slowly and carefully. I iced the first layer and set that in the fridge for an hour before adding the next layer on top. this set the icing, making it a little harder so you can set the next layer on top of that and frost again. This way you do not collapse the layer with icing oozing out the sides as you frost. Sure time consuming but really hands on work not nearly as long.
And be sure to take a look at my next post, the famous ALMOST TRADITIONAL RED VELVET CAKE!
OK... Here's what I did...
Whipped BUTTERCREAM FROSTING
Ingredients
- 3 Sticks Butter, Softened to Room Temperature
- 3 Bricks Cream Cheese, Softened to Room Temperature
- 1 TBS Clear Vanilla Extract
- 3 Cups Confectioners Sugar
- In the bowl of a stand mixer with paddle attachment (or an electric mixer with 2 beaters (do not try this without an electric or stand mixer).Cream together the butter and cream cheese. Mix on low setting for 1 minute,
- Add a TBS of Vanilla... Be sure to add clear vanilla to keep the frosting pure white. If you are going to color the frosting, "regular" Vanilla will work fine,
- Then "whip" at higher setting for 5 minutes.
- Drop the speed to low again, add Powdered Sugar one cup at a time until fully incorporated.
- Now, replace the paddle attachment with the whisk attachment and whisk the buttercream on medium high for 5 more minutes. The frosting will grow almost double in size as you whisk in air. Frosting will be soft but still will retain stiff peaks.
- If making a layer cake, frost a layer, refrigerate to chill and set the frosting between each layer for one hour to prevent the layers from collapsing.
- Serve your cake with pride and ENJOY!
And come take a look at my next post... The RED VELVET CAKE!!!
******************************************************
These are the desserts you make for your family. No fancy amazing wedding cakes, just the rustic beauty of the classics. From pumpkin pie to cheesecakes to layer cakes, these are what your family craves for dessert. You may even see a few unusual crusts and frosting ideas to try.
You get the idea. These recipes are simple, delicious and will have your family wanting dessert first...
***********************PINTEREST*********************
Come and find me on Pinterest... Any of my "52 Ways to cook" Boards are worth following. If you like this post, please take a second and "Pin" this to your own boards... Better yet, if you are part of a foodie group board please take a second and add this post to your group pins... best way to show your Love!
And BTW, if you are not yet part of a group board, drop me an email at Contact@eRecipeCards.com and request to be added to my group board... FAVORITE FOOD BLOGGERS! (be sure to include your pinterest ID when you write) Once you are added, any pins you add will be seen by 10s of THOUSANDS of followers of the board (and growing daily).
Rules, only 2...
- In order to join you need to start following the group board as well as at least one of my boards.
- And you must ONLY pin original sources, posts from food related bloggers only. If you are a blogger, this is a great way to have thousands of potential readers see your work, If you are a fan of bloggers, a great way to share your favorites...
Come and be a part of ... FAVORITE FOOD BLOGGERS! on Pinterest


No comments:
Post a Comment