Monday, November 23, 2015

Cheesy Stuffed Acorn Squash - 52 Side Dishes and Cooking with Beer Recipes

Pin It Now!

Double click the photo above for a link to this
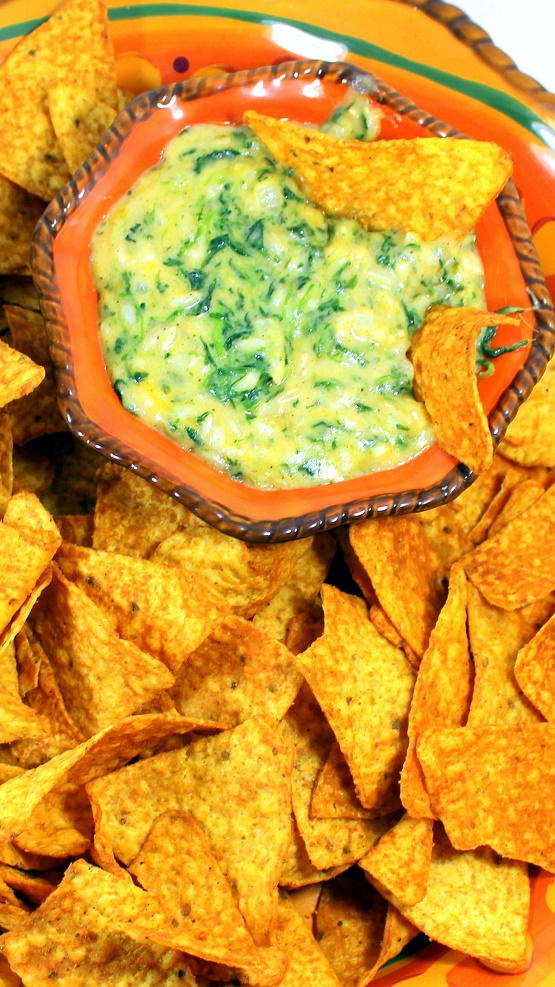
Doritos and Beer Spinach Dip
Did you happen to catch yesterday's post about a party dip - Doritos and Beer Spinach Dip?

This is a planned vegetarian main dish that I made from extra dip.  I have a friend who happens to be a vegetarian.  She is invited to just about all of my larger dinner parties, so I am always on the look out for something new that I can serve and not make her feel like an afterthought.

This stuffed acorn squash was so popular many of my other guests thought about asking for a vegetarian option next party.

Cheese, spinach, rice and the thick meaty squash made for a very tasty meal.

And simple.

PLUS I had a plate of dip and chips the night before for a few family members that came for a visit.

Win - Win - Win - And I get a cheesy dip!

As I am writing this, Thanksgiving meals are being planned throughout the US.  Here's a great option, easy for a lunch but just special enough to serve on any holiday when you want to include your vegetarian friends in a meal other than just asking them to double up on the sides.

And you can easily add an appetizer cheesy dip and chips to your menu!

Enjoy indeed!


For the Cheesy Beer and Doritos Spinach Dip recipe, double click the Blue Letters.

You will need that base to make the stuffed Acorn Squash...

OK.. Here's what I did...


Cheesy Stuffed Acorn Squash


Ingredients
  • 1 Cup Doritos and Beer Spinach Dip
  • 1 Cup Cooked Brown Rice
  • Half and Half (Can use whole milk) to thin the dip as needed.
  • 1 Acorn Squash, Halved lengthwise and de-seeded
  • 2 TBS Butter, Melted
  • Pinch of Sea Salt
Cooking Directions
  1. Position a rack in the upper third of the oven; preheat to 425 degrees.
  2. Cut and de-seed the squash. Brush the butter onto the flesh of the squash. Put the squash, cut-side down on a parchment paper lined cookie sheet. Bake for 1 hour until the shell skin can be pierced easily with a knife.
  3. While the Squash is cooking, Cook the brown rice according to the package directions. Add the cheese dip to the hot rice and stir to mix (and melt). If need be, add a few TBS of Half and Half (or Milk) to this to thin.
  4. When the squash has cooked through, flip the squash over and top with the cheese/rice mix. Return to the oven and cook for about 20 minutes until the cheese has started to brown - Golden Brown and delicious. You can use the broiler setting to brown faster, only 2-3 minutes but be sure to keep an eye on it so it doesn't burn.
  5. Serve HOT and ENJOY!

*************************************************************************

So,  I am pleased to list this as one of my Growing list of  "52 Ways to Cook Side Dish Recipes"!!!

Sure the meat gets all the glory but real cooks know it's the spread... the specialty Side Dishes that makes a meal rise or fall. Here's a few of my favorite recipes that will help to create that illusive COMPLETE MENU!

LOTS of Potato Sides, Vegetable Sides, Specialty Salads, Bread and MORE!

*************************************************************************

Also,  I am pleased to list this as one of my Growing list of  "52 Cooking With BEER Recipes"!!!

Everyone knows about cooking with wine, but BEER has so much more complex flavors.  I imagine the day after beer was invented, someone made an Irish Stew. Cooking with beer infuses recipes with this intoxicating concoction of hops and barley in an effort to enhance and enrich everyday food..  Come take a look, sure to have something you might like to try.  All recipes have been tested and WORK!

****************************PINTEREST**************************

Come and find me on Pinterest... Any of my "52 Ways to cook" Boards are worth following.  If you like this post, please take a second and "Pin" this to your own boards... Better yet, if you are part of a foodie group board please take a second and add this post to your group pins... best way to show your Love!

And BTW, if you are not yet part of a group board, drop me an email at Contact@eRecipeCards.com and request to be added to my group board... FAVORITE FOOD BLOGGERS! (be sure to include your pinterest ID when you write)  Once you are added, any pins you add will be seen by 10s of THOUSANDS of followers of the board (and growing daily).

Rules, only 2... 
  1. In order to join you need to start following the group board as well as at least one of my boards.
  2. And you must ONLY pin original sources, posts from food related bloggers only.  If you are a blogger, this is a great way to have thousands of potential readers see your work,  If you are a fan of bloggers, a great way to share your favorites...
    Come and be a part of ... FAVORITE FOOD BLOGGERS! on Pinterest

Sunday, November 22, 2015

Doritos and Beer Spinach Dip - 52 Appetizers and Cooking with Beer Recipes

Pin It Now!

It's PARTY TIME!

And here's a favorite dip of mine.  A couple of varieties of melty cheese, flavored with a half bottle of beer, made rich and thick with cool sour cream and made pretty (and even an illusion of health) with a package of frozen spinach.

This is the stuff they charge a lot for as an appetizer at restaurants (or charge less and skimp corners).

Add the Doritos and you have a dip that party goers hover over.

Enjoy indeed!


Keep scrolling down for this easy to follow recipe...


 OK... here's what I did...


Doritos and Beer Spinach Dip


Ingredients
  • 1/2 Pound Velveeta Brand Cheese food
  • 1/2 Pound Queso Cheese
  • 1/2 Bottle (6 OZ) Beer
  • 1/2 Large Sweet Onion, small dice
  • 1 tsp Taco Seasoning
  • 1 tsp Garlic Powder
  • 1 (10 OZ) Package Frozen Spinach, thawed, drained and squeeze as much water as possible out.
  • 1 Cup Sour Cream
  • 1 Bag Taco Doritos Chips
Cooking Directions
  1. In a large pot, add both cheeses with the beer and stir to combine. Set over medium heat and continue to occasionally stir until melted and well combined.
  2. Add the onion, spinach and seasonings and continue to stir.
  3. Add the Sour Cream to thin the dip. Add additional sour cream as needed for best dipping consistency.
  4. Serve heated and hot with Doritos Taco Corn chips and ENJOY!

*************************************************************************

So,  I am pleased to list this as one of my Growing list of  "52 Cooking With BEER Recipes"!!!

Everyone knows about cooking with wine, but BEER has so much more complex flavors.  I imagine the day after beer was invented, someone made an Irish Stew. Cooking with beer infuses recipes with this intoxicating concoction of hops and barley in an effort to enhance and enrich everyday food..  Come take a look, sure to have something you might like to try.  All recipes have been tested and WORK!

*************************************************************************
I am also pleased to list this as one of my Growing list of  "52 Appetizers Recipes"!!!

From Dips and Salsas to everyone's favorite, Deviled Eggs; Appetizers will set the mood for something special. And make enough different ones and you have a Tapas Meal!

Links include Dips (Take a Look at the WORLD's BEST Guacamole recipe (and world's easiest to make), Salsas, Grilled Bites, Watermelon Art, and of course something with a spectacular presentation and taste... Take a look, something to match any occasion...

****************************PINTEREST**************************

Come and find me on Pinterest... Any of my "52 Ways to cook" Boards are worth following.  If you like this post, please take a second and "Pin" this to your own boards... Better yet, if you are part of a foodie group board please take a second and add this post to your group pins... best way to show your Love!

And BTW, if you are not yet part of a group board, drop me an email at Contact@eRecipeCards.com and request to be added to my group board... FAVORITE FOOD BLOGGERS! (be sure to include your pinterest ID when you write)  Once you are added, any pins you add will be seen by 10s of THOUSANDS of followers of the board (and growing daily).

Rules, only 2... 


  • In order to join you need to start following the group board as well as at least one of my boards.


  • And you must ONLY pin original sources, posts from food related bloggers only.  If you are a blogger, this is a great way to have thousands of potential readers see your work,  If you are a fan of bloggers, a great way to share your favorites...
    Come and be a part of ... FAVORITE FOOD BLOGGERS! on Pinterest
  • Saturday, November 21, 2015

    5 Pounds of Hamburger is on Sale (Freezable) CHILI - 52 Recipes for Soups and Chili, Church PotLuck Dishes

    Pin It Now!

    I have 2 reasons for making this dish...

    First and most important, I am cheap.  Frugal in polite corners but really, I love a bargain and I am cheap.

    Recently my favorite grocery store had ground beef on sale.  BIG 5 pound tubes of 80/20 ground beef for $1.99 a pound.  I really don't buy much ground beef, so when I need something for a recipe, I end up paying $4 or more per pound.  So I bought 4 "tubes", of hamburger, divided up three of them, broke them down to 1 pound hunks and froze them.  Then used the last one for a BIG batch of chili.  Most to eat now and a gallon or two to freeze for that first COLD spell of winter (not the 30 degree cold, I am talking 5 degrees with wind whipping down the plains... But I digress).

    And Second, I just love this chili recipe.  It is very simple, just brown the burger and dump everything into a big roasting pan, thicken at the end and serve.  But even if this took hours to make, I just love chili!

    This is a very handy recipe to have on hand.  It uses big size ingredients (usually those big cans are much cheaper than an equal amount in smaller cans).  It does indeed feed an army (I made this once for a church project and fed more than 50 people).  It freezes nicely.  I just spoon into gallon size ziplock freezer bags and I have a pot whenever the cold hits my foodie fancy.

    Holiday season is coming up.  Nice to have a big pot of this when you have company.  Those night before Christmas and Thanksgiving meals are solved (as well as midnight snackers).

    So, plan ahead, watch for sales and of course... ENJOY!


     OK... Here's what I did...


    5 Pounds of Hamburger 

    is on Sale 
    CHILI


    Ingredients
    • 5 Pounds Hamburger, browned and drained
    • 1 BIG can (6 lbs 9 oz) Tomato Sauce
    • 6 regular size cans Chili Beans (drained and rinsed
    • 3 Large Sweet Onions, diced
    • 3 Cups Chicken Stock (can use Tomato Juice or water)
    • 1/4 Cup Garlic Powder
    • 1/2 Cup Chili Powder (plus additional to taste)
    • 1 TBS Cayenne Pepper
    • 3 TBS Cumin
    • 1 TBS Oregano
    • 1 TBS Pepper (plus additional to taste)
    • 1 TBS Salt (plus additional to taste)
    • Optional 1/2 Cup Brown Sugar
    • 2 (12 Oz) Cans Tomato Paste (1 extra as needed)
    Cooking Directions
    1. This is a brown and dump recipe... Brown the hamburger, breaking up into small bits.
    2. In a LARGE Roasting pan, add all of the remaining ingredients EXCEPT the tomato paste. Stir to mix
    3. Set on 300 degrees, cover and allow to low simmer for 1 hour.
    4. Add the tomato paste, add additional as needed to thicken the gravy.
    5. Taste, add additional seasonings to taste.
    6. Serve HOT and ENJOY!
    7. BTW, freezes nicely in gallon size freezer bags, perfect size for a chili pick me up on cold winter days.

    *************************************************************************

    So,  I am pleased to list this as one of my Growing list of  "52 Recipes for Soup, Chili or Chowder" (Now more than 52 and still growing)

    Soup from Scratch is one of the great kitchen joys.  The house smells amazing and the soup warms to the bone.  From broth to chowder, vegetarian to loaded up chili... Even a great idea for a party (love the Potato Soup Bar idea).  Come take a look, sure to have something you might like to try.  All recipes have been tested and WORK!

    ****************************PINTEREST**************************

    Come and find me on Pinterest... Any of my "52 Ways to cook" Boards are worth following.  If you like this post, please take a second and "Pin" this to your own boards... Better yet, if you are part of a foodie group board please take a second and add this post to your group pins... best way to show your Love!

    And BTW, if you are not yet part of a group board, drop me an email at Contact@eRecipeCards.com and request to be added to my group board... FAVORITE FOOD BLOGGERS! (be sure to include your pinterest ID when you write)  Once you are added, any pins you add will be seen by 10s of THOUSANDS of followers of the board (and growing daily).

    Rules, only 2... 
    1. In order to join you need to start following the group board as well as at least one of my boards.
    2. And you must ONLY pin original sources, posts from food related bloggers only.  If you are a blogger, this is a great way to have thousands of potential readers see your work,  If you are a fan of bloggers, a great way to share your favorites...
      Come and be a part of ... FAVORITE FOOD BLOGGERS! on Pinterest

    Friday, November 20, 2015

    World's Best Chicken Pot Pie - "Old School" 52 Uses for a Rotisserie Chicken Casserole Recipe

    Pin It Now!

    Just in time for Thanksgiving leftovers (I made this with Chicken from a store bought Rotisserie Chicken, but just imagine the dribs and drabs of your Holiday Turkey turned into this wonderful EASY casserole (and a great use of all those other holiday side dish leftovers)...

    A chicken pot pie is one of those dishes I like to make whenever I buy too much produce.  Extra carrots, cheap cans of corn (love those pre-holiday sales), open bags of frozen peas in the freezer... Use em up, make a meal of leftovers.


    This particular recipe comes from a new favorite cookbook, The Homemade Kitchen: Recipes for Cooking with Pleasure.  The book is a joy to read with dozens of essays on the joy of cooking.  The book features plenty of recipes that back up the author's (Alana Chernila) plans to make a homemade kitchen a way of life.

    A particular aspect of her writings is to use what you have on hand, turn pantry items into something special...

    Like a Chicken Pot Pie.  This is a modification of the recipe she publishes in the book, along with a few additions of mine.

    Most all of her recipes includes a paragraph about how to make the recipe your own.  Optional additional ingredients, swaps or simply encouragement to try something of your own cooking imagination.  Pot Pies are just made for imagining...

    In particular, I made a few lasagnas this week for a catering client.  I had extra Parmesan cheese so I made more of an Alfredo inspired gravy for the base.  I love buttermilk biscuits so I used buttermilk with an extra brush on the top and the extra pepper on top of that brushed buttermilk is an homage to my father who loved dumping pepper into a glass of buttermilk and swigging away.  He was right, pepper and buttermilk go great together!

    Using fresh made Buttermilk Biscuits to top the pot pie is genius!  The thick gravy mixed in with the vegetables make a unique Biscuits and Gravy taste and texture.  The biscuits come out with a crisp top coating and almost a soft chewy dumpling flavor on the bottom, making an additional mix of textures.  Plenty of seasonings (Mustard in the gravy is one I really liked) make this a pot pie to remember.  Better than just a leftover dish, this deserves front and center at any family gathering.  People will rave!


    As to the book, I LOVED THIS BOOK!  A wonderful first cookbook for a beginning want to be cook, while thought provoking enough for any experienced kitchen jockey.  If you have the joy of cooking in your soul, this will reinforce that feeling.  If you want to become a better cook, this will inspire and aid your plans.  And if you just like a good read, spend a cold rainy Sunday afternoon with this book.

    “This is so much more than a cookbook full of unforgettable recipes (though it is that, too). Alana Chernila has written an intimate portrait of a cook in her kitchen, one who celebrates the surprise windfalls and the mundane, everyday moments with equal fervor. Irrepressible, flavor-seeking, and always curious, she makes the best case ever for daily home cooking: happiness!”
    —AMY THIELEN, author of The New Midwestern Table and host of Food Network’s Heartland Table 


    Here's the legal stuff... "I received this book from Blogging for Books for this review." But the review and opinions are 100% accurate and mine!".  Love this book and highly recommend it!


     OK... Here's what I did...


    Chicken Pot Pie


    Ingredients
    • FOR THE FILLING - Meat stripped from one Store Bought Rotisserie Chicken
    • 4 TBS Butter
    • 1/2 Cup Whole Milk
    • 2 Cup Chicken Stock
    • 1 Cup Shredded Parmesan Cheese
    • 4 TBS Olive Oil
    • 2 Medium Sweet Onions, Diced
    • 4 Medium Carrots, Peeled and Diced
    • 1 Cans Sweet Corn, drained
    • 1 Cups Frozen peas, rinsed under hot water to thaw
    • 1 Cup Mushrooms, sliced thin
    • 2 Stalks Leeks, outer leaves peeled, then sliced thin.
    • 2 Stalks Celery, Diced
    • 4 TBS Whole Grain Mustard
    • 2 TBS Thyme
    • 2 TBS Sea Salt
    • 4 TBS Pepper
    • FOR THE BISCUIT BATTER - 4 Cups Flour
    • 2 TBS Baking powder
    • Large Pinch Sea Salt
    • 2 Sticks (1 Cup) Butter, softened to room temperature
    • 2 Cup plus 1/4 Cup Divided Buttermilk
    • 2 Large Eggs
    • 2 TBS Pepper
    Cooking Directions
    1. Preheat oven to 450 degrees
    2. For the filling, in a large heavy bottomed sauce pan, melt the butter and add the flour. Under low to medium heat, stir continuously for 5 minutes until the roux darkens and has a nutty aroma. CAUTION, stir continuously, do not let the flour burn or you must start over.
    3. Add Milk and Chicken stock and stir to Combine. heat to a low simmer and stir occasionally while you cook the vegetables.
    4. To cook the vegetables, in a heavy bottomed frying pan, over medium high heat, Add the diced Onions, Celery, Carrots and Leeks. Saute for about 5 minutes until the onions are soft and translucent.
    5. Add the Peas and Corn and saute for 1 minute.
    6. Add the Mushrooms, Mustard and seasoning, stir to combine
    7. Transfer the cream sauce to the vegetables and stir to mix. Add additional milk if needed for a gravy to your taste.
    8. Transfer this to a large baking dish.
    9. MEANWHILE, make the batter for the biscuits... In a large bowl, combine the Flour and Baking Powder, whisk to mix. Work the soft butter into the dry mix, using your fingers continue to rub together until well integrated.
    10. In a small bowl, whisk together the 2 cups Buttermilk and Eggs.
    11. Fold together the wet and dry ingredients, Do not over mix, that makes dense biscuits.
    12. Spoon hockey puck size bits of the batter evenly over the sauced vegetables.
    13. Bake for 20 minutes until the biscuits are baked through and are golden brown and delicious looking.
    14. Once cooked, brush on additional buttermilk and sprinkle with additional pepper to taste.
    15. Serve HOT and Enjoy!


    Cannot recommend this book more!


    *************************************************************************

    This recipe has been added to my growing list of "52 Uses For a Rotisserie Chicken"  (Now over 100!)...I am so confused... $5.49 for a fully cooked, fully seasoned Oven Roasted, Rotisserie Chicken. Yet shop in the raw meat department and most raw chickens are at best $8 each and usually far closer to $10. Anyone have an answer??? Me either. So, I can either rail against the machine, or learn to embrace the beauty that is the $5 chicken! In this pin are recipes I have made, and recommend. MORE than 52 (I just can't stop)..
    You get the idea.  From Scratch Pizza to Chinese Take Out recipes, Lots of Soups and Chili... Appetizers to Main Courses (Still can't find a dessert, but I am looking).  More than enough ideas for that store bought bird to shine with just a little extra work

    ***********************PINTEREST*********************

    Come and find me on Pinterest... Any of my "52 Ways to cook" Boards are worth following.  If you like this post, please take a second and "Pin" this to your own boards... Better yet, if you are part of a foodie group board please take a second and add this post to your group pins... best way to show your Love!

    And BTW, if you are not yet part of a group board, drop me an email at Contact@eRecipeCards.com and request to be added to my group board... FAVORITE FOOD BLOGGERS! (be sure to include your pinterest ID when you write)  Once you are added, any pins you add will be seen by 10s of THOUSANDS of followers of the board (and growing daily).

    Rules, only 2... 
    1. In order to join you need to start following the group board as well as at least one of my boards.
    2. And you must ONLY pin original sources, posts from food related bloggers only.  If you are a blogger, this is a great way to have thousands of potential readers see your work,  If you are a fan of bloggers, a great way to share your favorites...
      Come and be a part of ... FAVORITE FOOD BLOGGERS! on Pinterest

    Thursday, November 19, 2015

    Marshmallows "Under the Sea" - 52 Snacks for Children's Church

    Pin It Now!

    Another week, another opportunity to make a treat for our Children's Church (and you may want to just make an after school snack for your own mini version of the gang).

    These were wonderfully popular.  Some kids just grabbed a fast bite, some picked off the Goldfish and then peeled off the chocolate coating.  A couple saved theirs to show their parents, but all loved the whimsy.

    These were pretty easy to make.  Honestly it took the first three before I got the hang of making them.  they need to be dipped carefully.  The tricky part is getting the SAND look.  Add too much and you end up with more sand than ocean.  Too little and it just looks spotty.

    So, those first three were the chef's reward (me).  Waste not want not and all that.

    Another tip is to resist the urge to do all the marshmallows at once.  By the time you dip all, the first ones will have already set and you will not be able to get the "Sand" to stick.  But you don't want to work with the marshmallows fresh from the dipping in chocolate stage.  Then they are too wet and the sand will continue to ooze down even as you try to add the sand.

    Find that sweet spot in between too wet and too set.

    But. as I said, your last ones will look better than your first ones so just stick with it and you will find them easy and fun for all!

    Enjoy!


     OK... Here's what I did...


    Marshmallows
    "Under the Sea"


    Ingredients
    • 24 "Normal" size (NOT Mini's) Marshmallows
    • 3 Cups White Chocolate Melting Chips
    • A few drops of Blue Food Coloring to get the Ocean Color
    • 2 Cups Vanilla Wafers crushed into sand (Use a food processor)
    • 96 (a bag) of Goldfish Crackers
    • 24 Skewers or fancy Toothpicks
    Cooking Directions
    1. Melt you white chocolate according to the package directions. Me, I like to do the microwave method, put the chips in a microwave safe bowl, Zap for 15 seconds, stir and repeat until smooth (4 or 5 times should do it. Be careful not to over cook as white chocolate will burn easily. Add drops of food color until you get the correct coloring.
    2. Prepare your stations... A bowl with about 1/4th of the Cookie crumbs, A bowl with about 1/4th of the chocolate, the goldfish close and the marshmallows on skewers.
    3. Work in batches of 2-4 at a time (work with just 1 until you get he hang of getting the right look. Your last ones will look much better than your first ones. Dip the marshmallows in the chocolate to coat the sides . Hold these for a couple of minutes until the chocolate just starts to get set but is still a little wet. Dip the bottom third in the cookie crumbs. I used a small spatula to press the crumbs into the bottom third (be careful, you want the beach look so do your best to not brush the crumbs any higher.
    4. Press the Goldfish Crackers into the chocolate so the fish appear to be swimming. 4 per marshmallow.
    5. Set the finished marshmallows on a sheet of parchment or waxed paper and allow to set fully.
    6. Repeat until finished, you can chill in the fridge to hurry the setting process.
    7. Serve to the delight of the kids and ENJOY!

    Wednesday, November 18, 2015

    Holiday M&M Gravity Cake (EASY EASY EASY and Spectacular) - 52 Cakes and Pies at Home

    Pin It Now!

    The idea for this cake has been popping around the internet and Pinterest for awhile.  But I was never really able to find directions, just photos.

    So I thought about it for a bit, what it would take to get the bag held up, how to get the look of the gravity defying cascading M and Ms.

    Turns out, this is about as easy as it gets!

    There is one tricky part...

    The brace in the cake.

    If you are not careful to use a little engineering math, the weight of the M and Ms/Dowel/Frosting will gradually force the whole AMAZING part to fall.

    I have made this cake a few times now and the braces turn out to be pretty easy.  I have used a dowel rod as the main center.  In the photo shown to the right I used long skewers (like for BBQing).  The real secret is the extra side pieces that form a tri pod to hold the dowel upright and take the pressure of the weight of gravity.

    Remember, Gravity - It's not just a good idea, it's the law!

    Take a close look at the montage of photos to the right.  It REALLY IS EASY once you get the dowel rod braced.

    Get the kids to help, they will LOVE making this!

    Other than that, the cake is pretty obvious.  I went ahead and used box mix and canned frosting.  Sure I have scratch versions of each but honestly, no one is eating this based on the taste.

    Kit Kat brand candy bars line the edge (use the mini size).

    Buy 2 cans of frosting, use extra around the sides to "glue" the bars to the cake.

    Then use extra frosting to coat the dowel and support pieces so that you can stick the bag and M and Ms on.

    And that's it.  Easy Peasy and an AMAZING CROWD PLEASER!

    Enjoy!


     OK... Here's what I did...

    Holiday M&Ms
    Gravity  Cake


    Ingredients
    • 1 BOX White Confetti Cake Mix,Baked according to directions on the box, in 2 (8 Inch) Springform pans
    • 2 CANS White Buttercream  Icing (No one is eating this because of your scratch recipe skills, use the boxes and cans for ease)
    • 25 to 30 Holiday WHITE "Kit Kat" Brand Mini bars (the Halloween give away size Type) 
    • A BIG Bag of Christmas Color M and M Brand Candy
    • A one foot long 3/4 inch thick DOWEL ROD
    • a Single Chopstick, broken in half
    • a metal twist tie from a breadwrapper
    Cooking Directions
    1. Please refer to the photos in the post for a better guide to get "the Look".
    2. Bake the cake according to the package directions. Use one can of frosting to frost the cake as you would a "normal" 2 layer cake.
    3. Use 1/4th of the second can of frosting to add an extra thick layer of frosting around the sides. This will make it easier to add the Kit Kat bars.
    4. Add the Kit Kat bars, sticking them to the side of the cake, pressing into the frosting. Work for an even appearance, level across the top and uniform looking around the sides.
    5. Now is the only tricky part... Stick the dowel rod into the cake at about a 120 degree angle. A little higher than a right angle 90 degree angle. Press in until the dowel hits bottom.
    6. Close to where the dowel emerges from the cake. insert the two halves of the chopstick so that when combined with the dowel they form a tripod for stability. arrange the leg braces so that you can wrap a bread wrapper metal twist tie around the meeting point of the dowel and braces (again, see photo).
    7. Coat the dowel and leg braces with the remaining frosting.
    8. Open the bag of M and M Brand Candy in such a way that the bag only has a small opening where you can insert the empty bag onto the top of the dowel rod for the appearance of M and M Brand Candy cascading out of the bag.
    9. Press M&Ms into the frosting covering every inch as best you can except the top one inch.  Insert the opening of the M and M Brand Candy bag into the top of the dowel, pressing the bag into the frosting to act as a glue.
    10. Pour remaining M and M Brand Candy on top of the cake so it looks like they have come from the bag. Chill until ready to serve. You don't want the frosting on the dowel to weaken.
    11. Serve chilled to the Oooohs and Aaaahs of amazement and... ENJOY!

    ******************************************************

    This simple recipe has been added to my growing list of "52 Cakes and Pies at Home"!

    These are the desserts you make for your family.  No fancy amazing wedding cakes, just the rustic beauty of the classics.  From pumpkin pie to cheesecakes to layer cakes, these are what your family craves for dessert.  You may even see a few unusual crusts and frosting ideas to try.

    You get the idea. These recipes are simple, delicious and will have your family wanting dessert first...

    ***********************PINTEREST*********************

    Come and find me on Pinterest... Any of my "52 Ways to cook" Boards are worth following.  If you like this post, please take a second and "Pin" this to your own boards... Better yet, if you are part of a foodie group board please take a second and add this post to your group pins... best way to show your Love!

    And BTW, if you are not yet part of a group board, drop me an email at Contact@eRecipeCards.com and request to be added to my group board... FAVORITE FOOD BLOGGERS! (be sure to include your pinterest ID when you write)  Once you are added, any pins you add will be seen by 10s of THOUSANDS of followers of the board (and growing daily).

    Rules, only 2... 
    1. In order to join you need to start following the group board as well as at least one of my boards.
    2. And you must ONLY pin original sources, posts from food related bloggers only.  If you are a blogger, this is a great way to have thousands of potential readers see your work,  If you are a fan of bloggers, a great way to share your favorites...
      Come and be a part of ... FAVORITE FOOD BLOGGERS! on Pinterest

    Tuesday, November 17, 2015

    Secret Ingredient CHOCOLATE CHIP COOKIES -Shhhhh! - 52 Cookie Recipes

    Pin It Now!

    Shhhhh!

    Keep quiet and be a star!

    Everyone needs an everyday Chocolate Chip cookie recipe.  And truth be told, no matter what you might read, the recipe on the bag is really really good.

    But some days you want to show off.  Some days you need a little something something extra to make your cookies stand out as the "Best I've ever had"!

    And here it is.

    First, a little extra texture... Almond Meal.  This also adds a slight nutty flavor.  I like to add some walnuts to my cookies but not everyone likes that extra crunch.  Adding a bit of almond meal will get you a slight extra nutty flavor without the crunchy texture of adding nuts.

    Next, a little extra Flavor... Cayenne Pepper Spice AND the Zest of an Orange.  Be very conservative (1/4 tsp or just a tiny pinch) is plenty.  You really can not taste the spice but it does increase the number of taste buds that taste your cookies making them a fuller flavored cookie.  Relly, it's too much science-y stuff, but there are some taste buds that only taste Hot Spicy things... Like Cayenne Pepper Spice.  Same applies to the orange zest.  just a little extra citrus flavor.  Not really enough to single out the flavor, but certainly something something extra.

    And finally... Increase the chocolate chips.  'Nuff Said!

    Keep scrolling down, the full recipe follows, but I will promise that this recipe will make your cookies stand out from the pack.

    Just keep it down, or pretty soon everyone will have your secrets.

    Enjoy!


     OK... Here's what I did...

    Secret Ingredient
    Chocolate Chip Cookies

    Ingredients
    • 2 Cups Flour
    • 1/4 Cup Almond Meal
    • 1 tsp Salt
    • 1 tiny pinch (less than 1/8th TSP) Cayenne Pepper
    • 1 Cup (2 Sticks) Butter, softened to room temperature
    • 3/4 Cup Sugar
    • Zest of 1 Medium Orange
    • 3/4 Cup Brown Sugar
    • 1 tsp Vanilla
    • 2 Large Eggs
    • 2-1/2 Cups Semi-Sweet Chocolate Chips (Lots of Chips)
    • 1 Cup Walnut Pieces (optional)
    Cooking Directions
    1. Preheat oven to 375. Prepare baking sheet with parchment paper
    2. In the bowl of a stand mixer, mix Butter, Sugar, Orange Zest, Vanilla and Brown Sugar with the paddle attachment until Creamy.
    3. Meanwhile, in a separate bowl whisk together the Flour, Almond Meal, Salt and Cayenne Pepper until well combined.
    4. Add the eggs one at a time to the butter mix and mix for one additional minute.
    5. Remove bowl from the stand mixer. Fold wet ingredients and dry ingredients together until well mixed. BUT do not over mix. Once the ingredients have been incorporated, add the Chocolate Chips and optional nuts. Fold until evenly mixed.
    6. Drop by rounded teaspoon onto the cookie sheet, 2 inches apart.
    7. Bake for 9 minutes until edges just start to brown. The goal is to have a bit of crunch on the outside while the center is soft and chewy.
    8. Remove the tray from the oven and allow to cool for 5 minutes before transferring the cookies onto a cooling rack.
    9. Makes 4 to 5 dozen, Serve still a bit warm from the oven with an ice cold glass of milk and ENJOY!

    *************************************************************************

    So,  I am pleased to list this as one of my Growing list of  "52 Ways to Cook COOKIE, BARS and TRUFFLES"!!!

    Old school like classic criss cross peanut butter to new takes on interesting recipes like a beautiful Red Velvet with the cream cheese mixed inside the cookie, accented with white chocolate chips!  Even a Pineapple Cream Cheese EASY Bar with only 5 ingredients! 
    Stop on by, there's always a new cookie in the cookie jar!

    ****************************PINTEREST**************************

    Come and find me on Pinterest... Any of my "52 Ways to cook" Boards are worth following.  If you like this post, please take a second and "Pin" this to your own boards... Better yet, if you are part of a foodie group board please take a second and add this post to your group pins... best way to show your Love!

    And BTW, if you are not yet part of a group board, drop me an email at Contact@eRecipeCards.com and request to be added to my group board... FAVORITE FOOD BLOGGERS! (be sure to include your pinterest ID when you write)  Once you are added, any pins you add will be seen by 10s of THOUSANDS of followers of the board (and growing daily).

    Rules, only 2... 
    1. In order to join you need to start following the group board as well as at least one of my boards.
    2. And you must ONLY pin original sources, posts from food related bloggers only.  If you are a blogger, this is a great way to have thousands of potential readers see your work,  If you are a fan of bloggers, a great way to share your favorites...
      Come and be a part of ... FAVORITE FOOD BLOGGERS! on Pinterest
    FMP