Tuesday, September 23, 2014

HUMMUS - Fast and Easy - 5 Minutes Lemon Garlic HUMMUS - 52 Appetizers Recipes

Pin It Now!

WOW Is this easy!!!

A Whirl through the food processor is the only cooking instructions.  Ingredients are probably in your pantry right now (well, you may have to shop for a can of chickpeas),

The fresh toasted pita triangles are just as easy and just as fast.  Start to finish, 5 minutes!

Rich satisfying HEALTHY tastes, lemony with just hints and flashes of spices and you have a fresh made CHEAP Appetizer that will amaze!

Enjoy


Keep Scrolling Down for this Easy to Follow recipe...


OK... Here's what I did...


HUMMUS -
Fast and Easy - 5 Minutes
Lemon Garlic HUMMUS


Ingredients
  • FOR THE PITA CHIPS 6 - (Six inch) Pita Rounds
  • Drizzle of Olive Oil
  • Sprinkle of Sea Salt
  • FOR THE HUMMUS 1 Can (15 OZ) Chickpeas (Garbanzo Beans), Drained
  • 3 Large Cloves Garlic, Peeled, crushed and minced
  • 1 tsp Cumin
  • Pinch Cayenne Pepper (to Taste)
  • Juice and Zest of 1 Medium Lemon
  • 3 TBS Olive Oil
Cooking Directions
  1. FOR THE PITA CHIPS... Preheat oven to 400 degrees. Cut Each Pita Round into 8 triangles (like Pie Slices). Lay out a single layer of the pitas on a cookie sheet. Drizzle Olive Oil over the chops, Sprinkle Sea Salt on the Chips. Bake for 5 Minutes until chips begin to crisp.
  2. FOR THE HUMMUS... Meanwhile, In the bowl of a Food Processor, Add the drained Chickpeas, Minced Garlic, Cumin, Cayenne, Lemon Zest and Juice and the Olive Oil. Process for 10 seconds, scrape down the sides of the bowl and process for another 5 seconds. Hummus should be the consistency of a thick milk shake. Add additional Lemon Juice or Olive Oil to reach correct texture.
  3. Serve Chilled or at Room Temperature and ENJOY!!!

******************************************************

This simple recipe has been added to my growing list of "52 Simple but Next Level Dishes"!

Kind of an odd title for these posts. But the longer sentence is... Simple recipes that are easy and inexpensive that will take your cooking to the next level... Things like easy pickled items (I always have a jar of Pickled Red Onions for sandwiches in my fridge). Or how about the easiest bread to make in the world... Beer Bread that is tasty on it's own but also makes a wonderful open face pizza style sandwich... With easy to make Tomato Sauce. Or how about Roasting Garlic for a spread on toast points for a unique appetizer. Infusing Oil with Herbs or spices or spicy peppers. Or how about making your own BBQ sauce. Nothing sets you apart as a grill master like setting out a jar of your own specialty BBQ Sauce.

You get the idea. These recipes are very simple, take very little time but will set you apart as a better cook...

***********************PINTEREST*********************

Come and find me on Pinterest... Any of my "52 Ways to cook" Boards are worth following.  If you like this post, please take a second and "Pin" this to your own boards... Better yet, if you are part of a foodie group board please take a second and add this post to your group pins... best way to show your Love!

And BTW, if you are not yet part of a group board, drop me an email at Contact@eRecipeCards.com and request to be added to my group board... FAVORITE FOOD BLOGGERS! (be sure to include your pinterest ID when you write)  Once you are added, any pins you add will be seen by 10s of THOUSANDS of followers of the board (and growing daily).

Rules, only 2... 
  1. In order to join you need to start following the group board as well as at least one of my boards.
  2. And you must ONLY pin original sources, posts from food related bloggers only.  If you are a blogger, this is a great way to have thousands of potential readers see your work,  If you are a fan of bloggers, a great way to share your favorites...
    Come and be a part of ... FAVORITE FOOD BLOGGERS! on Pinterest

Monday, September 22, 2014

Cheddar Cheese Buttermilk CORNBREAD - 52 Side Dish Recipes

Pin It Now!

Oh BOY Scratch made CORNBREAD!

But not just any cornbread, this is loaded with corn, onions, and even a little jalapeno peppers (Trim out the white membrane and seeds if you only want hints of spice... Dice up the whole pepper, seeds, membrane and all if you want that really spicy taste. There is even more than a cup of REAL Corn in the Cornbread!

Cheesy and amazingly moist (that's the buttermilk) and you have something special.  Not the dry bland box mix.  Takes only a few minutes more but SO MUCH WORTH THE EXTRA DIY EFFORT!

And goes PERFECT with a specialty Chili on a Crisp Cool Fall Day!


Keep scrolling down for this easy to follow recipe...


OK... Here's what I did...


Cheddar Cheese Buttermilk Cornbread


Ingredients
  • 1 Medium Sweet Onion, Diced
  • 4 TBS Butter
  • 1 Cup Cornmeal
  • 1 Cup Flour
  • 1 TBS Baking Powder
  • 1 tsp Salt
  • 1 pinch Cayenne Powder
  • 1/4 Cup Sugar
  • 2 Medium Jalapeno Peppers (Stems, White Inner Membrane, Seeds
  • 1 Cup Grated Cheddar Cheese Divided (save a bit for a topping)
  • 1 Cup Buttermilk
  • 1 Can (15 OZ) Sweet Corn, drained
Cooking Directions
  1. Preheat oven to 400 degrees
  2. In a large Heavy Bottomed skillet, over medium high heat, melt the butter and add the diced onion. Saute every couple of minutes until Onions have become soft and translucent.
  3. Meanwhile, whisk together the Corn Meal, Flour and Baking Powder. Add the Salt, Cayenne Pepper, Sugar, Jalapeno Pepper, Cheese (most of it, save a small handful for topping) and drained Sweet Corn. Stir to mix.
  4. In a small bowl, whisk together the Buttermilk and Egg.
  5. Add the Butter and Onions to the dry ingredients, stir to mix.
  6. Add the Buttermilk and Egg mix and fold to mix with no lumps. But, do not over mix.
  7. Spoon mixture onto a 9X13 Casserole pan (be sure to use non-stick spray or line with parchment paper before you spoon)..
  8. Bake at 400 degrees for 20 minutes. After 20 minutes, add remaining Cheese to the top, return to oven and bake an additional 5 minutes until top is golden brown and delicious. Insert a knife in the center. If it comes out clean, the bread is done. If still wet, return to oven and bake for an additional 5 minutes... repeat test.
  9. Serve WARM and ENJOY!

*************************************************************************

So,  I am pleased to list this as one of my Growing list of  "52 Ways to Cook Side Dish Recipes"!!!

Sure the meat gets all the glory but real cooks know it's the spread... the specialty Side Dishes that makes a meal rise or fall. Here's a few of my favorite recipes that will help to create that illusive COMPLETE MENU!

LOTS of Potato Sides, Vegetable Sides, Specialty Salads, Bread and MORE!

******************************************************

This recipe has been added to my growing list of "52 Church PotLuck Dishes"!

A list of something NEW worthy of being shown off at a neighborhood BYODish (Bring Your Own Dish) Party, a Family special occasion dinner, Any Big Holiday Gathering or of course that glorious day when you bring a dish to share with your Church family...

Ages ago, literally almost a half century ago I was listening to our pastor talking about a PotLuck Dinner. It happened to be scheduled around a church work day when we were expected to weed, polish and do general cleaning and maintenance around the church (you know, back in the day when there were no no-wax floors and church pews smelled of Old English furniture polish). I am of course paraphrasing, but as I recall the pastor said,

"A potluck, like a church requires work. At a potluck everyone is expected to contribute.. At a church no one should come empty handed and no one should leave unfed".
I will confess that in my youth I brought more store bought plastic spoons and forks than I ever brought covered dishes and crock pots of fresh made love and caring delights. But now that I have become a hobbyist cook, I occasionally am reminded of those days and people from my youth. I reminded and I do wish that I could drop a dish of some new creation on those old tables at my fondly remembered Liberty Baptist Church.  Tables covered with newspapers and loaded with God's bounty prepared with love and caring... Enjoy

***********************PINTEREST*********************

Come and find me on Pinterest... Any of my "52 Ways to cook" Boards are worth following.  If you like this post, please take a second and "Pin" this to your own boards... Better yet, if you are part of a foodie group board please take a second and add this post to your group pins... best way to show your Love!

And BTW, if you are not yet part of a group board, drop me an email at Contact@eRecipeCards.com and request to be added to my group board... FAVORITE FOOD BLOGGERS! (be sure to include your pinterest ID when you write)  Once you are added, any pins you add will be seen by 10s of THOUSANDS of followers of the board (and growing daily).

Rules, only 2... 
  1. In order to join you need to start following the group board as well as at least one of my boards.
  2. And you must ONLY pin original sources, posts from food related bloggers only.  If you are a blogger, this is a great way to have thousands of potential readers see your work,  If you are a fan of bloggers, a great way to share your favorites...
    Come and be a part of ... FAVORITE FOOD BLOGGERS! on Pinterest

Sunday, September 21, 2014

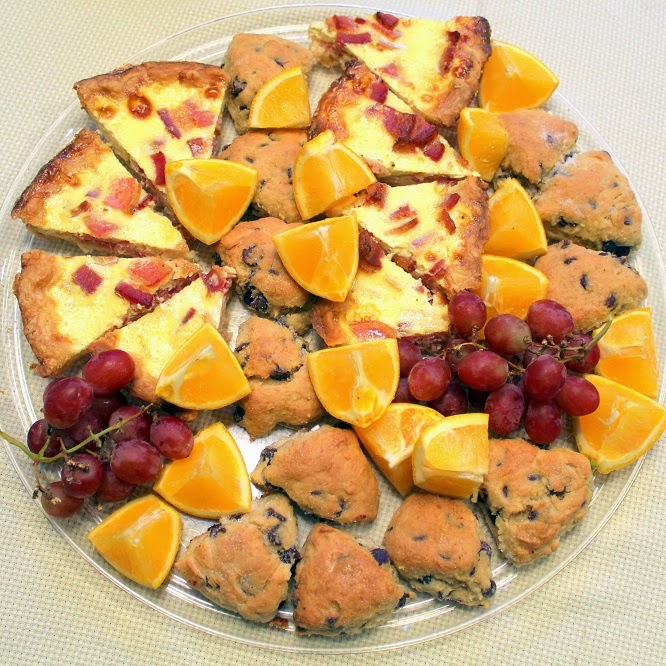
Do Ahead BREAKFAST - Quiche - Scones - Fruit - 52 Breakfast and Catering Recipes

Pin It Now!

Keep scrolling... recipes for the Quiche Loraine and Chocolate Chip Scones below.

I am a Caterer!  Odd thing to say as I sort of backed into the deal.  I work mostly for a single client, a Realtor related company that serves lunches for 20-30 people 3 or 4 places a week (fortunately all lunches for the most part served on the same day).  SO, one day a week I fire up the platters and serve up sandwiches, sides, desserts and specialty salads.

But occasionally I am asked for a platter of food for breakfast.  While I like to make fresh food for the lunches made the same day they are served (yes, I get up at 3 AM to start cooking on "game Day").  When I am serving these breakfasts everything needs to be made the day before.

This morning I was asked to serve up a breakfast platter for 6-10 people.  While I was making up the platter last night it occurred to me that this would make a pretty useful blog post.  Not only for any caterers out there but also for anyone hosting extra family or friends (Thanksgiving and Christmas are sneaking up quick).

Here's what I like about this meal...

  • Everything is made the night before.  Just artfully arrange on a platter and cover with cling wrap.  Breakfast is done!
  • Everything can be chilled in the fridge until ready to serve, can sit out for hours (Quiche and scones are great fresh and hot, room temperature or chilled) or warmed up.
  • And finally... You get to be part of the fun of having guests... They are visiting you, not for memorable breakfast but memorable visits (but the platter is pretty memorable!
So, make this platter up, charge $40-$50 for it... Or make this platter and enjoy your morning.  


OK... Here's what I did...

Quiche Lorraine
Makes 2 "pies" 16 Slices


Ingredients
  • 2 - Nine Inch Pie Crust (Scratch made or store bought)
  • 1 Pound Thick Slice Bacon, sliced into 1 inch pieces and fried
  • 4 Cups (2 - 8 Ounce Bricks) Gruyere Cheese (buy the brick cheese and fresh grate)
  • 6 Cups Half and Half
  • 1 tsp Salt
  • 10 Large Eggs, slightly beaten
Cooking Directions
  1. Prepare your ingredients, Par-Bake your pie shell (400 degrees for about 8 -10 minutes until it just starts to brown. This is important to avoid a soggy crust). Fry the bacon (easier to fry after you slice the raw bacon into pieces). In a large bowl, break all the eggs and whip slightly. Grate the cheese.
  2. Preheat oven to 350 degrees
  3. Add the Half and Half and salt to the beaten eggs and whip until smooth and evenly colored, thoroughly mixed.
  4. Line the bottom of each pie shell with the grated cheese, evenly divided.
  5. Top this cheese with the bacon, again evenly divided.
  6. Add the milky egg mix on top of the cheesy bacon to the top of the pie shell.
  7. Move to the oven and bake for 30 to 40 minutes until the top just starts to brown.
  8. Quiche can be served warm (allow it to rest for 30 minutes before slicing), room temperature (perfect for a brunch buffet) or chilled from the fridge.
  9. If you want to freeze one and serve one, Freezing instructions... Chill for several hours in the refrigerator. Wrap TIGHTLY with cling wrap, then with aluminum foil. Date and freeze for no more than 60 days. When reheating, thaw first, then reheat in the oven, NEVER the microwave (or crust will get soggy). 450 for 20-30 minutes.
  10. And tell the quiche-phobic that you are serving BACON CHEESECAKE and ENJOY!
**************************************************************

OK... Here's what I did...

Sour Cream
Chocolate Chip Scones

Makes 24 2-Bite Scones


Ingredients
  • 1 - 3/4 Cups Flour
  • 1/4 Cup Almond Meal (can substitute another 1/4 Cup flour)
  • 2 TBS Sugar
  • 3 TBS Packed Brown Sugar
  • 1 tsp Baking Powder
  • pinch Baking Soda
  • Zest of 1 Medium Orange
  • 1 tsp Salt
  • 6 TBS Butter, VERY COLD and cut into small cubes
  • 3/4 Cup Sour Cream
  • 1 Large Egg
  • 1 tsp Vanilla
  • 1 (12 Ounce) Bag Mini-Chocolate Chips
  • 2 TBS Melted Butter
  • 1/4 Cup Sugar
Cooking Directions
  1. Preheat oven to 400 degrees
  2. Mix flour, almond meal, both sugars, baking powder and soda, orange zest and salt.
  3. Add flour mix to the bowl of a food processor. Add the COLD Butter one cube at a time with the processor running. Continue to process until the mix forms into tiny beads.
  4. In a large bowl, whisk together the Sour Cream, Egg, and Vanilla.
  5. BY HAND, do not add to the food processor as that would cause tough scones... By hand add the flour mix to the wet ingredients and mix until just blended. do not over mix.
  6. Fold in the chocolate chips.
  7. Turn out onto a lightly floured surface. Form into a flat 7 inch circle and slice into 8 pie shaped pieces.... Or 4 smaller disc, each cut into 6 slices, 24 two bite pieces
  8. Transfer to a parchment paper lined cookie sheet, pieces separated by about an inch so they are not touching. Bake for 15-17 minutes until top just begins to brown on the edges
  9. Remove from oven and let rest for 5 minutes. While the scones are still warm, brush with the melted butter and then sprinkle additional sugar on the top
  10. Best served warm with a nice hot cup of coffee, but tastes great room temperature. If not served immediately, store in air tight container.... And ENJOY!!!

******************************************************

This simple recipe has been added to my growing list of "52 Breakfast Ideas!"

It's the most important meal of the day.  From fancy to simple, there are always ways to dress up a breakfast dish.  These are the meals that make Bed and Breakfast Inns legendary (and usually easier than you think).

Here's your chance to make your guests Ooh and Aah!

***********************PINTEREST*********************

Come and find me on Pinterest... Any of my "52 Ways to cook" Boards are worth following.  If you like this post, please take a second and "Pin" this to your own boards... Better yet, if you are part of a foodie group board please take a second and add this post to your group pins... best way to show your Love!

And BTW, if you are not yet part of a group board, drop me an email at Contact@eRecipeCards.com and request to be added to my group board... FAVORITE FOOD BLOGGERS! (be sure to include your pinterest ID when you write)  Once you are added, any pins you add will be seen by 10s of THOUSANDS of followers of the board (and growing daily).

Rules, only 2... 
  1. In order to join you need to start following the group board as well as at least one of my boards.
  2. And you must ONLY pin original sources, posts from food related bloggers only.  If you are a blogger, this is a great way to have thousands of potential readers see your work,  If you are a fan of bloggers, a great way to share your favorites...
    Come and be a part of ... FAVORITE FOOD BLOGGERS! on Pinterest

Saturday, September 20, 2014

Spiral Spinach and Cheese Bites with Sun Dried Tomato Pesto - 52 Church PotLuck Appetizers

Pin It Now!

Oh BOY are these little guys PACKED with flavor.

The white is a Cream cheese flavored with ranch Dressing and Garlic Chives (recipe below).

The Green is Spinach.

And the Red is a Sun Dried Tomato Pesto!

Of course you can buy a jar of that or feel free to MAKE YOUR OWN!... Just follow this LINK for my recipe for Sun Dried Tomato Pesto.

The combination of flavors makes this an irresistible very satisfying little snack.  Perfect for any "Pass a Plate" event, PotLuck, Family gathering or just when you want a snappy little bite!

Keep scrolling down for this easy to follow recipe.


OK... here's what I did...


Spiral Spinach and Cheese Bites with Sun Dried Tomato Pesto


Ingredients
  • 4 Large Burrito Size Tortillas
  • 1 Bag (5 Ounces) Pre-Washed Spinach
  • FOR THE CHIVE CREAM CHEESE 2 (8 OZ) Bricks Cream Cheese, softened to room temperature
  • 1/4 Cup Ranch Dressing
  • 1/4 Cup Garlic Chives, Minced
  • 1 Cup Sun Dried Tomato Pesto
Cooking Directions
  1. First, Make the Cream Cheese... In a Stand Mixer, combine the cream cheese the Ranch Dressing and the Chives. Mix at medium speed until the cheese becomes light and fluffy, about 5 minutes.
  2. Lay out a Tortilla on a cutting boar. Spread about 1/4th of the Cream Cheese in an even coating over the entire Tortilla.
  3. Add a layer of the Spinach, overlapping to make a thicker layer.
  4. In the Canter of the Tortilla, over the cream cheese and spinach layers, add a line of the Sun Dried Tomato Pesto, about 1/4 inch round.
  5. With that line of pesto parallel to you, begin rolling from the bottom. Tight but not pressing too tight. Once you have the tortilla rolled into a log put it in the refrigerator for an hour for the cheese to set.
  6. Repeat with the remaining tortillas.
  7. Slice each Tortilla log into a dozen same size slices (about 1/3rd inch each). Discard (or cook's treat) the ends that do not look pretty, plate and return to the refrigerator until ready to serve.
  8. Serve chilled and ENJOY!

******************************************************

This recipe has been added to my growing list of "52 Church PotLuck Dishes"!

A list of something NEW worthy of being shown off at a neighborhood BYODish (Bring Your Own Dish) Party, a Family special occasion dinner, Any Big Holiday Gathering or of course that glorious day when you bring a dish to share with your Church family...

Ages ago, literally almost a half century ago I was listening to our pastor talking about a PotLuck Dinner. It happened to be scheduled around a church work day when we were expected to weed, polish and do general cleaning and maintenance around the church (you know, back in the day when there were no no-wax floors and church pews smelled of Old English furniture polish). I am of course paraphrasing, but as I recall the pastor said,

"A potluck, like a church requires work. At a potluck everyone is expected to contribute.. At a church no one should come empty handed and no one should leave unfed".
I will confess that in my youth I brought more store bought plastic spoons and forks than I ever brought covered dishes and crock pots of fresh made love and caring delights. But now that I have become a hobbyist cook, I occasionally am reminded of those days and people from my youth. I reminded and I do wish that I could drop a dish of some new creation on those old tables at my fondly remembered Liberty Baptist Church.  Tables covered with newspapers and loaded with God's bounty prepared with love and caring... Enjoy

***********************PINTEREST*********************

Come and find me on Pinterest... Any of my "52 Ways to cook" Boards are worth following.  If you like this post, please take a second and "Pin" this to your own boards... Better yet, if you are part of a foodie group board please take a second and add this post to your group pins... best way to show your Love!

And BTW, if you are not yet part of a group board, drop me an email at Contact@eRecipeCards.com and request to be added to my group board... FAVORITE FOOD BLOGGERS! (be sure to include your pinterest ID when you write)  Once you are added, any pins you add will be seen by 10s of THOUSANDS of followers of the board (and growing daily).

Rules, only 2... 
  1. In order to join you need to start following the group board as well as at least one of my boards.
  2. And you must ONLY pin original sources, posts from food related bloggers only.  If you are a blogger, this is a great way to have thousands of potential readers see your work,  If you are a fan of bloggers, a great way to share your favorites...
    Come and be a part of ... FAVORITE FOOD BLOGGERS! on Pinterest

Friday, September 19, 2014

Sun Dried Tomato Pesto - 52 Small Batch Canning Ideas

Pin It Now!

Yet again, another, "You can't make that recipe without first making This"!

Lately I have become obsessed with Sun Dried Tomato pesto.  I have made a really good pesto pasta, but lately I have been making large batches of a specialty Spiral Wrap   That illusive vegetarian snack perfect for any "pass a Plate" occasion and is now a staple of my Catering lunches.

But that's a recipe for tomorrow.

A few days ago I posted a recipe for making your own Sun Dried Tomatoes packed in Oil.  This recipe is the natural progression of making your own.

You can certainly buy jars of Sun Dried tomatoes packed in oil.  But once you make that decision to buy a food dehydrator, it is just a matter of planning (it takes almost a full day to dry them out).

Aside from the pinwheel sandwiches just a spoonful brightens up the taste of left over pasta.  A quick snack of  toast and pesto.  for main courses, a dollop on top of a simple salad turns that simple salad into a gourmet delight.

Just a quick google search of "With Sun Dried Tomato Pesto" gives you dozens and dozens of ideas... Scallops!  Vegetables (on Celery) like Brussels Sprouts!  Eggs Florentine!  Blackened Chicken !  Salmon!

So many uses... So little Time!

This Pesto, unlike traditional Basil Pesto will last for several months in the refrigerator.  If you store in a narrow lid jar, pour a thin layer of fresh Olive Oil over the top each time you open the jar to help preserve the freshness.

Course, so far Mine lasts less than a week!

Keep scrolling down for this easy to follow recipe...


OK... Here's what I did...


Sun Dried Tomato Pesto


Ingredients
  • 1 Pint Jar (2 Cups) Sun Dried Tomatoes Packed in Oil
  • 1 Cup Toasted Almonds (can use Walnuts or traditionally Pine Nuts)
  • 1 Head of Garlic, Separated into cloves, skins removed and rough dice
  • 1 Cup Freshly Grated Parmesan Cheese
  • 1 Cup Tightly Packed Basil (can use Spinach)
  • Pinch of Sea Salt
  • Zest of 1 Medium Lemon
  • Depending on use, may need additional Olive Oil
Cooking Directions
  1. In a Food Processor, add the Sun Dried Tomatoes (with the Oil they are packed in) with all other ingredients. Process until evenly minced.
  2. AS NEEDED, while the processor is running, add additional Olive Oil to get a wetter batch. Especially if you are planning to use the pesto with pasta, you may want a more spreadable wet Pesto.
  3. Store covered in the fridge until ready to use and ENJOY!
And come back tomorrow to see my recipe for these quick and easy Sun Dried Tomato pesto Pinwheel Snacks!


Thursday, September 18, 2014

Lemon Lemon Sugar Cookies (Cookies so Lemony I named 'em Twice) - 52 Cookie Recipes

Pin It Now!

OH BOY... A new favorite cookie.

I am constantly on the look out for an Adult Cookie.  Certainly something that satisfies the sweet tooth in us all, but also mixes flavors (in this case sweet and sour) and has a real PUNCH of flavor.  You will need to break out your microplane zester for this as the recipe features the ZEST of SEVEN lemons.  That's where the real lemon flavor is.

No need for frosting, sprinkles or funny shapes... Just big girl grown up flavors that pack that PUNCH!

Be sure to check out yesterday's post on how to make the Lemon Sugar that really makes these beauties sing!

Feel free to cut in half (or quarters). But as I imply, I was making these for a BIG group. I served two lunches (20 people each), delivered 3 dozen to friends and still had a couple dozen left for me! This recipe made almost 10 dozen silver dollar size cookies, 120

OK... Here's what I did...


Lemon Lemon
Sugar Cookies
(Cookies so Lemony I named 'em Twice)


Ingredients
  • 4 Sticks (2 Cups) Butter, Softened
  • 3 Cups Sugar
  • 3 Large Eggs
  • 2 tsp Lemon Extract
  • Zest from 4 Large Lemons
  • Juice from 2 Large Lemons
  • 4-1/2 Cups Flour
  • 1 tsp Baking Powder
  • 1 tsp Sea Salt
  • 1 Cup Lemon Sugar (mix 1 Cups Sugar with the zest of 3 Lemons)
Cooking Directions
  1. Preheat oven to 350 degrees, Line cookie sheets with parchment papers
  2. Cream Together Butter and Sugar until light and fluffy, about 5 minutes in a stand mixer with the paddle attachment.
  3. Add the Lemon Extract, Juice and Zest from the lemons and the Eggs (one at a time). Continue to mix for another minute until thoroughly mixed.
  4. In a separate bowl, mix together Baking Powder, Sea Salt and the Flour.
  5. Combine the wet ingredients with the dry. Fold together. Mix until just combined, do not over mix.
  6. Use a 1 TBS size scoop and make uniform size "balls" of cookie dough. Roll each "ball" in the Lemon Sugar, coating generously. Place on Cookie Sheet about 2 inches apart. Take the back of a spoon and lightly press down on each cookie.
  7. Bake for 12 minutes until just barely starting to brown.
  8. Allow to cool for 3 minutes on the cookie sheets before moving to a cooling rack. Store in an airtight container.
  9. Serve with a Cup of tea, coffee or Ice Cold Glass of Milk and ENJOY!

*************************************************************************

So,  I am pleased to list this as one of my Growing list of  "52 Ways to Cook COOKIE, BARS and TRUFFLES"!!!

Old school like classic criss cross peanut butter to new takes on interesting recipes like a beautiful Red Velvet with the cream cheese mixed inside the cookie, accented with white chocolate chips!  Even a Pineapple Cream Cheese EASY Bar with only 5 ingredients! 
Stop on by, there's always a new cookie in the cookie jar!
******************************************************

This recipe has also been added to my growing list of
"52 Church PotLuck Dishes"!

A list of something NEW worthy of being shown off at a neighborhood BYODish (Bring Your Own Dish) Party, a Family special occasion dinner, Any Big Holiday Gathering or of course that glorious day when you bring a dish to share with your Church family...


Ages ago, literally almost a half century ago I was listening to our pastor talking about a PotLuck Dinner. It happened to be scheduled around a church work day when we were expected to weed, polish and do general cleaning and maintenance around the church (you know, back in the day when there were no no-wax floors and church pews smelled of Old English furniture polish). I am of course paraphrasing, but as I recall the pastor said,

"A potluck, like a church requires work. At a potluck everyone is expected to contribute.. At a church no one should come empty handed and no one should leave unfed".
I will confess that in my youth I brought more store bought plastic spoons and forks than I ever brought covered dishes and crock pots of fresh made love and caring delights. But now that I have become a hobbyist cook, I occasionally am reminded of those days and people from my youth. I reminded and I do wish that I could drop a dish of some new creation on those old tables at my fondly remembered Liberty Baptist Church.  Tables covered with newspapers and loaded with God's bounty prepared with love and caring... Enjoy

***********************PINTEREST*********************

Come and find me on Pinterest... Any of my "52 Ways to cook" Boards are worth following.  If you like this post, please take a second and "Pin" this to your own boards... Better yet, if you are part of a foodie group board please take a second and add this post to your group pins... best way to show your Love!

And BTW, if you are not yet part of a group board, drop me an email at Contact@eRecipeCards.com and request to be added to my group board... FAVORITE FOOD BLOGGERS! (be sure to include your pinterest ID when you write)  Once you are added, any pins you add will be seen by 10s of THOUSANDS of followers of the board (and growing daily).

Rules, only 2... 
  1. In order to join you need to start following the group board as well as at least one of my boards.
  2. And you must ONLY pin original sources, posts from food related bloggers only.  If you are a blogger, this is a great way to have thousands of potential readers see your work,  If you are a fan of bloggers, a great way to share your favorites...
    Come and be a part of ... FAVORITE FOOD BLOGGERS! on Pinterest

FMP