Monday, June 18, 2012

Chocolate Chip Cookie Dough Brownies ala Eats Well With Others

Pin It Now!

Genius... Pure genius

May be the best dessert I have had in a very long time.  Certainly my new favorite brownie recipe.  Layers of texture, layers of different chocolates... Well, I could go on, but this dessert is just as good as it sounds... better!

A quick history, one of my favorite bloggers is Joanne from the Eats Well With Others Blog.  Joanne is the total package, always a terrific read (like a dinner and a movie (well, recipe and a story) when you stop by her blog.  How on Earth she has the time as in addition to consistently restaurant quality meals, in her spare time she is also a medical student in NYC studying to save the world.  Worth the read for her stories...

And more than every so often, she gives me something like this that I just had to make...

A little bit of history for this recipe, I found it on Joanne's blog (click HERE for her post, MUCH better photos and story than you will read here).  But it originated in a new cookbook, written and photographed by a new favorite blogger, Lindsey from the Love & Olive Oil blog.  Yeap, one of us... Food blogger... One of them... Cookbook author!!!

AND WHAT A COOKBOOK!!!

The Cookie Dough Lover's Cookbook!  Honest, not just a cookie recipe book, but TONS of uses for this gift of the food gods (including many with my favorite, raw cookie dough (no eggs)...  Here's what Amazon.com has to say about Lindsey's book...
Food blogger Lindsay Landis has invented the perfect cookie dough. It tastes great. It’s egg free (and thus safe to eat raw). You can whip it up in minutes. And, best of all, you can use it to make dozens of delicious cookie dough creations, from cakes, custards, and pies to candies, brownies, and even granola bars. Included are recipes for indulgent breakfasts (cookie dough doughnuts!), frozen treats (cookie dough popsicles!), outrageous snacks (cookie dough wontons! cookie dough fudge! cookie dough pizza!), and more.


Now, Joanne got an advance copy of the book, as well as permission to post the recipe.  I got neither.  But I have a link to Joanne's recipe page where you can find this recipe... Click the blue letters...


But in typical inspired by tradition, I made a few tiny adjustments...

First, I upped the ante a bit by taking 1 tsp of water and mixing that with a tsp of instant coffee and adding this to brownie mixture.  I am going to guess that the tiny amount of extra liquid was enough to make my brownies more fudgy than the fudgy yet cake like texture of Joanne's brownies.  Mine lost a bit of presentation as Joanne's had equal size layers of brownie and cookie dough.  Mine had about half the size of brownie compared to the larger size of dough.

But that was more than OK, I like a fudgy brownie.
I also added some white chocolate chips to the brownie.

A) I know that there is no actual chocolate in white chocolate chips, but I like 'em... sue me.

And 2) I like the extra look of the dark chips that are in the cookie dough layer and the white chips in the dark brownie layer.

Next time I make this recipe I am going to double the brownie layer recipe so my 2 layers are equal size and look pretty.  But as I have been saying... My oh my these were good.

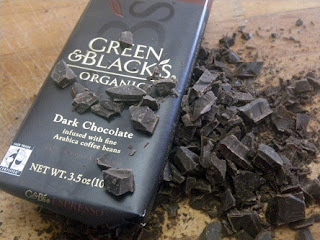
Last change I made was to use a darker chocolate, already infused with coffee beans.

I am a big fan of Green & Black's Organic Dark Chocolate infused with Arabica coffee beans and I use this brand of chocolate a lot.  Just a hint of the Earthy taste that pairs fabulously with chocolate.

But that's it... just a few changes to an already perfect recipe!

There are no eggs in the "raw" layer of cookie dough, so no need to worry about killing your family.

So, thanks Joanne, terrific introduction to a new blogger and a terrific recipe... As a reminder...
 Joanne got an advance copy of the book, as well as permission to post the recipe.  I got neither.  But I have a link to Joanne's recipe page where you can find this recipe... Click the blue letters...


Now I am heading off to buy the book!

Friday, June 8, 2012

Honey Bourbon Sriracha Sauced Fried Grilled Chicken Wings

Pin It Now!

Ah... The illusive "Perfect" Chicken Wing...  So many options for toppings, so many options for styles of cooking (fried, baked, grilled... I even read a blogger's "perfect wing" recipe that was microwaved... but I digress).

I have to admit I am a chicken wing addict.  When the perfect balance of heat spices and sweet sauces combine with sticky and crispy texture, I am in heaven.  I could eat em by the dozens.

The quest for perfection will be a never ending journey I suspect.  But what a ride.  For me, right now, at this point in my life, these are my current version of the perfect chicken wing...

Heat from the gift of the food gods, Sriracha Sauce
Sweet from Honey
An Earthy bite from the Bourbon.

Fried with a simple thin layer of breading to insure juicy chicken
Grilled to achieve a crispy texture while still maintaining that glorious gooey wet sauce!

To quote Ira Gershwin... Who could ask for anything more???

 First thing I did was to flour the wings.  Flour only, no egg.

Simple enough...
Big plastic bag
Big scoop of flour
Big scoop (about 1/3rd cup) of my ubiquitous salt substitute, SODOM and GOMORRAH (equal parts Course grain Salt, Garlic Flakes and Black and white Sesame Seeds)

Add chicken, shake.

 Next I fried em.

Canola Oil works best, higher burn temperature.  Peanut oil is also a great option.  I was most of the way through the process when I realized I was low on oil.  SO I made these in a small sauce pan with just enough oil to cover the wings (about half way up the side).  So I worked in batches.

Heat the oil to 360 degrees.
Cook ONLY for 6 minutes.  Just long enough to insure they are cooked through.  If you have unusually large drumettes, add a minute.  If you are cooking the smaller wing portion, knock it down to only 5 minutes.  but 6 minutes is the general rule of thumb.

 While these are cooking, make up your sauce...

1/4 cup Honey
1/4 cup Soy Sauce
1/4 cup Whiskey (Bourbon if it comes from Kentucky)
Sriracha hot sauce to taste (I used 1 TBS).  Add more if you like them HOT... less if you want a hint of heat.
1 TBS Ground Ginger

Whisk until well combined.  Go ahead and taste test.  add more sriracha if you like, more honey if you added too much.


 Time to sauce the wings.

Dip and coat well.  At this stage, you could simply serve as is.  Most of the time when you order wings at a bar this is how they are served, fried and then sauced.

Me... I add an extra step... Grilling the already cooked wings to add an extra texture... crispy patches of skin and heating up the sauce.


Serve em while they are hot and wish you made more, they will go quick!

Tuesday, June 5, 2012

Mascarpone Cheesecake with a Mango Sauce

Pin It Now!

Oh Sigh...

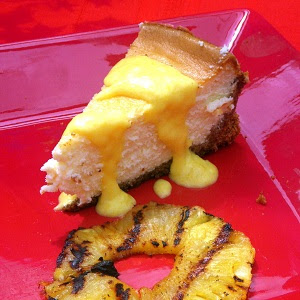
I forgot... I was busy... I was caught up in the British Diamond Jubilee fever... Who knows, but bottom line, I did not take any "in-progress" cake prep photos, nor a photo of the whole pie.  Much as the above shot is OK, I just do not feel it is worthy of this incredible dessert.  AND IT IS INCREDIBLE!!!

I wanted to give mascarpone cheese a try in the cake.   Also most recipes call for a bit of flour added to make the thick texture of a great NY style cheesecake.  I was after a lighter, fluffier cake and it all came off without a hitch!

And the real treat was the mango sauce topping.

Very simple to make, a fresh mango, peeled and pitted (wish that was easier to do).  Then I took about half of it, chopped it and heated in a sautee pan over medium heat.  I added a couple TBS of sugar, one tsp of lemon juice and continued to break down the fruit over the heat.  In about 10 minutes everything is cooked, soft and smells wonderful!

I added heavy cream to make the sauce, started at 1/4 cup and added a TBS at a time to get the right consistency.  Finally I ran the sauce stuff through a food processor to get the smooth, creamy, saucy look and texture.

And since I was grilling for the meal, I grilled a few pineapple slices sprinkled with brown sugar and soaked in rum!


First, the history lesson (with thanks to WhatscookingAmerica.net)...
New York cheesecake is the pure, unadulterated cheesecake with no fancy ingredients added. It is made with pure cream cheese, cream, eggs, and sugar. Everybody has a certain image of New York Style Cheesecake. According to New Yorkers, only the great cheesecake makers are located in New York, and the great cheesecake connoisseurs are also in New York. In the 1900s, cheesecakes were very popular in New York. Every restaurant had their version. I believe the name "New York Cheesecake" came from the fact that New Yorkers referred to the cheesecakes made in New York as "New York Cheesecake." New Yorkers say that cheesecake wasn't really cheesecake until it was cheesecake in New York.
1929 - Arnold Reuben, owner of the legendary Turf Restaurant at 49th and Broadway in New York City, claimed that his family developed the first cream-cheese cake recipe. Other bakeries relied on cottage cheese. According to legend, he was served a cheese pie in a private home, and he fell in love with the dessert. Using his hostess’ recipe and a pie she made with ingredients he provided, he then began to develop his own recipe for the perfect cheesecake. Reuben soon began to serve his new recipe in his Turf Restaurant, and the cheesecake quickly became very popular with the people who frequented Reuben’s Broadway restaurant.
That wasn't so bad.

And now the soapbox editorial...
One of the great sins of the culinary world is the box, no-bake cheesecake.  the sin is not that they exist, the sin is in the name.  Call those no bake things whatever you like, but set them side by side with one of these beauties and you will understand.  Speed, efficiency, the hint of something special, all make sense.  But, I guess I understand, no one would buy them if they were called Faux Cheesecake.
A couple of notes...

If you've never made one of these, a word of warning.  They are incredibly easy, but the baking process is several HOURS.  Don't try to cut the time down.  It's part of the baking process to bake for an hour and 10 minutes, then allow it to continue baking while the oven is off and cooling for the next 5 hours (about the time for the inside of the oven to reach room temperature).  As in most things in life, good things come to those who wait.

And finally, this can be an expensive cake to make.  2 bricks of cream cheese and 2 tubs of Mascarpone can be expensive.  But, follow the sales in your store.  I saw Philadelphia Brand Cream Cheese on sale this week for 69 cents a brick.  Sale time is the only time I make this.
Alright, enough delay...

Here's what I did...

For the Crust, 
10 Cinnamon Graham Crackers
3 TBS Butter, melted
For the Filling,
2 8oz. tubs of Mascarpone Cheese
2 8oz. packages of Cream Cheese
1 1/2 cups Sugar
3/4 cup Heavy Cream
4 whole Eggs
1 cup Sour Cream
1 tablespoon Real Vanilla 
  • Preheat oven to 350 degrees
  • Grease a 9-inch spring-form pan. 
  • In a medium bowl, mix graham cracker crumbs, or, I used my food processor to make the crumbs, with melted butter
  • Press onto the bottom of the pan using the bottom of a glass or measuring cup.  
  • Only  press the crust up about half way.  Part of the appeal of a NY Style Cheesecake is the unevenness of the crust (go back and look at that very first photograph)
  • Onto the filling...In a large bowl, mix mascarpone and cream cheese with sugar until smooth. 
  • Blend in cream, and then mix in the eggs one at a time, mixing just enough to incorporate. 
  • Mix in the sour cream, vanilla until smooth. 
  • Pour filling into prepared crust.
  • Bake in preheated oven for 1 hour. 
  • Turn the oven off and let cake cool in oven with the door closed for 5 to 6 hours. 
  • Chill in refrigerator until serving.
As I said, for a denser, more traditional style NY Cheesecake, add 1/4 cup of flour.  This was a delightful change of pace texture that was INCREDIBLY well received.  Everyone LOVED it!  A real winner.


Tuesday, April 10, 2012

Garlic Peppercorn London Broil - Grilling Time Secret Extras

Pin It Now!

Here's my Easter Dinner.  Big pile of a delicious warm potato/green Bean Salad bed under an INCREDIBLE grilled Top Round roast.  I'll do the salad post recipe tomorrow.  Today it's all about this delicious meat!

LOTS of garlic.  I took 10 pieces of garlic and sliced them into thin thirds.  That's thirty pieces of garlic! I embedded these into the roast.  Just take a knife that is about the same size as the garlic pieces.  Poke deep enough so that the entire garlic piece will sit inside the meat.  If you are not a fan of garlic, these are large enough to pick out as you cut the finished slices.  BUT, the garlic roasted along with the meat juices makes for an incredible taste.


Next I coated the roast with a layer of Dijon Mustard.  The wet helps to keep the roast moist and most important, it gives the rub something to hold onto.  While it cooks it makes a simply delicious bark.  I made a simple rub of about equal parts...

Dried Garlic Flakes
Garlic Powder
Onion Powder
Slightly crushed Peppercorns
Sea Salt
Black and White Pepper

Mix this all together and then rub the meat.  NOTE: This is a rub, not a sprinkle.  Bub this into the mustard,  Pay particular attention to the holes that the you made with the garlic.  This forms a bark, which helps to hold in all the juices that might have leaked out during the slow roasting grilling.


Allow the meat to rest and come to close to room temperature before you begin cooking.  About an hour.  This also helps to allow the spices and especially the salt to help absorb all of those flavors of the rub and mustard to absorb into the top layer of the meat.

I cooked this on my grill, indirect heat, low and slow ( Almost like smoking on a grill, Coals or burners on each side of the meat turned to low.  Burners or coals directly under the meat off (or clear of coals).  The internal temperature close to the meat was about 280 degrees.

I used an internal temperature prob (Don't cook without one).  Cooked the meat (no need to turn, as you are using your grill like an oven with no direct heat applied to the bottom of the meat) until I got a medium rare temperature of 135 degrees.  It took about 30-40 minutes.  I then wrapped the meat in aluminum foil and let it rest for 30 minutes.  the temperature actually evened out at 140 during the wrap rest.  this allows the juices to absorb into the meat and have an even temperature throughout the slices.

Slice thin, at angles against the grain...


I am lucky enough to see several hundred food blogger posts in a day.  Somethings look stunningly beautiful.  For me, this was delicious and I was able to capture the right look where I practically can taste this from the photo.

Here is my food porn...


Good friends came to join us...
Warm enough to enjoy a meal outside on our patio!

Grab a beer and enjoy!

Happy Easter


*************************************************************************

So,  I am pleased to list this as one of my Growing list of  "52 Grilling Time Secret Extras" or "52 Ways to Cook BBQ and Grilling Recipes"!!!

Well over 52 recipes actually as I just can't stop... Over 100 in one grilling season (I love to grill!). But not just leat... Drinks, Condiments (LOTS of different BBQ sauces), Drinks, Desserts... even specialty items like GRILLED Pizza, and fun shaped Watermelons.  Easy and these ideas will make you the MASTER of your Backyard Domain!

****************************PINTEREST**************************

Come and find me on Pinterest... Any of my "52 Ways to cook" Boards are worth following.  If you like this post, please take a second and "Pin" this to your own boards... Better yet, if you are part of a foodie group board please take a second and add this post to your group pins... best way to show your Love!

And BTW, if you are not yet part of a group board, drop me an email at Contact@eRecipeCards.com and request to be added to my group board... FAVORITE FOOD BLOGGERS! (be sure to include your pinterest ID when you write)  Once you are added, any pins you add will be seen by 10s of THOUSANDS of followers of the board (and growing daily).

Rules, only 2... 
  1. In order to join you need to start following the group board as well as at least one of my boards.
  2. And you must ONLY pin original sources, posts from food related bloggers only.  If you are a blogger, this is a great way to have thousands of potential readers see your work,  If you are a fan of bloggers, a great way to share your favorites...
    Come and be a part of ... FAVORITE FOOD BLOGGERS! on Pinterest

Thursday, April 5, 2012

A CARROT-Carrot Cake - Dramatic but AMAZINGLY Easy!

Pin It Now!


Food Network MagazineAlright, credit due...  


This is (visually) almost a 100% copy of the cake that is shown in last year's  FOOD NETWORK MAGAZINE.


It was their Easter/Spring issue.  As always, this month is packed full of recipes, stories and a couple of contests.  Said it before, worth repeating, this is my favorite of all the foodie related magazines.  Largely because of recipes like this...


To the right is a photo of their version of the carrot cake.  There were a couple of glaring problems that separate theirs from my version. First, their carrot cake is a pound cake inside.  How they missed the obvious of making a carrot-carrot cake is beyond me; but I decided this screamed a real CARROT-carrot shaped cake.  Next is something they found that I could not...


Their greenery is a "5-ounce bag green apple sour straws".  I went to two different candy stores, but was not able to find the candy that looked like this.  I was surprised, and I am sure that once I stop looking, I will be seeing bags of this candy everywhere, but this weekend, there were no "5-ounce bag green apple sour straws" to be found.  

BUT... I was making up a nice big batch of Jambalaya (because much as I wanted, I knew it would be rude to just serve the cake to company).  I was pondering my alternatives to the candy straws.  If I had more time, I probably would have made candied Orange Peels and used some food coloring to get the right look.  


Instead, I just saved the leafy greens from the celery I was going to use in my Jambalaya.  Not perfect, as it wasn't candy like the Magazine.  But I think it added to the authenticity of my CARROT-Carrot Cake.


SO, if you like, take a look at their version by clicking THIS LINK.  It is very simple, as it uses a frozen pound cake and a "tub of icing", which I assume means store bought.  Nothing wrong with that, easy, fast and dramatic is a good thing.  But that's not how we roll in the Cul de Sac!


Here's my recipes (and there will be plenty of HOW TO decorating photos after the recipes)...


CARIBBEAN CARROT CAKE


1 cup Sugar
1 cup Flour
1 tsp Baking Powder
3/4 cup Canola Oil
2 large Eggs
1 cup Walnut pieces

1 cup Tropical Trio (Pineapple, Papya, Mango) Find them next to the Raisins
1 1/2 cup grated Carrots
1/2 cup canned crushed Pineapple (include all but 2 TBS of the juice... Reserve the 2 TBS for the frosting)
1 tsp Pineapple Rum (why not!  can substitute Vanilla extract)
1 TBS Ground Cinnamon

  • Pre-heat the oven to 350 degrees
  • Whisk together the dry ingredients
  • Add one egg and the oil... Whisk, add the second egg, whisk
  • Add the walnuts, carrots and pineapple, whisk
  • Add the rum and cinnamon.. whisk
  • oil and flour the bottom of one loaf pan
  • fill pan with batter
  • bake for @60 minutes (use the toothpick method to check that the center of the cake is done, you all know that trick)

And here's the Pineapple Cream Cheese recipe...


1 8 oz package Cream Cheese
1/4 cup Butter
2 TBS pineapple juice from the can of crushed pineapple used in the cake
1 tsp Pineapple Rum (WHY NOT AGAIN???  You can sub Vanilla Extract)
1 cup Confectioner's Sugar
Cream together the butter and cream cheese

  • Add the juice and rum and cream again
  • Slowly add the sugar and continue to cream
  • Let the cake cool completely before you frost

Add food coloring to make the icing orange.  I used the Wilton gel.  About twice as much yellow as I used red.  Add slowly till you get the color you like.


OK, now to the decorating part.


Long time readers know that I am not a talented cake decorator.  The finished cake in my mind's eye is never the finished cake on the plate.


This time, it came out just like I envisioned it...


First, allow the cake to completely cool before you start decorating.  In fact, put it in the fridge so it is VERY cool.  Less crumbs.


In order to get the long carrot shape, you are going to cut a wedge from the both sides of the cake as shown here...


Next, you will take those points, trim a little off the pottom so the points angle downward and "glue" them together and to the ends of the loaf using a little icing as shown here...


I didn't take a photo of this step, but you can see what I am talking about in the next photo.  I trimmed a bit around the loaf so i got a more rounded shape to the "carrot".  


Then I did a "crumb layer" of frosting.  Take a small amount of frosting, add an extra bit of eater to get an almost runny batch of icing.  Use this to get a thin layer of frosting on the cake.  Then pop it in the fridge for about 30 minutes for it to harden.  This prevents those crumbs from coming out of the cake and into your finished icing layer.  Like this...


And next...


Ice the cake... Not too thick (once you add the jelly beans, you get plenty of sweet, no need to pile on).


Hey LOOK...


It looks like a carrot...


But for the final layer, add orange jelly beans... Be neat and work in rows...


And finally, add a bit of greenery out the back.  I just stuck in some of the leafy bits of a celery stalk.  Or use "5-ounce bag green apple sour straws".


We had a small party with a few rare children.  Their mom swore they would not eat carrot cake.


They ate every bit (even the carrots)...

FMP