Tuesday, April 10, 2012

Garlic Peppercorn London Broil - Grilling Time Secret Extras


Here's my Easter Dinner.  Big pile of a delicious warm potato/green Bean Salad bed under an INCREDIBLE grilled Top Round roast.  I'll do the salad post recipe tomorrow.  Today it's all about this delicious meat!

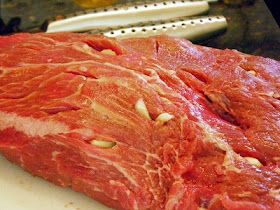
LOTS of garlic.  I took 10 pieces of garlic and sliced them into thin thirds.  That's thirty pieces of garlic! I embedded these into the roast.  Just take a knife that is about the same size as the garlic pieces.  Poke deep enough so that the entire garlic piece will sit inside the meat.  If you are not a fan of garlic, these are large enough to pick out as you cut the finished slices.  BUT, the garlic roasted along with the meat juices makes for an incredible taste.


Next I coated the roast with a layer of Dijon Mustard.  The wet helps to keep the roast moist and most important, it gives the rub something to hold onto.  While it cooks it makes a simply delicious bark.  I made a simple rub of about equal parts...

Dried Garlic Flakes
Garlic Powder
Onion Powder
Slightly crushed Peppercorns
Sea Salt
Black and White Pepper

Mix this all together and then rub the meat.  NOTE: This is a rub, not a sprinkle.  Bub this into the mustard,  Pay particular attention to the holes that the you made with the garlic.  This forms a bark, which helps to hold in all the juices that might have leaked out during the slow roasting grilling.


Allow the meat to rest and come to close to room temperature before you begin cooking.  About an hour.  This also helps to allow the spices and especially the salt to help absorb all of those flavors of the rub and mustard to absorb into the top layer of the meat.

I cooked this on my grill, indirect heat, low and slow ( Almost like smoking on a grill, Coals or burners on each side of the meat turned to low.  Burners or coals directly under the meat off (or clear of coals).  The internal temperature close to the meat was about 280 degrees.

I used an internal temperature prob (Don't cook without one).  Cooked the meat (no need to turn, as you are using your grill like an oven with no direct heat applied to the bottom of the meat) until I got a medium rare temperature of 135 degrees.  It took about 30-40 minutes.  I then wrapped the meat in aluminum foil and let it rest for 30 minutes.  the temperature actually evened out at 140 during the wrap rest.  this allows the juices to absorb into the meat and have an even temperature throughout the slices.

Slice thin, at angles against the grain...


I am lucky enough to see several hundred food blogger posts in a day.  Somethings look stunningly beautiful.  For me, this was delicious and I was able to capture the right look where I practically can taste this from the photo.

Here is my food porn...


Good friends came to join us...
Warm enough to enjoy a meal outside on our patio!

Grab a beer and enjoy!

Happy Easter


*************************************************************************

So,  I am pleased to list this as one of my Growing list of  "52 Grilling Time Secret Extras" or "52 Ways to Cook BBQ and Grilling Recipes"!!!

Well over 52 recipes actually as I just can't stop... Over 100 in one grilling season (I love to grill!). But not just leat... Drinks, Condiments (LOTS of different BBQ sauces), Drinks, Desserts... even specialty items like GRILLED Pizza, and fun shaped Watermelons.  Easy and these ideas will make you the MASTER of your Backyard Domain!

****************************PINTEREST**************************

Come and find me on Pinterest... Any of my "52 Ways to cook" Boards are worth following.  If you like this post, please take a second and "Pin" this to your own boards... Better yet, if you are part of a foodie group board please take a second and add this post to your group pins... best way to show your Love!

And BTW, if you are not yet part of a group board, drop me an email at Contact@eRecipeCards.com and request to be added to my group board... FAVORITE FOOD BLOGGERS! (be sure to include your pinterest ID when you write)  Once you are added, any pins you add will be seen by 10s of THOUSANDS of followers of the board (and growing daily).

Rules, only 2... 
  1. In order to join you need to start following the group board as well as at least one of my boards.
  2. And you must ONLY pin original sources, posts from food related bloggers only.  If you are a blogger, this is a great way to have thousands of potential readers see your work,  If you are a fan of bloggers, a great way to share your favorites...
    Come and be a part of ... FAVORITE FOOD BLOGGERS! on Pinterest

Thursday, April 5, 2012

A CARROT-Carrot Cake - Dramatic but AMAZINGLY Easy!


Food Network MagazineAlright, credit due...  


This is (visually) almost a 100% copy of the cake that is shown in last year's  FOOD NETWORK MAGAZINE.


It was their Easter/Spring issue.  As always, this month is packed full of recipes, stories and a couple of contests.  Said it before, worth repeating, this is my favorite of all the foodie related magazines.  Largely because of recipes like this...


To the right is a photo of their version of the carrot cake.  There were a couple of glaring problems that separate theirs from my version. First, their carrot cake is a pound cake inside.  How they missed the obvious of making a carrot-carrot cake is beyond me; but I decided this screamed a real CARROT-carrot shaped cake.  Next is something they found that I could not...


Their greenery is a "5-ounce bag green apple sour straws".  I went to two different candy stores, but was not able to find the candy that looked like this.  I was surprised, and I am sure that once I stop looking, I will be seeing bags of this candy everywhere, but this weekend, there were no "5-ounce bag green apple sour straws" to be found.  

BUT... I was making up a nice big batch of Jambalaya (because much as I wanted, I knew it would be rude to just serve the cake to company).  I was pondering my alternatives to the candy straws.  If I had more time, I probably would have made candied Orange Peels and used some food coloring to get the right look.  


Instead, I just saved the leafy greens from the celery I was going to use in my Jambalaya.  Not perfect, as it wasn't candy like the Magazine.  But I think it added to the authenticity of my CARROT-Carrot Cake.


SO, if you like, take a look at their version by clicking THIS LINK.  It is very simple, as it uses a frozen pound cake and a "tub of icing", which I assume means store bought.  Nothing wrong with that, easy, fast and dramatic is a good thing.  But that's not how we roll in the Cul de Sac!


Here's my recipes (and there will be plenty of HOW TO decorating photos after the recipes)...


CARIBBEAN CARROT CAKE


1 cup Sugar
1 cup Flour
1 tsp Baking Powder
3/4 cup Canola Oil
2 large Eggs
1 cup Walnut pieces

1 cup Tropical Trio (Pineapple, Papya, Mango) Find them next to the Raisins
1 1/2 cup grated Carrots
1/2 cup canned crushed Pineapple (include all but 2 TBS of the juice... Reserve the 2 TBS for the frosting)
1 tsp Pineapple Rum (why not!  can substitute Vanilla extract)
1 TBS Ground Cinnamon

  • Pre-heat the oven to 350 degrees
  • Whisk together the dry ingredients
  • Add one egg and the oil... Whisk, add the second egg, whisk
  • Add the walnuts, carrots and pineapple, whisk
  • Add the rum and cinnamon.. whisk
  • oil and flour the bottom of one loaf pan
  • fill pan with batter
  • bake for @60 minutes (use the toothpick method to check that the center of the cake is done, you all know that trick)

And here's the Pineapple Cream Cheese recipe...


1 8 oz package Cream Cheese
1/4 cup Butter
2 TBS pineapple juice from the can of crushed pineapple used in the cake
1 tsp Pineapple Rum (WHY NOT AGAIN???  You can sub Vanilla Extract)
1 cup Confectioner's Sugar
Cream together the butter and cream cheese

  • Add the juice and rum and cream again
  • Slowly add the sugar and continue to cream
  • Let the cake cool completely before you frost

Add food coloring to make the icing orange.  I used the Wilton gel.  About twice as much yellow as I used red.  Add slowly till you get the color you like.


OK, now to the decorating part.


Long time readers know that I am not a talented cake decorator.  The finished cake in my mind's eye is never the finished cake on the plate.


This time, it came out just like I envisioned it...


First, allow the cake to completely cool before you start decorating.  In fact, put it in the fridge so it is VERY cool.  Less crumbs.


In order to get the long carrot shape, you are going to cut a wedge from the both sides of the cake as shown here...


Next, you will take those points, trim a little off the pottom so the points angle downward and "glue" them together and to the ends of the loaf using a little icing as shown here...


I didn't take a photo of this step, but you can see what I am talking about in the next photo.  I trimmed a bit around the loaf so i got a more rounded shape to the "carrot".  


Then I did a "crumb layer" of frosting.  Take a small amount of frosting, add an extra bit of eater to get an almost runny batch of icing.  Use this to get a thin layer of frosting on the cake.  Then pop it in the fridge for about 30 minutes for it to harden.  This prevents those crumbs from coming out of the cake and into your finished icing layer.  Like this...


And next...


Ice the cake... Not too thick (once you add the jelly beans, you get plenty of sweet, no need to pile on).


Hey LOOK...


It looks like a carrot...


But for the final layer, add orange jelly beans... Be neat and work in rows...


And finally, add a bit of greenery out the back.  I just stuck in some of the leafy bits of a celery stalk.  Or use "5-ounce bag green apple sour straws".


We had a small party with a few rare children.  Their mom swore they would not eat carrot cake.


They ate every bit (even the carrots)...